The second life of the HTC HD2
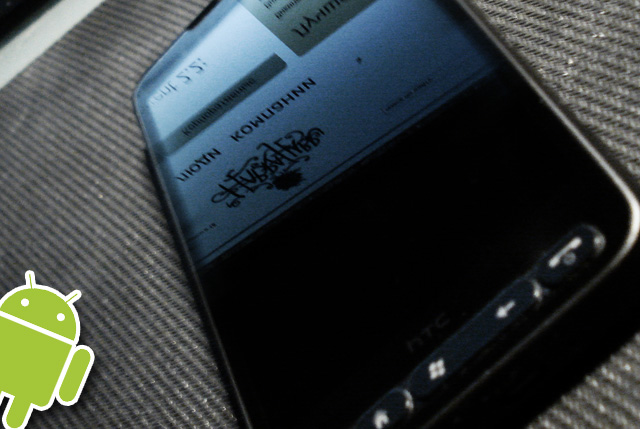
Install Android on HTC HD2. Detailed instructions for installing and bringing the system into a state suitable for everyday use.
I want to start a story from afar: with the choice of the phone. The 5800 served me faithfully for two years and finally got tired of the software under it so far with the nose, the speed of work is mediocre, I was only pleased with the player and the battery. And I wanted, as usual, more. I figured the budget and needs: the choice was between Acer Liquid E, HD2, X10 and Desire. There was no first and last anywhere on that day, and apparently I didn’t like Desire, and Acer ... how to say it. He is cool, and when friends ask what is worth seeing on Android, I advise him right away, and many take it, and are satisfied, but ... I don’t know, my soul does not lie to him. And I generally did not like X10, I don’t know why. Always SE liked. In the end, I took the HTC HD2, knowing that Android is perfectly placed on it, and there are no problems in using it. Yes, you understood everything correctly, after reading this manual, you can install a fully working Android, and everything from Wi-Fi and GPS to flash and autofocus of the camera will work.
note: And the camera is generally better than it does in its native OS: - \
')
Short plan of action:
- Find out the SPL version
- We sew Hard SPL
- We are flashing the phone with the firmware without a regional with the version of the radio module and core we need
- Install Android
- Make Android enjoyable for everyday work.
By the way, if you have recently been re-flashed / updated - you can try to go directly to the “Install Android” item, nothing terrible will happen if it doesn't start the first time. In the extreme case - you will distort the battery and go on the full path.
Cooking
The first thing we need to experiment is to find out the current version of SPL.
SPL - downloader, first used by HTC on the HTC Hermes platform, in the days of WM5. Its main tasks are the banal binding of the phone to the region and blocking the launch of customized firmware.
Fortunately, there are two ways to get around a malicious vendor-lock-in: SSPL and HSPL, one-time and universal versions of unlocking. They differ in that SSPL disappears after a reboot, and HSPL remains before flashing.
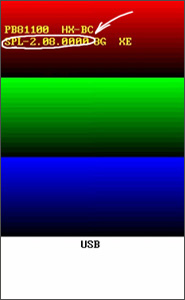
It's easy to find out the SPL version - you need to remove the back cover from our HD2, hold down the “volume down” and poke something into the red reset button aka soft reset . “Volume down” we release after releasing soft reset .
A three-color “mattress”, bootloader mode will open. In it we are interested in the second line, and specifically - the SPL version. It looks like this: SPL-X.XX.XXXX , and the versions, respectively, can be 1.48.0000 , 1.48.6666 , 1.68.0000 , 2.08.0000 and all sorts of others.
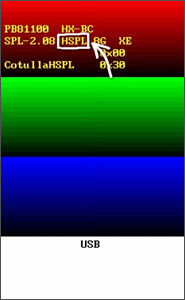
Next, we download a simple utility that can be taken here , and without unhooking the phone, we launch it on behalf of the administrator . Choose a point in which the basic numbers coincide with yours, and instead of four zeros are the letters HSPL . We are waiting for the reboot of the communicator. That's it, now we have got full access to the bootloader, and, as a result, we can supply a customized version of the firmware.
For the firmware we need:
- Actually, the firmware itself, and even without regionalok
- A custom flash driver who doesn't care which firmware to sew
- Patience
Create a folder in a convenient place for you. We unpack the custom flasher, which can be taken here . Next to the flasher we put the file with the unlocked firmware. One of the last you can take here , or go to the appropriate section w3bsit3-dns.com and select the necessary. Achtung! Users of HTC HD2 (!) TMobile (!) Are strictly MUST go and select the firmware themselves, so that there is no brick.
Next - run the flash driver on behalf of the administrator , follow the simplest instructions, wait until the firmware is completed.
As a result, we get a phone that can work in any language, regardless of the region in which it was purchased, as well as, as a bonus, 128 megabytes of previously hidden RAM .
After flashing, we boot into the “mattress” mode, make sure that we have HSPL left (if not, we put it again, we already know how), and after another reboot, by connecting the USB cable, we wait for synchronization back to Outlook.
On this the boring and difficult actions are completed.
Install Android
Hooray! Begins the most fun. Actually, in order for the fun to begin, we will need to choose the core and the harness system. Climbing a bunch of topics on this issue, I came to the conclusion that this combination would be one of the best to begin with, everyone who wants independent experiments can go to w3bsit3-dns.com and study this topic, although the version I specified is suitable for the first run. Or rather, I even recommend using it for the first time. everything that is needed is integrated into it, and it is incredibly stable. This version is based on the Desire core, HTC Sense is bolted, so everything will be very similar to the native HTC Android.
We also need a memory card with a capacity of at least 2 gigabytes (and if more, it is highly desirable that it be at least 2 gigabytes free). And it is also desirable to format it, just in case. Important files, of course, can and should be backed up.
We unpack the downloaded archive into the root of the memory card, so that the Android folder appears at the root, and the * .img file with the size of 1 gigabyte appears next to it.
Next, unhooked from USB, open the “explorer” in the phone, go to the memory card, to the android folder, and run 2 exe-shnik in it in that order - CLRCAD.EXE (nothing happens), and after a couple of seconds - HARET .EXE
The loader lines will appear, after a moment they should change the HTC logo on a black background. Further, whatever happens to the phone (and anything can happen - turning on / off the screen, backlight, appearance of “garbage” on the screen, etc.), just wait. However, if the download stopped on the “jumping to kernel” field, it makes no sense to wait; Android will not start. Most likely the problem is that you have an old version of the firmware of the radio module (for the sake of updating it, we sewed HSPL and performed a full flashing of the phone).
The first launch of Android takes 5-10 minutes, but it does not make sense to wait more than 20 minutes. All subsequent launches take 2-3 minutes.
Immediately after loading the operating system and “passing the quest” (and this is really a quest, it will be slow to restart Android, please don't be afraid), we recommend restarting the phone, restart Android, and restart again.
However, after the first reboot, do not rush to restart Android, it is better to download this little software under Windows Mobile, it will greatly simplify the launch of Android. I do not recommend ticking "autoload", well, or put a decent amount of time (at least 6 seconds, and better - at least ten seconds) to select an operating system, just in case.
You can also start Android by simply selecting the program from the Start menu and double clicking on the icon of interest to us.
Putting Android in order
We hook up the wi-fi, open the menu-market, in the search we drive the following programs. Download and install free versions.
Extending life from a single charge :
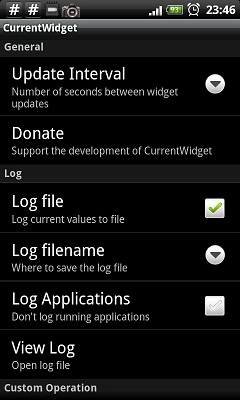
Current Widget - you will need to control the "leaving" of the charge from the battery.
Bat Stat is a convenient and minimalistic widget that shows the current battery charge, as well as its temperature.
Set CPU - needed to set the rules for changing the processor clock frequency.
TasKiller is a simple and convenient process manager.
IM and social networks :
TweetDeck - HTC peep, of course, is good, but this thing is much more flexible.
Trillian IM is a multi-protocol IM with a completely native interface and a pleasant speed.
I also recommend to download swype , with already built-in Ru / En layouts. It is included in the settings, "languages and keyboard". After you need to find any text field, make it a long "tap", and in the "input method" choose the very Swype. Everyone who got used to it is practically unable to refuse, it is too cool an input method. And get used instantly. If you have never heard / seen, you can go to the official website , or watch a video on the same YouTube.
In the Current Widget, you need to put the auto update for 30 or 60 seconds, check the logging, if desired, drag it onto the desktop.
Bat Stat, in principle, is not required, but you can also add to the desktop, since we have seven of them. I left it in the foo ^ W far tab, so that my eyes are not corns.
After the preparations, we launch Set CPU, go to the second tab, set up profiles in accordance with this picture (hereinafter the screenshots are shrunk in half):
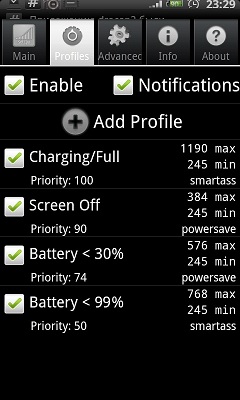
To be honest, 576 is enough for everyday use, the phone has a 3d / 2d accelerator, and the GUI will not slow down, but I didn’t find a subjective increase in battery life, and, to be honest, it even seemed to be discharging a little faster , than from 768. Probably with greater frequency, some tasks in the background work faster, and the percent again goes to 254, in the power saving mode. So these profiles were selected by trial and error, the device works with them about the same as under WinMo.
Now, when we have customized energy saving profiles, unhook from USB, drop out onto the desktop (press the “house” button under the screen), scroll to the Current Widget, look at the numbers and be
Editor, choose any, scroll to the bottom of the log and see. Ideally, power consumption should be 3-6 mA / h, but everything that is less than or equal to 5-7 mA / h can be considered “normal”. Rare jumps up to 20-40 mA / h are quite acceptable.
Well, in order to finish it to the end - open TasKiller, wait five seconds, for all applications that do not receive their own icon - do a long “click” and “ignore”, this is a system junk, it does not interest us. Also ignore those applications that we need, for example - IM and Music Player. After opening the application settings (press the windows-button, a panel appears, there are settings in it); tick off hide ignored applications and autokill when screen off .
This is all, you can enjoy the work of Anroid, download Angry Birds , boast to your family ... well, in general, everything that pleases you, because The system is fully functional and more than stable. Thanks for attention :)
UPD: At the request of workers added files to Yandex, as a mirror.
HSPL activator
Custom flash driver
DualBut for WM
Build Android
SetCPU
Trillian
Swype
UPD2: The speed of work also depends on the class of the SD card, it is recommended to use 4/6 and higher.
UPD3: Anyone who writes "fu, emul": will soon complete the creation of firmware in NAND, which will completely replace the WM on this machine.
UPD4: Latest news from the front: works best on cards 4 classes of decent manufacturers, volume 4/8/16 gigabytes.
UPD5 : Do not forget to remove HSPL, if you do not need it or you decide not to use Android. Go here , open the first spoiler (Additional tools for flashing) in it - open the second. And there is detailed information.
Source: https://habr.com/ru/post/110266/
All Articles