We write the first application for Android
In any case, the most difficult is the beginning. It is often hard to get into the context, which I also encountered when I decided to develop my first Android application. This article is for those who want to start, but do not know where.
The article will affect the entire application development cycle. Together we will write a simple one-screen Tic-Tac-Toe game (on Android, this is called Activity).
The lack of development experience in the Java language should not be an obstacle in the development of Android. So, the examples will not use Java-specific constructs (or they will be minimized as much as possible). If you are writing, for example, in PHP and are familiar with the fundamental principles in software development, this article will be most useful to you. In turn, since I am not an expert on Java development, it can be assumed that the source code does not pretend to the label “best Java development practices”.
')
I will list the necessary tools. Their 3:
Utilities are installed in the order defined above. There is no point in putting all the listed IDEs (unless you are having difficulty choosing the right one). I use IntelliJ IDEA Community Edition, one of the most advanced IDE for Java at the moment.
By running AVD Manager and installing additional packages (SDK of different versions), you can start creating a virtual device with the necessary parameters. Understanding the interface should be easy.
I always can't wait to get to work, minimizing the preparatory activities, which include the creation of a project in the IDE, especially when the project is educational and does not pretend to production.
So, File-> New Project:


By pressing the F6 button, the project will be assembled, compiled and run on a virtual device.
The previous screenshot shows the structure of the project. Since we are pursuing purely practical goals in this article, we will focus only on those folders that we will use in the process. These directories are gen , res, and src .
The gen folder contains files that are generated automatically when building a project. You can not change them manually.
The res folder is intended for storing resources, such as pictures, texts (including translations), default values, layouts.
src is the folder where the main part of the work will take place, because the source files of our program are stored here.
As soon as an Activity is created (application screen), the onCreate () method is called. IDE filled it with 2 lines:
The setContentView method (equivalent to this.setContentView) sets the xml layout for the current screen. Further, xml-layouts will be called “layout”, and screens - “Activity”. Layout in the application will be the following:
TableLayout is ideal for this application. Id can be assigned to any resource. In this case, TableLayout is assigned id = main_l. Using the findViewById () method, you can access the view:
Now you need to implement the buildGameField () method. For this you need to generate a field in the form of a matrix. This will be done by the Game class. First you need to create the Square class for the cells and the Player class, whose objects will fill these cells.
All classes of our application are in the src folder.
Initialization of Game in the KrestikinolikiActivity designer.
The buildGameField () method of the KrestikinolikiActivity class. It dynamically adds rows and columns to the table (playing field):
In line 8, an object is created that implements the View.OnClickListener interface. Create a nested class Listener. It will only be visible from KrestikinolikiActivity.
It remains to implement the logic of the game.
K. O. suggests that the one who will line X or O in a line with a length equal to the length of the field vertically, or horizontally, or diagonally, draws in tic-tac-toe. The first thought that comes to mind is to write methods for each case. I think in this case, the Chain of Responsobility pattern will work well. Define the interface
Since the Game is charged with identifying the winner, it implements this interface. It is time to create virtual "linesmen", each of which will check their side. All of them implement the WinnerCheckerInterface interface.
We initialize them in the Game constructor:
Implementation of checkWinner ():
Winner check after each move. Add code to the onClick () method of the Listener class.
The gameOver () method is implemented in 2 versions:
For Java, gameOver (Player player) and gameOver () are different methods. Using the Toast.makeText Builder, you can quickly create and display a notification. refresh () refreshes field state:
Done! I hope this article has helped you get started in the world of development under the Android OS. Thank you for attention!
Sources
PS: the article was published at the request of the commentators of this post .
The article will affect the entire application development cycle. Together we will write a simple one-screen Tic-Tac-Toe game (on Android, this is called Activity).
The lack of development experience in the Java language should not be an obstacle in the development of Android. So, the examples will not use Java-specific constructs (or they will be minimized as much as possible). If you are writing, for example, in PHP and are familiar with the fundamental principles in software development, this article will be most useful to you. In turn, since I am not an expert on Java development, it can be assumed that the source code does not pretend to the label “best Java development practices”.
')
Install the necessary programs and utilities
I will list the necessary tools. Their 3:
- JDK — Java Development Kit ;
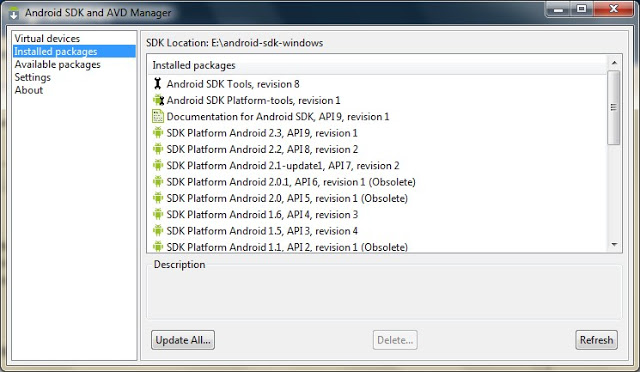
- Android SDK and AVD Manager - a set of utilities for development + emulator ;
- IDE with Android development support:
- Eclipse + ADT plugin;
- IntelliJ IDEA Community Edition;
- Netbeans + nbandroid plugin;
Utilities are installed in the order defined above. There is no point in putting all the listed IDEs (unless you are having difficulty choosing the right one). I use IntelliJ IDEA Community Edition, one of the most advanced IDE for Java at the moment.
Virtual device launch
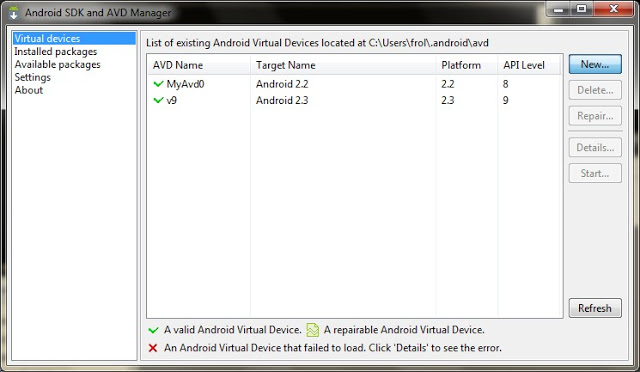
By running AVD Manager and installing additional packages (SDK of different versions), you can start creating a virtual device with the necessary parameters. Understanding the interface should be easy.
Device list
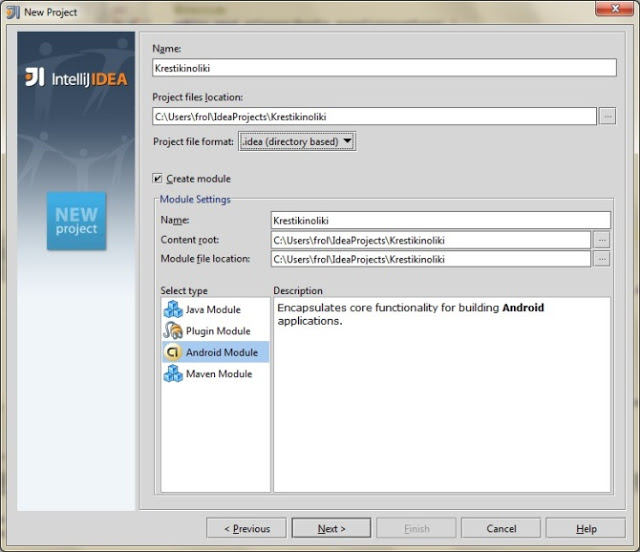
Creating a project
I always can't wait to get to work, minimizing the preparatory activities, which include the creation of a project in the IDE, especially when the project is educational and does not pretend to production.
So, File-> New Project:
By pressing the F6 button, the project will be assembled, compiled and run on a virtual device.
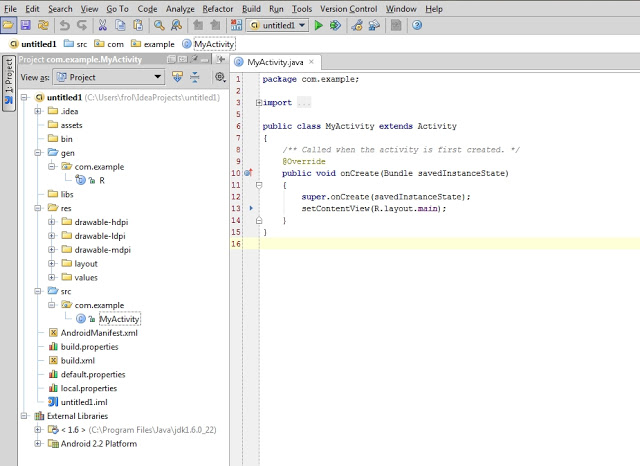
Project structure
The previous screenshot shows the structure of the project. Since we are pursuing purely practical goals in this article, we will focus only on those folders that we will use in the process. These directories are gen , res, and src .
The gen folder contains files that are generated automatically when building a project. You can not change them manually.
The res folder is intended for storing resources, such as pictures, texts (including translations), default values, layouts.
src is the folder where the main part of the work will take place, because the source files of our program are stored here.
First lines
As soon as an Activity is created (application screen), the onCreate () method is called. IDE filled it with 2 lines:
super.onCreate(savedInstanceState); setContentView(R.layout.main); The setContentView method (equivalent to this.setContentView) sets the xml layout for the current screen. Further, xml-layouts will be called “layout”, and screens - “Activity”. Layout in the application will be the following:
<?xml version="1.0" encoding="utf-8"?> <TableLayout xmlns:android="http://schemas.android.com/apk/res/android" android:layout_width="fill_parent" android:layout_height="fill_parent" android:id="@+id/main_l" android:gravity="center" > </TableLayout> TableLayout is ideal for this application. Id can be assigned to any resource. In this case, TableLayout is assigned id = main_l. Using the findViewById () method, you can access the view:
private TableLayout layout; // KrestikinolikiActivity public void onCreate(Bundle savedInstanceState) { super.onCreate(savedInstanceState); setContentView(R.layout.main); layout = (TableLayout) findViewById(R.id.main_l); buildGameField(); } Now you need to implement the buildGameField () method. For this you need to generate a field in the form of a matrix. This will be done by the Game class. First you need to create the Square class for the cells and the Player class, whose objects will fill these cells.
Square.java
package com.example; public class Square { private Player player = null; public void fill(Player player) { this.player = player; } public boolean isFilled() { if (player != null) { return true; } return false; } public Player getPlayer() { return player; } } Player.java
package com.example; public class Player { private String name; public Player(String name) { this.name = name; } public CharSequence getName() { return (CharSequence) name; } } All classes of our application are in the src folder.
Game.java
package com.example; public class Game { /** * */ private Square[][] field; /** * * */ public Game() { field = new Square[3][3]; squareCount = 0; // for (int i = 0, l = field.length; i < l; i++) { for (int j = 0, l2 = field[i].length; j < l2; j++) { field[i][j] = new Square(); squareCount++; } } } public Square[][] getField() { return field; } } Initialization of Game in the KrestikinolikiActivity designer.
public KrestikinolikiActivity() { game = new Game(); game.start(); // } The buildGameField () method of the KrestikinolikiActivity class. It dynamically adds rows and columns to the table (playing field):
private Button[][] buttons = new Button[3][3]; //(....) private void buildGameField() { Square[][] field = game.getField(); for (int i = 0, lenI = field.length; i < lenI; i++ ) { TableRow row = new TableRow(this); // for (int j = 0, lenJ = field[i].length; j < lenJ; j++) { Button button = new Button(this); buttons[i][j] = button; button.setOnClickListener(new Listener(i, j)); // , row.addView(button, new TableRow.LayoutParams(TableRow.LayoutParams.WRAP_CONTENT, TableRow.LayoutParams.WRAP_CONTENT)); // button.setWidth(107); button.setHeight(107); } layout.addView(row, new TableLayout.LayoutParams(TableLayout.LayoutParams.WRAP_CONTENT, TableLayout.LayoutParams.WRAP_CONTENT)); // } } In line 8, an object is created that implements the View.OnClickListener interface. Create a nested class Listener. It will only be visible from KrestikinolikiActivity.
public class Listener implements View.OnClickListener { private int x = 0; private int y = 0; public Listener(int x, int y) { this.x = x; this.y = y; } public void onClick(View view) { Button button = (Button) view; } } It remains to implement the logic of the game.
public class Game { /** * */ private Player[] players; /** * */ private Square[][] field; /** * ? */ private boolean started; /** * */ private Player activePlayer; /** * */ private int filled; /** * */ private int squareCount; /** * * */ public Game() { field = new Square[3][3]; squareCount = 0; // for (int i = 0, l = field.length; i < l; i++) { for (int j = 0, l2 = field[i].length; j < l2; j++) { field[i][j] = new Square(); squareCount++; } } players = new Player[2]; started = false; activePlayer = null; filled = 0; } public void start() { resetPlayers(); started = true; } private void resetPlayers() { players[0] = new Player("X"); players[1] = new Player("O"); setCurrentActivePlayer(players[0]); } public Square[][] getField() { return field; } private void setCurrentActivePlayer(Player player) { activePlayer = player; } public boolean makeTurn(int x, int y) { if (field[x][y].isFilled()) { return false; } field[x][y].fill(getCurrentActivePlayer()); filled++; switchPlayers(); return true; } private void switchPlayers() { activePlayer = (activePlayer == players[0]) ? players[1] : players[0]; } public Player getCurrentActivePlayer() { return activePlayer; } public boolean isFieldFilled() { return squareCount == filled; } public void reset() { resetField(); resetPlayers(); } private void resetField() { for (int i = 0, l = field.length; i < l; i++) { for (int j = 0, l2 = field[i].length; j < l2; j++) { field[i][j].fill(null); } } filled = 0; } } Determination of the winner
K. O. suggests that the one who will line X or O in a line with a length equal to the length of the field vertically, or horizontally, or diagonally, draws in tic-tac-toe. The first thought that comes to mind is to write methods for each case. I think in this case, the Chain of Responsobility pattern will work well. Define the interface
package com.example; public interface WinnerCheckerInterface { public Player checkWinner(); } Since the Game is charged with identifying the winner, it implements this interface. It is time to create virtual "linesmen", each of which will check their side. All of them implement the WinnerCheckerInterface interface.
WinnerCheckerHorizontal.java
package com.example; public class WinnerCheckerHorizontal implements WinnerCheckerInterface { private Game game; public WinnerCheckerHorizontal(Game game) { this.game = game; } public Player checkWinner() { Square[][] field = game.getField(); Player currPlayer; Player lastPlayer = null; for (int i = 0, len = field.length; i < len; i++) { lastPlayer = null; int successCounter = 1; for (int j = 0, len2 = field[i].length; j < len2; j++) { currPlayer = field[i][j].getPlayer(); if (currPlayer == lastPlayer && (currPlayer != null && lastPlayer !=null)) { successCounter++; if (successCounter == len2) { return currPlayer; } } lastPlayer = currPlayer; } } return null; } } WinnerCheckerVertical.java
package com.example; public class WinnerCheckerVertical implements WinnerCheckerInterface { private Game game; public WinnerCheckerVertical (Game game) { this.game = game; } public Player checkWinner() { Square[][] field = game.getField(); Player currPlayer; Player lastPlayer = null; for (int i = 0, len = field.length; i < len; i++) { lastPlayer = null; int successCounter = 1; for (int j = 0, len2 = field[i].length; j < len2; j++) { currPlayer = field[j][i].getPlayer(); if (currPlayer == lastPlayer && (currPlayer != null && lastPlayer !=null)) { successCounter++; if (successCounter == len2) { return currPlayer; } } lastPlayer = currPlayer; } } return null; } } WinnerCheckerDiagonalLeft.java
package com.example; public class WinnerCheckerDiagonalLeft implements WinnerCheckerInterface { private Game game; public WinnerCheckerDiagonalLeft(Game game) { this.game = game; } public Player checkWinner() { Square[][] field = game.getField(); Player currPlayer; Player lastPlayer = null; int successCounter = 1; for (int i = 0, len = field.length; i < len; i++) { currPlayer = field[i][i].getPlayer(); if (currPlayer != null) { if (lastPlayer == currPlayer) { successCounter++; if (successCounter == len) { return currPlayer; } } } lastPlayer = currPlayer; } return null; } } WinnerCheckerDiagonalRight.java
package com.example; public class WinnerCheckerDiagonalRight implements WinnerCheckerInterface { private Game game; public WinnerCheckerDiagonalRight(Game game) { this.game = game; } public Player checkWinner() { Square[][] field = game.getField(); Player currPlayer; Player lastPlayer = null; int successCounter = 1; for (int i = 0, len = field.length; i < len; i++) { currPlayer = field[i][len - (i + 1)].getPlayer(); if (currPlayer != null) { if (lastPlayer == currPlayer) { successCounter++; if (successCounter == len) { return currPlayer; } } } lastPlayer = currPlayer; } return null; } } We initialize them in the Game constructor:
//(....) /** * "" =). , * */ private WinnerCheckerInterface[] winnerCheckers; //(....) public Game() { //(....) winnerCheckers = new WinnerCheckerInterface[4]; winnerCheckers[0] = new WinnerCheckerHorizontal(this); winnerCheckers[1] = new WinnerCheckerVertical(this); winnerCheckers[2] = new WinnerCheckerDiagonalLeft(this); winnerCheckers[3] = new WinnerCheckerDiagonalRight(this); //(....) } Implementation of checkWinner ():
public Player checkWinner() { for (WinnerCheckerInterface winChecker : winnerCheckers) { Player winner = winChecker.checkWinner(); if (winner != null) { return winner; } } return null; } Winner check after each move. Add code to the onClick () method of the Listener class.
public void onClick(View view) { Button button = (Button) view; Game g = game; Player player = g.getCurrentActivePlayer(); if (makeTurn(x, y)) { button.setText(player.getName()); } Player winner = g.checkWinner(); if (winner != null) { gameOver(winner); } if (g.isFieldFilled()) { // , gameOver(); } } The gameOver () method is implemented in 2 versions:
private void gameOver(Player player) { CharSequence text = "Player \"" + player.getName() + "\" won!"; Toast.makeText(this, text, Toast.LENGTH_SHORT).show(); game.reset(); refresh(); } private void gameOver() { CharSequence text = "Draw"; Toast.makeText(this, text, Toast.LENGTH_SHORT).show(); game.reset(); refresh(); } For Java, gameOver (Player player) and gameOver () are different methods. Using the Toast.makeText Builder, you can quickly create and display a notification. refresh () refreshes field state:
private void refresh() { Square[][] field = game.getField(); for (int i = 0, len = field.length; i < len; i++) { for (int j = 0, len2 = field[i].length; j < len2; j++) { if (field[i][j].getPlayer() == null) { buttons[i][j].setText(""); } else { buttons[i][j].setText(field[i][j].getPlayer().getName()); } } } } Done! I hope this article has helped you get started in the world of development under the Android OS. Thank you for attention!
Video ready application
Sources
PS: the article was published at the request of the commentators of this post .
Source: https://habr.com/ru/post/110247/
All Articles