Automate the conversion of photos from stereopair to anaglyph
 |  |
Introduction
It all started with the fact that I bought anaglyph glasses . As soon as they fell into the hands, it was immediately decided to check their general capabilities. Just surfing the Internet and looking for photos is not so interesting, therefore, reluctantly, I had to admit that my favorite operating system was a significant drawback ( lack of drivers to add anaglyph output mode to games ) and load Windows that was long abandoned. Since I am a happy owner of a video card with Nvidia's chipset, using an uncomplicated trick ( you can download more recent drivers , you also need to edit the registry for owners of 64-bit systems ) I discovered the amazing world of pseudo-volatile games. It is clear that the sensations are not quite the same, as if glasses with LCD shutters were used , but then the order of the money spent is completely different. ( By the way, for those who have older video cards or chipsets from other manufacturers , there is a wonderful free utility that allows you to do the same. However, in my subjective opinion, the quality of the picture on my video card is somewhat worse ). Since the purpose of this article is not at all to advertise different technologies of a pseudo-volumetric image, I will not talk in detail about my impressions and show screenshots of games ( especially, those who have glasses, they know this very well, and those who do not have them do not can and appreciate ). But what upset me is that I cannot take a screenshot for myself. That is, I can do it ( good Nvidia has carefully provided for an undocumented combination “alt” + “F1” ), but its format is not in the form of anaglyph, but in the form of a stereo pair (.jps).
Having created a sufficient number of screenshots, I set out to convert them into an easy-to-see format. At first I downloaded and tried several free utilities that could do it in batch mode. But I was immediately embarrassed that the picture was slightly different. Firstly, the color rendition changed immediately ( not much, but it was noticeable to me ), and secondly, an additional parasitic duplication of objects appeared, which was not at the time of the game.
Perhaps some of the programs give the expected quality, but I decided not to waste time on further searches, but to accomplish this task myself.
Creating action
I just want to note that I am a lazy person, I am not going to convert all my screenshots manually. Therefore, I decided to record actions in the form of “actions” for further batch processing ( who would be interested in the finished atn file - link to it at the end of the article ).
A stereo image file is a regular jpeg format in which images for the right and left eyes are placed side by side.

The created script should be able to automatically resize the file and apply the necessary transformations to the layers in order to obtain a high-quality anaglyph picture. We will now deal with the phased creation of such a scenario.
')
It is necessary to make a reservation that despite the fact that jps is a “pure” jpeg format, Photoshop does not recognize it due to a “wrong” extension. So, first you have to use your favorite batch file renamer to change extensions to .jpg or .jpeg.
Now everything is ready to create our action script.
- Open one of the renamed files in Photoshop.
- Display the list of "actions" (Menu " Window " -> " Actions " [" Window " -> " Actions "]) and choose to create a new action

- Set a suitable name for it (I chose jps2anaglyph )
- Click the " begin recording " button
- Make sure that the layers palette is displayed. If not, click " F7 " or turn on the menu " Window " -> " Layers " (" Window " -> " Layers ").

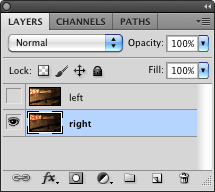
- Double-clicking on the background layer will allow us to turn it into a regular one. We give it the name " right ".
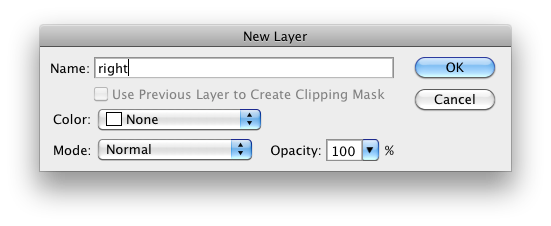
- The right key on the layer is " Duplicate Layer " (" Create a duplicate layer ") and set the name to the new layer " left "

- Now a little trick - make sure that the current selected layer is " left " for us, go to the menu " Edit " -> " Transform " -> " Flip Horizontal " (" Edit " -> " Trans-Editing " -> " Flip Horizontal ") .
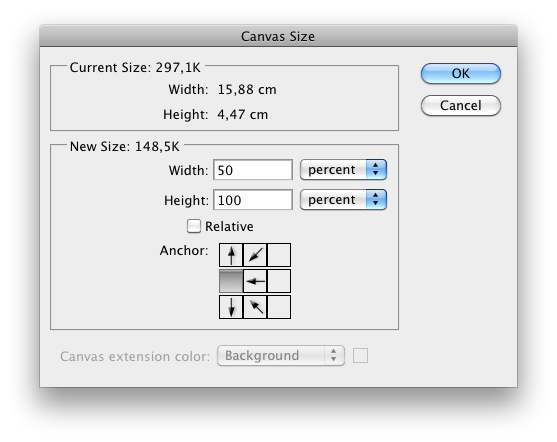
- Cut off the "extra" half of the image: " Image " -> " Canvas Size " (" Image " -> " Canvas Size "). We choose percentages from the list, set the width to 50 , leave the height as it is ( 100 ), set the anchor to the left central position. (Photoshop will warn us that we cut the size of the picture, but we agree with that).
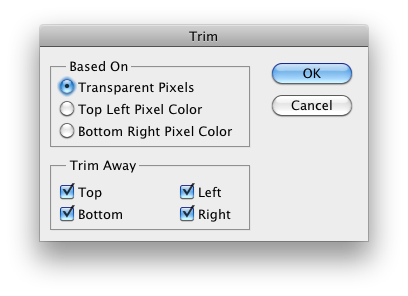
- After that, we adjust the size of the canvas and the size of the layers - to do this, use the menu item " Image " -> " Trim " (" Image " -> " Trimming "). Choose to crop by transparent pixels from all sides.
- Well, we are completing our first little trick: with the selected layer " left ", we again run " Edit " -> " Transform " -> " Flip Horizontal " (" Edit " -> " Trans-Editing " -> " Flip Horizontal "). So we combined the image for the left and right eyes in one photo. There is a little magic left, and a “volume” appears in the flat image.
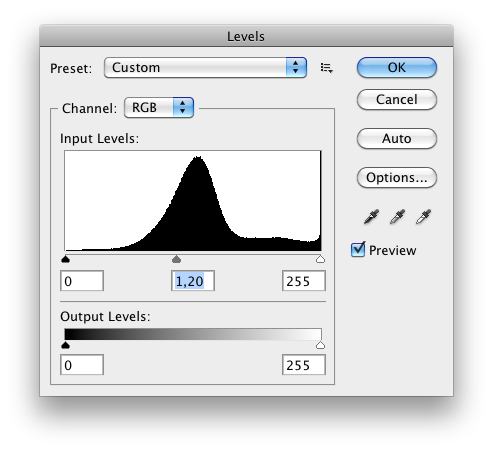
- The second little trick. In the course of experiments on lost flowers, I came to the conclusion that it is not enough just to take the red component for the left eye and the blue-green component for the right eye. If we use general considerations, then twice as much light (blue component plus green) comes to the right eye with white shading, than to the left eye (only red). To somehow compensate for this, I decided to simply increase the brightness of the image for the left eye. In order not to re-highlight the bright areas of the image, the beam should be used to adjust not the brightness, but the gamma. I personally liked the value of 1.2, but here you can choose what suits you best. So, the selected layer is still " left ", go to " Image " -> " Adjustment " -> " Levels " (" Image " -> " Correction " -> " Levels ") and specify 1.20 in the average input field ( gray level).
- We enter the finish line in the creation of our action. It is good that this is accompanied by a happy number of this item. So, you need to carefully and accurately perform the following actions: select the " right " layer in the layers palette, and remove the check mark from the display on the " left " layer. It is important!
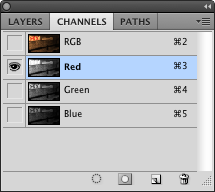
- Now open the color channel tab (" Window " -> " Channels "), and select only the red channel for display (manually, by using the combination of the " ctrl " + " 3 " [" command " + " 3 " keys on Mac OS). ]).
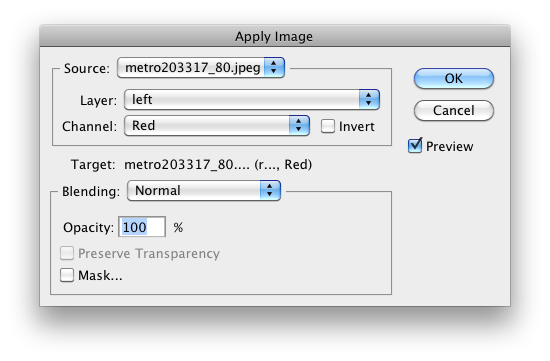
- Go to the menu item " Image " (" Image ") and select the command " Apply Image " (" External Channel "). As the source layer, select " left ", as the channel - " red " (" red "), the type of mixing - " normal " (" normal "). Apply, and we are almost there!
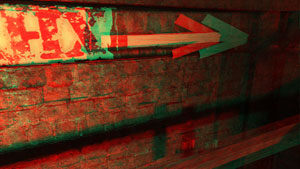
- Turn on to display all the color channels - the image is ready. It remains to save and close it, and then stop recording actions.
Now you can use Adobe Bridge: select the necessary files, go to " Tools " -> " Photoshop " -> " Batch ...", choose our action, redefine the save path - and with a single keystroke give the volume to all flat files ...
For those who are too lazy to do it yourself, here is the finished action file .
Thank you for your attention, I hope this article seemed to someone useful.
Afterword
Although the article as a whole about how to get pseudo-volumetric anaglyph images from a set of jps images (jpeg stereopair) (for the most common glasses with red / blue-green filters), it can be useful to those who want to create an anaglyph from two independent photos . Despite the fact that there was already an article on this topic, I use a slightly different technological approach to solve the problem - with a small theoretical justification.
Source: https://habr.com/ru/post/109998/
All Articles