We write our first application on Android

Foreword
The purpose of this post is, on the one hand, to share our successful experience in launching applications development on the Android platform and, on the other hand, to contribute to the development of the software market for this remarkable and rapidly growing platform due to (without false modesty, I will say) you, who have read this post. In the network, of course, you can find materials on the development of the application "a little more complicated than helloworld", but as a rule they are scattered and they do not describe various small underwater pebbles. In this post we will look at the full development cycle of the application, starting with a clean computer to the finished apk-file. Under the cut screenshots.
Preparation for development
In order to prepare for the development does not require any special actions and manipulations. I will describe step by step what to do. I have Windows XP, so all of the following should be attributed specifically to this OS, although actions without any major changes can be applied to other Windows operating systems and even Linux.
- Installing the Eclipse Development Environment
- Installing ADT plug-in to Eclipse
- Installing JDK and JRE
- Install Android SDK
Installing the Eclipse Development Environment
Everything is simple. Go to the Downloads section on the official website and download the Classic version. Then just unpack the archive where you want, but I decided to do it in the honorary directory C: \ Eclipse
Installing ADT plug-in to Eclipse
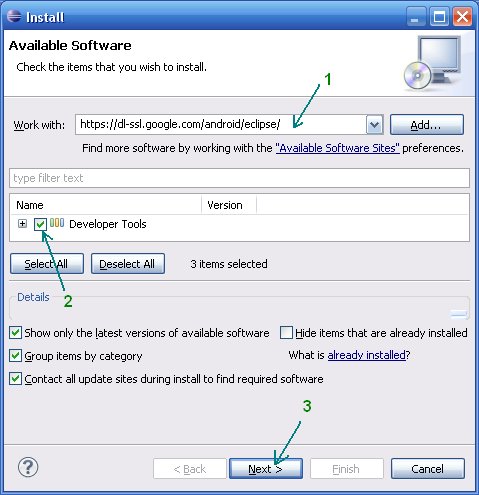
Launch Eclipse, and open the plugin installation dialog via the Help → Install new software menu. In the Work with field, enter the download address of the dl-ssl.google.com/android/eclipse plug- in (if it does not work out, then the plug-in can be downloaded and installed manually via the link http://developer.android.com/sdk/eclipse-adt.html ), then Developer Tools appears in the table below, mark it and go further.
After a successful installation, you can restart the Eclipse environment.
')
Installing a Java Environment: JDK and JRE
If you have not installed Java Development Kit (JDK) and Java Runtime Environment (JRE) yet, then you need to install them. You can do this on the Oracle site . Download and install JDK and JRE.

Install Android SDK
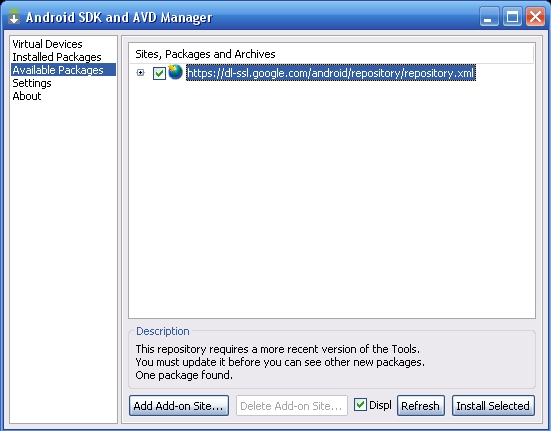
The thing left for small - this is to download and install the latest Android SDK. This is done on the website for Android developers . I personally installed the SDK again in the C: \ Android directory of honor. After that, you need to add platforms and other additional elements of the SDK. I added all available versions, as I plan to make applications for early platforms, as well as a USB driver and sample applications.
Preparation for development is complete. Now the next step is to create the application.
Creating an Android application
Before you create your first application, you can create a virtual Android device to quickly test your freshly written software on it. First I want to tell you a few words about the Android Virtual Device (AVD). This is a virtual smartphone with Android OS, where you can easily run the program you created. As you can see, the advantage of Android Virtual Device is that you can visually see how your program will work on different Android smartphones, rather than buying the entire range and testing the application on each of them.
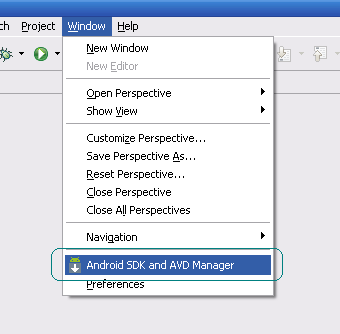
Let's start creating a virtual Android device. Follow the menu on the path Window → Android SDK and AVD Manager .
We select New in the right part of the window, in the appeared window we enter the name of the virtual device, the platform (say Android 2.1), the size of the memory card (say 512 Mb), the type of display (say HVGA). Then click on the Create AVD button below.
Now create a project. To do this, go on the way to the menu File → New → Other , in the appeared list Android → Android Project .
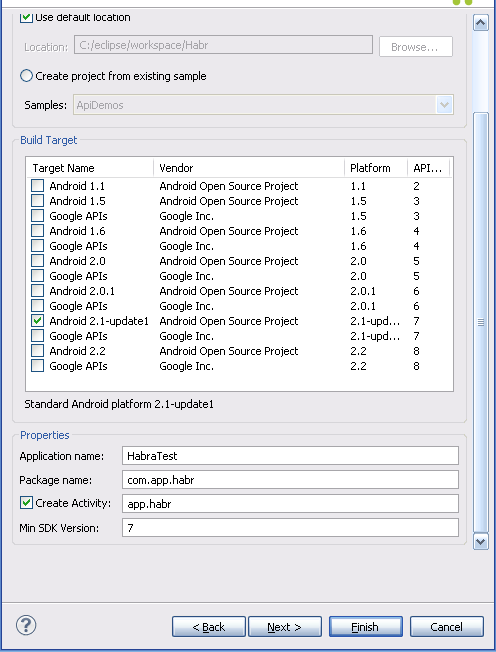
As an example, I’ll talk about the development of one of my simplest UfaTermometr program, which shows the current temperature from sensors located at one of the facilities of the local energy company.
After creating the project, on the left you will see a directory tree. First of all, let's load our application icon, or rather 3 icons for various options. In the drawable-hdpi folder we load a png-image with a transparent background of 72x72, in drawable-mdpi respectively 48x48 and in the drawable-ldpi the smallest size of 36x36. You can do this by simply dragging files directly onto the tree. The next step will be controls. In my program, I needed only three interface elements: ImageView (just a picture of the application logo), Button (update the temperature value) and TextView (display the temperature value). All these controls need to be described in a special xml-file. In the tree, it is located at res → layout → main.xml . In many ways, the layout of controls is similar to the layout of web pages, there is both padding and margin, and an analogue of align. My application's main.xml code:
<? xml version = "1.0" encoding = "utf-8" ? >
< LinearLayout xmlns: android = " schemas.android.com/apk/res/android "
android: orientation = "vertical"
android: layout_width = "fill_parent"
android: layout_height = "fill_parent"
>
< ImageView android: layout_width = "fill_parent"
android: layout_height = "wrap_content"
android: src = "@ drawable / droid"
android: layout_gravity = "center_horizontal | center"
android: layout_margin = "0px"
/>
< Button
android: id = "@ + id / refrbutton"
android: layout_width = "wrap_content"
android: layout_height = "wrap_content"
android: gravity = "center_horizontal"
android: layout_gravity = "center_horizontal | center"
android: textSize = "30px"
android: padding = "20px"
android: layout_marginTop = "10dip"
android: text = "Refresh"
/>
< Textview
android: layout_width = "fill_parent"
android: layout_height = "wrap_content"
android: text = "..."
android: textSize = "100dip"
android: gravity = "center_horizontal"
android: id = "@ + id / temper"
android: textColor = "# EEE3C4"
/>
</ LinearLayout >
I will not dwell on the layout of controls, since all this is described in sufficient detail in the manual and generally intuitively clear, especially to those who dealt with the html / css-layout and / or development in any visual environment (for example, Delphi) . The only thing to notice is how I uploaded an arbitrary image to ImageView. In the src field, specify the path starting with the @ symbol and then specify the address for the tree. In the res folder, I created a drawable subfolder in advance and threw the logo there, and then simply pointed the way to ImageView. Easy? So much for me.
The application code itself is located along the path src → “your package name” → “application name” .java .
By default, a “blank” of the main class is created and from it you can further dance. I will not dwell on the intricacies of such a simple code as I have in the example, but I will explain that the logic of the work is explained in three simple steps:
- Download an HTML page with temperature values
- With the help of regulars "pull out" the temperature
- Show in TextView temperature value
Actually the code itself that implements the above logic of operation:
package app.test.ufatermometr;
import android.app.Activity;
import android.os.Bundle;
import android.view.View;
import android.widget.TextView;
import android.widget.Button;
import java.io.InputStreamReader;
import java.net.URL;
import java.net.URLConnection;
import java.util.regex. *;
public class UfaTermometr extends Activity
{
@Override
public void onCreate (Bundle savedInstanceState)
{
super.onCreate (savedInstanceState);
setContentView (R.layout.main);
final Button button = (Button) findViewById (R.id.refrbutton);
button.setOnClickListener ( new Button.OnClickListener () {
public void onClick (View v) // click on the button
{
RefreshTemper ();
}
});
RefreshTemper (); // load temperature immediately when starting
};
// ------------------------------------------------ ----------------
public String GetTemper (String urlsite) // temperature loading function
{
String matchtemper = "" ;
try
{
// page load
URL url = new URL (urlsite);
URLConnection conn = url.openConnection ();
InputStreamReader rd = new InputStreamReader (conn.getInputStream ());
StringBuilder allpage = new StringBuilder ();
int n = 0;
char [] buffer = new char [40000];
while (n> = 0)
{
n = rd.read (buffer, 0, buffer.length);
if (n> 0)
{
allpage.append (buffer, 0, n);
}
}
// working with regulars
final pattern pattern = Pattern.compile
( "<span style = \" color: # [a-zA-Z0-9] + \ "> [^ - + 0] + ([- + 0-9] +) [^ <] + </ span> [^ (a-YaA-Yayoa-zA-Z0-9)] + ([a-YaA-Yayaa-zA-Z] +) " );
Matcher matcher = pattern.matcher (allpage.toString ());
if (matcher.find ())
{
matchtemper = matcher.group (1);
}
return matchtemper;
}
catch (Exception e)
{
}
return matchtemper;
};
// ------------------------------------------------ ----------------
public void RefreshTemper ()
{
final TextView tTemper = (TextView) findViewById (R.id.temper);
String bashtemp = "" ;
bashtemp = GetTemper ( " be.bashkirenergo.ru/weather/ufa " );
tTemper.setText (bashtemp.concat ( "°" )); // temperature display
};
}
After the application is written, you can already debug and test it.
Run and test the application
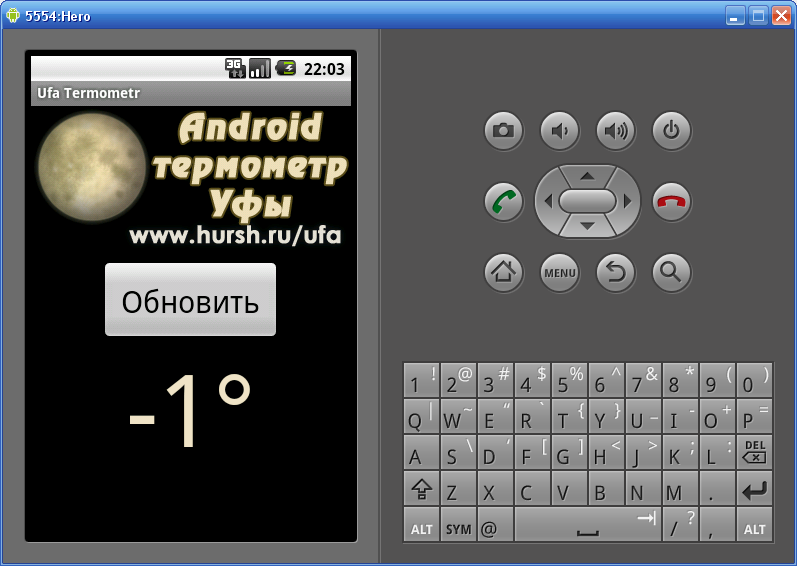
We recall our virtual machine and launch it using the usual button or the Run → Run menu.
Here we can then contemplate such a picture:
Now, if you want to share the application, then you need to collect the apk-file. To do this, use the menu File → Export and in the list of Android → Export Android application . Next, select the project, then create the keystore keystore and key, for this you will need to fill in a few fields with all sorts of reference information. The resulting apk-file can be distributed and even put in the Android Market, but for this you have to register and pay $ 25, which is not much, especially for a standing project. But registration in the Market, perhaps, is a topic for a separate article.
Conclusion
In conclusion, I would like to say that certainly the development of applications for Android is pleasant, quite simple and interesting. Of course, we looked only at the tip of the iceberg, but I hope that in the minds of those of you who have never tried to do anything like a “light bulb lit up” and it is quite possible that sometime millions will use your application.
Sources, links
In post used materials:
www.ibm.com
www.itblog.name
Wikipedia
Apk app file
UPD: Elimination of possible errors
Defite :
1. Error
ERROR: Unable to open class file C: \ workspace \ Test \ gen \ com \ example \ test \ R.java: No such file or directoryis solved by clearing the project via the Project → Clean menu or restarting Eclipse.
2. When an error occurs
emulator: ERROR: no search paths found in this AVD's configuration. Weird, the AVD's config.ini file is malformed. Try re-creating it- This is a consequence of the fact that you have Cyrillic in the user name. Solved: go to Computer → System Properties → Advanced System Settings → Environment Variables . Create a new variable with the name ANDROID_SDK_HOME and value - the path where the AVD folder is located (for example, C: \ Android \). We create, then look for the Path variable in the same place, open it and add a path to the tools folder of the Android SDK (for example, C: \ Android \ tools) through the semicolon in the value field. We save. Run Eclipse, run the program.
UPD 10/05/2011, what this application has become can be seen on the following screenshots:
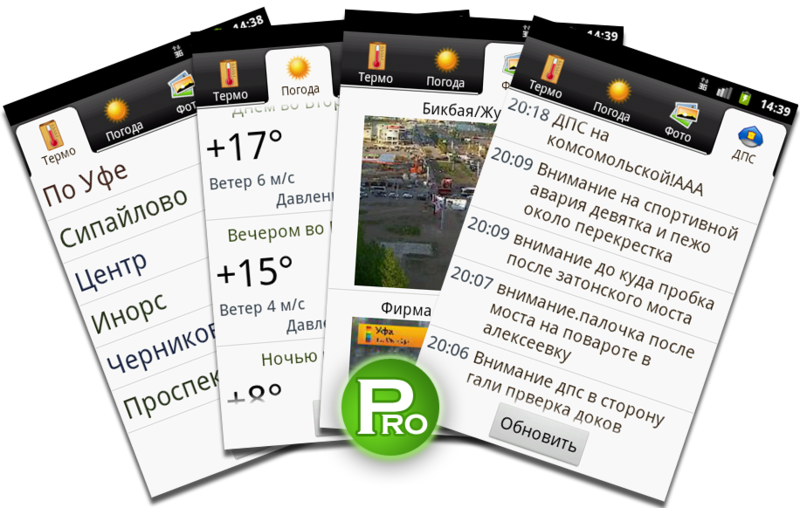
This is the result of the development of the very disc, which is given above as an example.
Development and creation of Android applications
Website development
Source: https://habr.com/ru/post/109944/
All Articles