AndroidDev # 1. Create a file manager

Android is a promising and dynamic operating system. And many programmers want to learn how to program applications for OS Android, but a cursory search for structured materials on the Internet and, in particular, Runet, leads them to a stupor. Indeed, there is still the problem of finding educational articles (especially in Russian) on developing applications for this very popular operating system.
Well, well, we will gradually improve this situation with the help of Habr.
Immediately I will warn you that the materials are intended for those who have no experience in developing applications for Android, but very, very much want to gain this experience.
')
Getting ready
The first thing we need is to install and configure IDE. We will use Eclipse, however it is important to note that it is possible to use any development environment.
Detailed instructions for installing and configuring the Eclipse IDE are contained in the documentation on the Android website . In short:
- Install Eclipse Classic from here
- Install the SDK Starter Package from here
- Install the ADT Plugin using this manual , follow the same instructions described in the section Configuring the ADT Plugin
- Launch Eclipse, click Window> Android SDK and AVD Manager and select the necessary components for installation. The easiest option is to select everything, but the necessary minimum - SDK Platform Android 2.1 (or 2.2), Android SDK Tools , Android SDK Platform-tools
After all this, we have a working environment for developing applications for the Android OS. But we need to check our applications somewhere, right? And here we are faced with a choice - either to carry out these actions in the emulator, or on a real device.
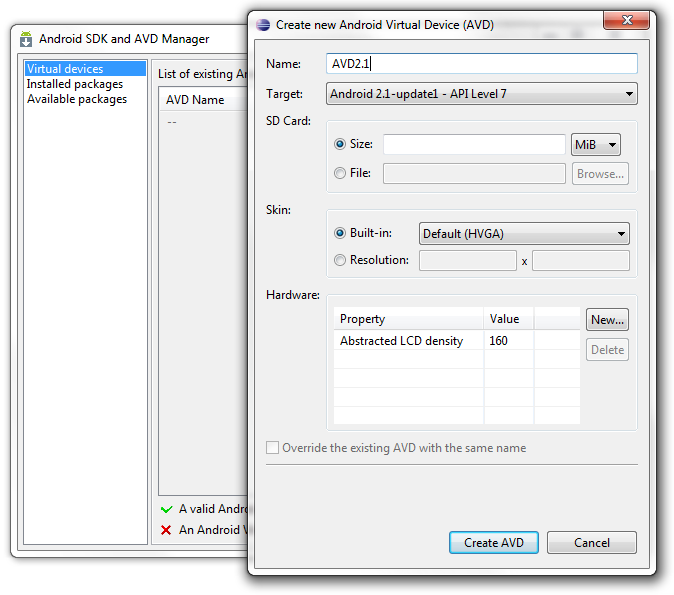
The emulator can be added in the already familiar window of the Android SDK and AVD Manager by clicking the New ... button in the Virtual Devices tab. Fill in the Name field, specify the API version and add our virtual device.
If you want to test your applications on a real device, look here . It is important to note that in the end, you still have to check your application on a real device, because it is a bit strange to release an application, for example, in the Android Market, as it should not be tested on existing phone / tablet samples.
Create a project
It's time to create a new project. To do this, click File> New> Project , select Android> Android Project in the window that appears and click Next . The following window appears, which we fill out like this:
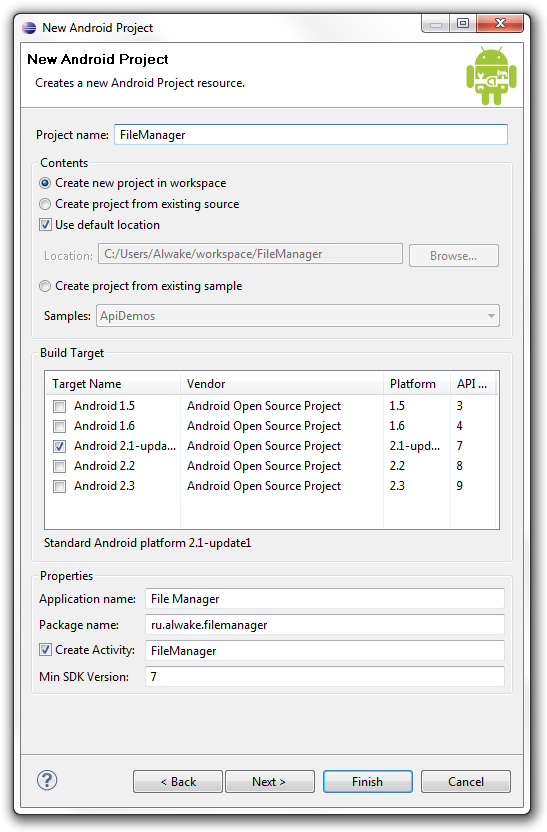
Now a few explanations.
Project Name - the name of the project in the Eclipse environment.
Application Name - the name of the application, the one that users will see on the target Android device.
Package Name - the name of the package. It's all the same as any Java project. It is important to know that this name must be unique among all the packages available on the end device. Therefore, the classical logic is quite effective to give the name corresponding to the web domain written in reverse (as here - ru.alwake), and then the name of the project itself. This step will to some extent ensure the uniqueness of the name.
Create Activity - the name of the class, which in the future will be a subclass of the class Activity.
Min SDK Version - Minimal SDK version. If you look at the Build Target list above in this window, you can come to the conclusion that our application runs only on devices with Android> = 2.1 (Android 2.1 corresponds to SDK version 7). In this case, it is not very important, but so be it.
Now you can safely click Finish and see your project in the Package Exploper panel . The project was created and it would be nice to get acquainted with some theoretical basis on the device of Android-applications, which is described well here .
About our project
To begin with, let's define what we want from our file manager. Ideally, a complete replacement for ASTRO and eStrongs. Well, for now we need to provide basic navigation through directories, and by “basic” we understand that we don’t need to go into those folders that only root has access to. In addition, in the field above we will display our current location in the directory structure.
Well, first let's talk about the structure of the project:
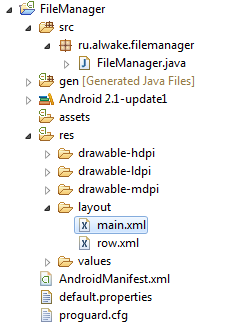
/ res / drawable- * dpi - in these three folders we contain resources intended for different screen extensions. At the moment there is only a file icon.png, that is, the icon of our application.
/ res / layout - this folder contains xml-files describing the appearance of forms and various form elements. After creating the project, there is already a main.xml file there, you also need to create a row.xml file that will describe the appearance of each individual row (that is, the list item of our file tree).
/ res / values - here we have any constants that we can use in our project.
It is worth noting that these XML files can be edited both in visual mode and in text mode (by changing the xml code directly). We will act in the second way. To edit the code, right-click on the xml file in the Package Explorer panel and select Open with> Text Editor . This is so for the future;)
File FileManager.java - in this file, in fact, contains our main class for the main and only form of the application. All our code in this project will be placed here.
The AndroidManifest.xml file is a file with the main properties of our project, in particular, given when the project was created (such as, for example, the name). Accordingly, in order to change, suppose, the name, we need to pick this file.
The rest of the files are of little interest to us.
Start writing code
In general, everything that was above is the basic information that every Android programmer must know. And now it's time to deal directly with our code.
Main.xml file:
<? xml version ="1.0" encoding ="utf-8" ? >
< TableLayout xmlns:android ="http://schemas.android.com/apk/res/android"
android:orientation ="vertical"
android:layout_width ="fill_parent"
android:layout_height ="fill_parent" >

< TableRow >
< TextView android:id ="@+id/titleManager"
android:layout_width ="fill_parent"
android:layout_height ="fill_parent"
android:padding ="5dip"
/>
</ TableRow >
< TableRow >
< ListView android:id ="@id/android:list"
android:layout_width ="fill_parent"
android:layout_height ="fill_parent"
android:layout_weight ="2"
android:drawSelectorOnTop ="false" />
</ TableRow >
</ TableLayout >

* This source code was highlighted with Source Code Highlighter .
Here we set the markup for our main Layout form. TableLayout here means that the elements are lined up as a table. Next, the TextView element (text field) is placed in the upper cell of the table, and the ListView is located in the lower cell. Both elements have an id, using which we can change the contents of the elements. For example, using R.id.titleManager for our TextView text field.
Row.xml file:
<? xml version ="1.0" encoding ="utf-8" ? >
< TextView
xmlns:android ="http://schemas.android.com/apk/res/android"
android:layout_width ="fill_parent"
android:layout_height ="40sp"
android:padding ="5dip"
android:gravity ="center_vertical"
/>

* This source code was highlighted with Source Code Highlighter .
Here we set the markup for each element of our ListView, that is, directly for each individual folder or file. In this code, we set the width of each element, the height, the padding and the center_vertical alignment - that is, the centering vertically.
FileManager.java file:
* This source code was highlighted with Source Code Highlighter .
- package ru.alwake.filemanager;
- import java.io. File ;
- import java.util. ArrayList ;
- import java.util. List ;
- import android.app.AlertDialog;
- import android.app.ListActivity;
- import android.content.DialogInterface;
- import android.content.Intent;
- import android.content.DialogInterface.OnClickListener;
- import android.net. Uri ;
- import android.os.Bundle;
- import android.view.View;
- import android.widget.ArrayAdapter;
- import android.widget.ListView;
- import android.widget.TextView;
- public class FileManager extends ListActivity {
- private List < String > directoryEntries = new ArrayList < String > ();
- private File currentDirectory = new File ( "/" );
- // when application started
- @Override
- public void onCreate (Bundle icicle) {
- super.onCreate (icicle);
- // set main layout
- setContentView (R.layout.main);
- // browse to root directory
- browseTo ( new File ( "/" ));
- }
- // browse to parent directory
- private void upOneLevel () {
- if ( this .currentDirectory.getParent ()! = null ) {
- this .browseTo ( this .currentDirectory.getParentFile ());
- }
- }
- // browse to file or directory
- private void browseTo (final File aDirectory) {
- // if we want to browse directory
- if (aDirectory.isDirectory ()) {
- // fill list with files from this directory
- this .currentDirectory = aDirectory;
- fill (aDirectory.listFiles ());
- // set titleManager text
- TextView titleManager = (TextView) findViewById (R.id.titleManager);
- titleManager.setText (aDirectory.getAbsolutePath ());
- } else {
- // if we want to open this file, show this dialog:
- // listener when YES button clicked
- OnClickListener okButtonListener = new OnClickListener () {
- public void onClick (DialogInterface arg0, int arg1) {
- // intent to navigate file
- Intent i = new Intent (android.content.Intent.ACTION_VIEW, Uri .parse ( "file: //" + aDirectory.getAbsolutePath ()));
- // start this activity
- startActivity (i);
- }
- };
- // listener when NO button clicked
- OnClickListener cancelButtonListener = new OnClickListener () {
- public void onClick (DialogInterface arg0, int arg1) {
- // do nothing
- // or add something you want
- }
- };
- // create dialog
- new AlertDialog.Builder ( this )
- .setTitle ( "Confirmation" ) // title
- .setMessage ( "Do you want to open the file" + aDirectory.getName () + "?" ) // message
- .setPositiveButton ( "Yes" , okButtonListener) // positive button
- .setNegativeButton ( "No" , cancelButtonListener) // negative button
- .show (); // show dialog
- }
- }
- // fill list
- private void fill ( File [] files) {
- // clear list
- this .directoryEntries.clear ();
- if ( this .currentDirectory.getParent ()! = null )
- this .directoryEntries.add ( ".." );
- // add every file into list
- for ( File file: files) {
- this .directoryEntries.add (file.getAbsolutePath ());
- }
- // create array adapter to show everything
- ArrayAdapter < String > directoryList = new ArrayAdapter < String > ( this , R.layout.row, this .directoryEntries);
- this .setListAdapter (directoryList);
- }
- // when you clicked onto item
- @Override
- protected void onListItemClick (ListView l, View v, int position, long id) {
- // get selected file name
- int selectionRowID = position;
- String selectedFileString = this .directoryEntries. get (selectionRowID);
- // if we select ".." then go upper
- if (selectedFileString.equals ( ".." )) {
- this .upOneLevel ();
- } else {
- // browse to clicked file or directory using browseTo ()
- File clickedFile = null ;
- clickedFile = new File (selectedFileString);
- if (clickedFile! = null )
- this .browseTo (clickedFile);
- }
- }
- }
At the beginning of the name of the package (package name).
Lines 2-18 are responsible for importing the libraries we need. It is important to note that Eclipse can import libraries automatically as soon as it encounters something unknown.
In this code, we have only 5 fairly obvious functions that are easy to understand. And this is the skeleton of the application, providing basic navigation through the file structure. However, this application has one problem - when you try to enter a directory that only the superuser is allowed to access, we get an error and the application terminates.
Accordingly, the next time we will think about how to get rid of this error, as well as how to make the display of icons corresponding to the file type. In addition, we will consider implementing the Copy-Paste function in our file manager.
Ultimately, it is supposed to get a large and competent application that should give basic information about aspects of Android programming.
The idea and some of the implementation of the file manager is taken from anddev.org
I would also like to inform you that the next part of AndroidDev will appear on the twentieth of January.
Source: https://habr.com/ru/post/109486/
All Articles