Rendering of pictures through WPF on the example of Pivot
 Pivot needs no introduction. If you drive this word into the search for a habr, the result will be 37 articles, among which there are both reviews and tutorials. Therefore, I decided to focus my efforts on only one aspect of working with Pivot - in pictures.
 The convenience of working with Pivot strongly depends on the pictures chosen for it. Images of low resolution or different sizes and styles can spoil the whole impression. There are also such situations that there are no pictures at all and cannot be, since all data is in the database in the form of numbers, strings and dates.
There are many ways to programmatically generate images from a template. One of them is even built into the PautorLib library, which helps prepare data in a format that PivotViewer understands. HTML is used as a template.
')
In this article I will discuss the solution of the problem by means of WPF. In our case, the template will be a UserControl, in which there can be various TextBlock and Image whose properties can be set in the code. Not to be unfounded, let us consider everything with an example.
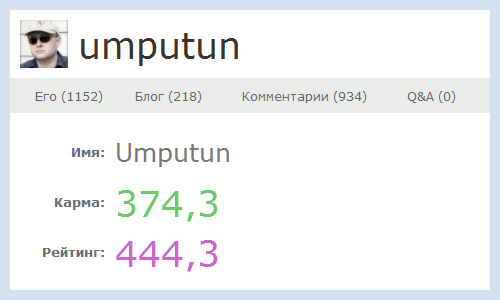
For example, information was taken about the first thousand users from the Habr top. For this, a bot was written, which leisurely collected all the data and put it in MongoDB.
The class that takes user data and converts it into a picture looks something like this (pastebin) .
At the output, the following images were obtained:
In order to achieve this quality of fonts, you need to set the following properties in the template:
TextOptions.TextFormattingMode="Display" RenderOptions.ClearTypeHint="Enabled" To render the control to the image, use the RenderTargetBitmap class. It has its own peculiarity - the output pictures have the inhuman Pbgra32 format. Other formats are not supported. Therefore, we have to additionally run the resulting bitmap through the FormatConvertedBitmap class in order to get Rgb24 at the output. After that, the result is encoded in PNG via PngBitmapEncoder and saved to a file.
All this happens on the timer ( DispatcherTimer ) and it looks like this - the timer works, the template is filled with new data, the timer works again, the redrawn window with new data is converted into a picture.
All this housekeeping with a timer, a template and a window is launched in a separate STA thread, as required by WPF. The thread in turn is started by calling the function.
As for the speed of such a decision, the main limitation here is the speed of writing to the hard disk.
An example program for generating images can be downloaded from the following links: bin , src . In the program configuration there are two keys. TilesPath contains the path to the folder in which the finished images will be saved. DemoRender is a binary value that switches the program modes (demo and work). In demo mode, pictures are not saved to disk, but displayed in a window as a slideshow. In working mode, the pictures are saved, and the window is hidden.
And finally you can find the resulting Pivot. I remind you that this is the first thousand people from the Habr top. Through the search, you can search by UserName and DisplayName. For the rest of the properties you can filter, sort and group. Here are some screenshots for those who for one reason or another cannot see it: img1 , img2 , img3 , img4 , img5 , img6 .
Source: https://habr.com/ru/post/109387/
All Articles