Writing Magic 8-Ball for Android
Based on the post Sharik, answering questions
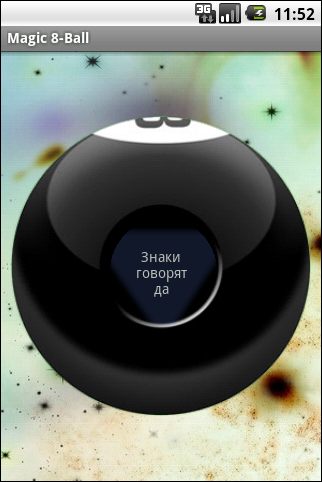
In this article, we will write a localized Magic 8-Ball for Android, which you can ask a question, shake and get an answer. A slight vibration will alert us that shaking is enough.
')
The article is intended for those who have already written Hellowworld for Android and are going to go further in this direction. The full version of the source code lies on google code . You can also try the magic-8-ball 1.1.apk file in the download tab.
For successful work, we will need the installed jdk, android sdk, eclipse and ADT plugin. How to do this is available written here .
Localization
The geography of Android devices is extensive, so the issue of localization occupies a key place in developing applications for this platform. Fortunately, we do not have to reinvent the wheel, Google has taken care of the programmers in this matter.
So, the concept of application localization is as follows: we create several sets of resources, the first is the default res / values / strings.xml , the rest are for the locale res / values- <qualifiers> /strings.xml , for example, values-en for English or values-ja for Japanese. When Android starts, it selects which resources to download based on the locale of the device itself. By the way, resources in Android are not only text strings, but also layouts, sound files, graphics, and other static data.
For our application, we will create res / values / , res / values-en and res / values-ru folders, in which will be strings.xml files. These files contain the application name, headers, and magic ball responses, which are stored in the responses array. It looks like this:
<? xml version ="1.0" encoding ="utf-8" ? >
< resources >
< string name ="app_name" > Magic 8-Ball </ string >
< string name ="shake_me_caption" > Shake Me </ string >
< string name ="press_menu_shake_caption" > Press Menu\n- Shake </ string >
< string name ="menu_shake_caption" > Shake </ string >
< string name ="menu_preferences_caption" > Preferences </ string >

< string name ="preferences_section_title" > Magic 8-ball Preferences </ string >

< string name ="shake_count_id" > shakeCount </ string >
< string name ="shake_count_title" > Shake count </ string >
...
< string-array name ="responses" >
< item > As I see\nit, yes </ item >
< item > It is\ncertain </ item >
< item > It is\ndecidedly\nso </ item >
< item > Most\nlikely </ item >
< item > Outlook\ngood </ item >
< item > Signs point\nto yes </ item >
< item > Without\na doubt </ item >
< item > Yes </ item >
< item > Yes -\ndefinitely </ item >
...
< item > Very\ndoubtful </ item >
</ string-array >

</ resources >

* This source code was highlighted with Source Code Highlighter .
Another nuance, android developer's guide warns us about the need to have an exact copy of some localization as a default resource, most often - English. And he gives an example that if the string in the res / values / strings.xml file , which is in res / values-en / strings.xml and used in the application, is not enough , everything can be compiled without problems, but in locale other than English the user will see the error message and the Force Close button.
Layout, animation and vibration
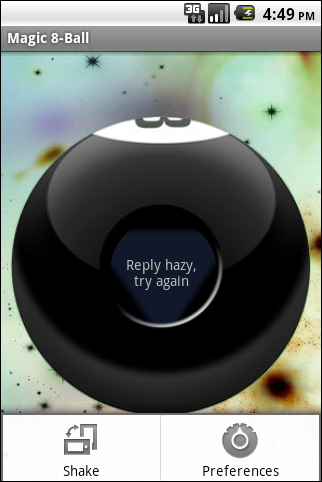
It's just that the background image has an inverted image of the cosmos. On it lies an ImageView with a ball, and our message will be shown using TextView. Main.xml code:
<? xml version ="1.0" encoding ="utf-8" ? >
< FrameLayout xmlns:android ="http://schemas.android.com/apk/res/android"
android:layout_width ="fill_parent"
android:layout_height ="fill_parent"
android:background ="@drawable/bg" >
< ImageView android:layout_width ="fill_parent"
android:layout_height ="fill_parent"
android:src ="@drawable/eight_ball"
android:layout_gravity ="center_vertical"
android:layout_margin ="10px" />
< LinearLayout xmlns:android ="http://schemas.android.com/apk/res/android"
android:orientation ="vertical"
android:layout_width ="fill_parent"
android:layout_height ="fill_parent"
android:gravity ="center" >
< TextView android:id ="@+id/MessageTextView"
android:layout_width ="wrap_content"
android:layout_height ="wrap_content"
android:layout_gravity ="center"
android:background ="@drawable/triangle"
android:text ="@string/shake_me_caption"
android:focusable ="false"
android:gravity ="center_vertical|center" android:layout_marginTop ="14dip" >
</ TextView >
</ LinearLayout >
</ FrameLayout >
* This source code was highlighted with Source Code Highlighter .
For the answer that appears, we will use AlphaAnimation. This class is most appropriate for our task, allowing objects to appear and disappear using the alpha level of the object.
private void showMessage( String message) {
TextView triangle = (TextView) findViewById(R.id.MessageTextView);
triangle.setVisibility(TextView.INVISIBLE);
triangle.setText(message);

AlphaAnimation animation = new AlphaAnimation(0, 1);
animation.setStartOffset(Defaults.START_OFFSET);
triangle.setVisibility(TextView.VISIBLE);
animation.setDuration(Defaults.FADE_DURATION);
triangle.startAnimation(animation);

vibrator.vibrate(Integer.parseInt(preferences.getString(
getString(R. string .vibrate_time_id), Defaults.VIBRATE_TIME)));
}

* This source code was highlighted with Source Code Highlighter .
Before answering, Magic 8-Ball will vibrate for the time of VIBRATE_TIME taken from the settings (see below). By default, this value is 250ms. Vibration of short duration (50ms) can be used in applications as a response to user actions. To work correctly with the Vibrator class, you need to remember to declare use-permission in the AndroidManifest.xml file:
< uses-permission android:name ="android.permission.VIBRATE" />Menu
To begin with, we implement the ability to get an answer using the menu. Create a menu.xml file in the res / menu / folder that contains the Shake and Preference buttons.
<? xml version ="1.0" encoding ="utf-8" ? >
< menu xmlns:android ="http://schemas.android.com/apk/res/android" >
< item android:id ="@+id/shake"
android:title ="@string/menu_shake_caption"
android:icon ="@android:drawable/ic_menu_always_landscape_portrait" />
< item android:id ="@+id/preferences"
android:title ="@string/menu_preferences_caption"
android:icon ="@android:drawable/ic_menu_preferences" />
</ menu >
* This source code was highlighted with Source Code Highlighter .
In the Magic8Ball class, we will write two such methods:
@Override
public boolean onCreateOptionsMenu(Menu menu) {
MenuInflater menuInflater = getMenuInflater();
menuInflater.inflate(R.menu.menu, menu);
return super.onCreateOptionsMenu(menu);
}

@Override
public boolean onOptionsItemSelected(MenuItem item) {
switch (item.getItemId()) {
case R.id.shake:
showMessage(getAnswer());
return true ;
case R.id.preferences:
startActivity( new Intent( this , Preferences. class ));
return true ;
}
return false ;
}

* This source code was highlighted with Source Code Highlighter .
The MenuInflater class is used to create Menu objects from an xml file. We get to the onOptionsItemSelected method at the moment when the menu item is selected, which is what the name of the method tells us. When you click on the Shake button, we will get an answer. About the Preferences button will tell the chapter Settings.
Working with sensor
To interact with the sensor, we need to implement the SensorEventListener interface. He declared two methods:
- onAccuracyChanged, called when the accuracy of the sensor has changed, we do not need it
- OnSensorChanged, called when the sensor values change, we even need this very much.
Another important point is that in order to work with the sensor, we need to find it and register with SensorManager.
sensorManager = (SensorManager)getSystemService(Context.SENSOR_SERVICE);
sensor = sensorManager.getDefaultSensor(Sensor.TYPE_ACCELEROMETER);
Note that we receive a sensor with the attribute Sensor.TYPE_ACCELEROMETER, which means that the data coming into the onSensorChanged method will be in units of acceleration (m / s ^ 2). The values along the three axes X, Y and Z will correspond to the values of event.values [0], event.values [1], event.values [2] of class SensorEvent.
public void onSensorChanged(SensorEvent event ) {
if ( event .sensor.getType() == Sensor.TYPE_ACCELEROMETER)
if (isShakeEnough( event .values[0], event .values[1], event .values[2]))
showMessage(getAnswer());
}

private boolean isShakeEnough( float x, float y, float z) {
double force = 0.0d;
force += Math .pow((x - lastX) / SensorManager.GRAVITY_EARTH, 2.0);
force += Math .pow((y - lastY) / SensorManager.GRAVITY_EARTH, 2.0);
force += Math .pow((z - lastZ) / SensorManager.GRAVITY_EARTH, 2.0);
force = Math .sqrt(force);

lastX = x;
lastY = y;
lastZ = z;

if (force > Float.parseFloat(preferences.getString(
getString(R. string .threshold_id), Defaults.THRESHOLD))) {
shakeCount++;
if (shakeCount > Integer.parseInt(preferences.getString(
getString(R. string .shake_count_id), Defaults.SHAKE_COUNT))) {
shakeCount = 0;
lastX = 0;
lastY = 0;
lastZ = 0;
return true ;
}
}
return false ;
}

* This source code was highlighted with Source Code Highlighter .
The lifetime of our Activitiy is controlled by Android, and we do not need our application to vibrate from random shakes in our pocket, so we stop working with the sensor as soon as the application becomes inactive. Also, if the sensor is not found, then we do not offer to shake the device.
@Override
public void onResume() {
super.onResume();
registerSensorListener();
if (isSensorRegistered())
showMessage(getString(R. string .shake_me_caption));
else
showMessage(getString(R. string .menu_shake_caption));
}

@Override
public void onPause() {
unregisterSensorListener();
super.onPause();
}

* This source code was highlighted with Source Code Highlighter .
Settings
Finally, we got to the settings. Testing on various phones has shown the need to set the shake force threshold. Between HTC Wildfire, Motorola Milestone and, for example, Highscreen Zeus, this value differed three times. This challenges us:
- You need a settings window where the user can manually set the threshold value and other parameters.
- These settings should be stored somewhere and read from somewhere.
Here, two ready-made PreferenceActivity classes for displaying settings and SharedPreferences for storing them come to our aid. Now in more detail.
PreferenceActivity is a class that visually shows us a hierarchy of preference objects. It loads content from the xml file using the addPreferencesFromResource method. It automatically interacts with the object of the SharedPreferences class and saves the settings to the specified key. Create an xml file of our settings and inflate our PreferenceActivity.
<? xml version ="1.0" encoding ="utf-8" ? >
< PreferenceScreen xmlns:android ="http://schemas.android.com/apk/res/android" >
< PreferenceCategory android:title ="@string/preferences_section_title" >
< EditTextPreference
android:key ="@string/shake_count_id"
android:defaultValue ="4"
android:title ="@string/shake_count_title"
android:summary ="@string/shake_count_summary"
android:dialogTitle ="@string/shake_count_dialogTitle"
android:inputType ="number"
android:numeric ="integer"
android:maxLength ="1"
/>
< EditTextPreference
android:key ="@string/threshold_id"
android:defaultValue ="2.75f"
android:title ="@string/threshold_title"
android:summary ="@string/threshold_summary"
android:dialogTitle ="@string/threshold_dialogTitle"
android:inputType ="numberDecimal"
android:numeric ="decimal"
android:maxLength ="4"
/>
< EditTextPreference
android:key ="@string/vibrate_time_id"
android:defaultValue ="250"
android:title ="@string/vibrate_time_title"
android:summary ="@string/vibrate_time_summary"
android:dialogTitle ="@string/vibrate_time_dialogTitle"
android:inputType ="number"
android:numeric ="integer"
android:maxLength ="3"
/>
</ PreferenceCategory >
</ PreferenceScreen >

* This source code was highlighted with Source Code Highlighter .
The root element of the preference xml file should always be PreferenceScreen. Nested elements can also be different subclasses of Preference (including also PreferenceScreen). In our file, all nested elements are EditTextPreference. This class is useful for showing the user a dialog box in which TextEdit he can enter a value. Now more about some of the EditTextPreference attributes:
- android: key = "@ string / shake_count_id" - the key by which we refer to SharedPreferences to read or write the value
- android: title = "@ string / shake_count_title" - title (inscription in large letters in PreferenceActivity)
- android: summary = "@ string / shake_count_summary" - a brief description of the option
- android: dialogTitle = "@ string / shake_count_dialogTitle" - popup dialog header
- android: numeric = "integer" - indicate that the input method must be numeric
Create a new activity with settings (see Preferences.java) and do not forget to specify it in AndroidManifest:
< activity android:name =".activities.Preferences"
android:label ="@string/app_name" >
</ activity >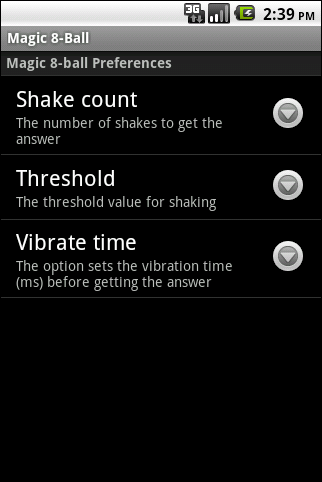

Now, the user can change the values of some settings, it remains for us to begin to read them correctly. To get an instance of SharedPreferences, we will call the PreferenceManager.getDefaultSharedPreferences (this) method. We have the keys for which we store the data, how do we read them? .. For example, the vibration time is: vibrator.vibrate (Integer.parseInt (preferences.getString (getString (R.string.vibrate_time_id), Defaults.VIBRATE_TIME))) );
Unfortunately, preferences.getInt (...) stubbornly throws a ClassCastException. This seems to be due to the fact that the preferences are stored as strings. The remaining values are read on the same principle. By changing the value of the threshold, we can make sure that a different force is needed to shake the ball in response.
PS
What else can be added to the application? It can be made more user friendly. For example, add a track bar instead of a window with values to change the threshold of sensitivity, and when you first start, ask to shake to automatically calibrate the ball. You can also create an answer editor in the application so that the user can add them according to their locale.
Source: https://habr.com/ru/post/108948/
All Articles