Avaya IP Office for Dummies
For Habr.
After a long lull, I want to devote this article to telephony and conference calling. Actually, I am a specialist of a different profile and I am engaged in networks and equipment, but on duty I ran into PBX.
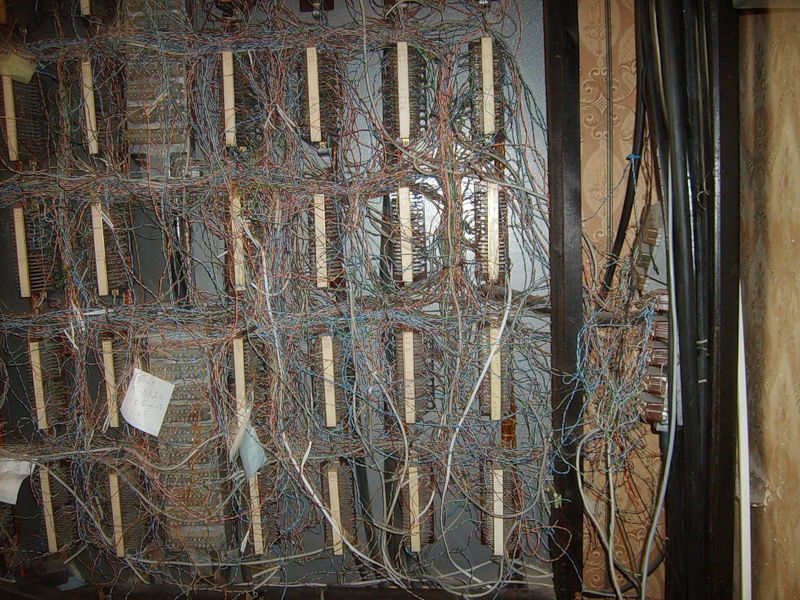
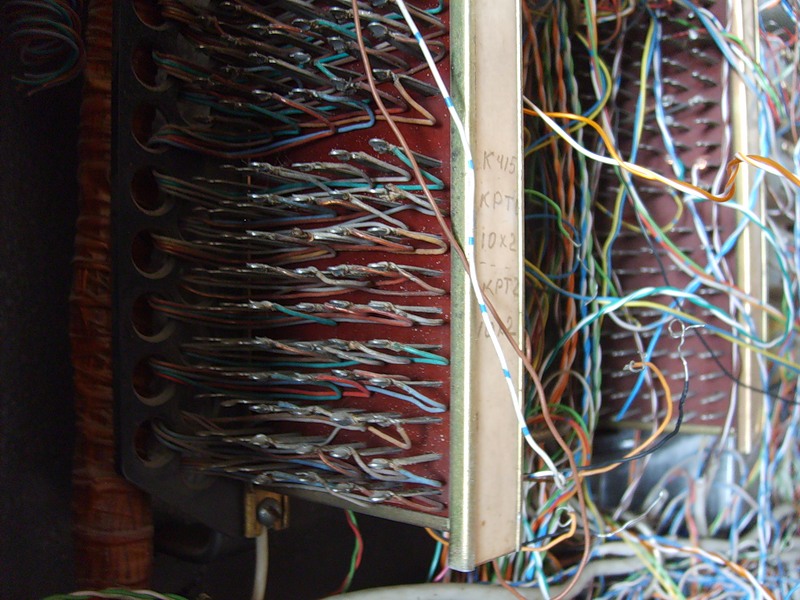
I used to consider classical telephony to be a mystical sphere of knowledge, mysterious and inexplicable. Over time, of course, it turns out that this is a fallacy, but an unpleasant aftermath of the amount of information remains. If for IP on the Internet, a lot of literature, forums, FAQ and other things, and only lazy did not write their articles on this topic, then with telephony more difficult. For me, a person who came to telephony from IP networks, it looks like a secret art, a tradition passed down from generation to generation, especially when you look at the terrifying look of Soviet wall-sized plinths in which telephone wires are bolted or PBX , from which the twisted wires diverge in all directions, like the hair of the Gorgon medusa.
')
In fact, finding how complete and understandable howto to install some PBXs is not so simple. The documentation is there, but it is very voluminous, the information is fragmented and it takes quite a lot of time to get into the essence of the matter.
Of course, reading howto is only the top layer of knowledge, practice without theory. But often you start with this, and over time the theoretical base accumulates. In the end, after graduating from vocational school no one forbids to go to university.
So here is the same story with Avaya. There are not many forums (they are: http://avaya.linkme.ru/ or http://www.tek-tips.com/ , but can they be compared with the abundance of websites, blogs and forums dedicated to the same switching or routing), search engine queries are usually thrown on suppliers, on the official website, on descriptions. Elementary, I could not find the decoding of the letters CO in the term CO-Trunk from the first call.
I’ll say right away that I am not a telephony guru - just a novice specialist, but faced with such difficulties in setting up, I decided to create a small manual for setting up IP Office. Criticism is not only relevant, but desirable. I hope that the content of this publication, coupled with your competent comments, will in some way help newcomers.
This article on nag.ru led to a terrible holivar. It is possible to extract the useful grain from it, but still it is not the result that I expected. I hope now to meet a wave of criticism of the article and my actions, and not the implementation of the telephone network on different equipment.
So, it will be about setting up the hardware-software complex IP-Office. This is one of Avaya product lines that is incomparably easier and clearer to configure than, for example, Definity.
In previous Avaya models, control took place via the COM port via a CLI-like interface - Avaya Terminal Emulator. Intuitively, it is not clear and you need to spend some time to put together a general impression of the principles of management.
Those who see him for the first time turn away in disgust and at times there is reason to silently agree with them.
The IP Office has a windows-based management application that takes place via the LAN port, that is, in fact, via any IP network.
The beauty of the station is that it is modular and universal, it can work with analog, digital and IP devices, and can connect to the operator’s network via E1, analog lines and IP. Of course, everything is solved by individual boards / modules and licenses. Licenses are just Avaya's scourge. Everything is decided by their presence and capacity. In addition, out of the box (without additional modules) supports conference calls to 64 subscribers. This claimed function actually implies a huge hemorrhoids in terms of settings.
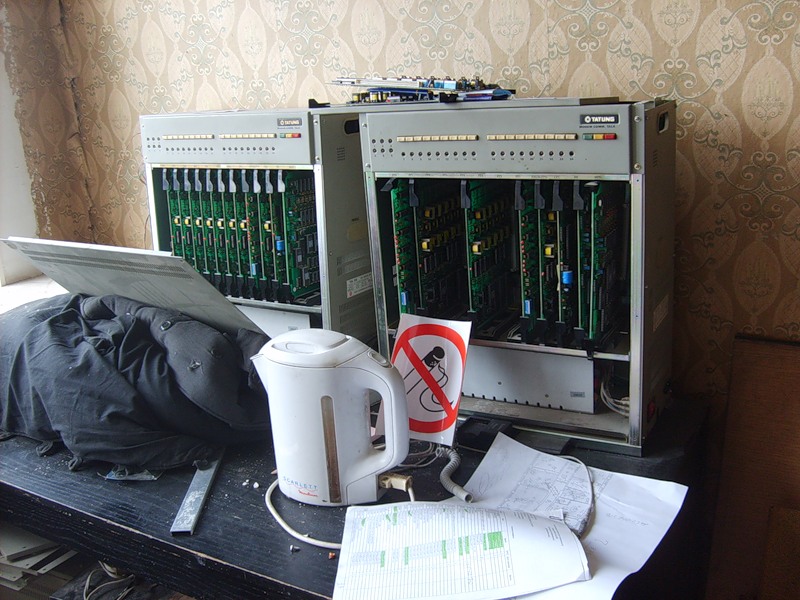
So, on the table I fell IP Office 500. A nice piece of iron, similar to a switch.
Management through the Manager program, viewing station status, current alarms and events — System Status, tracing via Monitor, telephone management, and simple conference call types — Phone Manager. Soft-console - a more advanced management interface and the ability to organize two conference rooms, X-Portal - a web interface, VoiceMail Pro - a powerful program for creating IVR and conference collection.
It all starts with iron. The largest box of delivery is the Avaya server. It has four slots for boards on the front panel, eight expansion ports on the back, LAN, WAN, COM, Compact Flash ports. We supplied an expansion module for 30 analog lines, a sound compression card and a daughter board for organizing trunks. Inserted one by one:


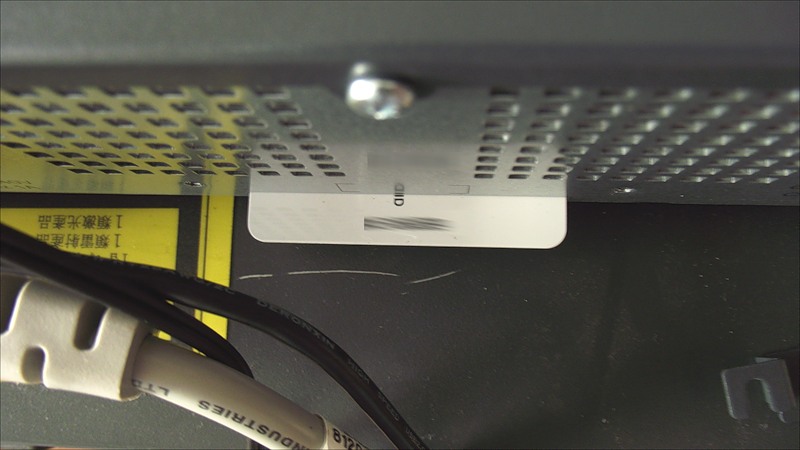
Also included must be a smart card - this is the main license key of the station. In general, there are four types of keys: a smart card (like a normal bank card with a chip), a USB key, a key for a com port and a parallel one. But for IPO500, only a smart card is suitable. This is quite convenient, because there is no need to allocate a special computer for the license server. The smart card is inserted under the metal plug on the rear panel with the serial number up.

If it is not inserted, inserted incorrectly or damaged, it will issue a corresponding message on the PBX console.
The expansion module (in my case on 30 analog lines) is connected by its Extension port to the free Extension Port on the server.
The COM port is used to monitor PBX boot logs, view errors (such as the absence of a smart card) and send AT commands. (The following parameters are used for the connection: 38400, 8N1, without flow control).
Port for Compact Flash - port for Compact Flash. The card is used as a directory of the tftp server (Hold Music storage, telephone recordings).
LAN port for connecting to a local network. The default is 192.168.42.1/24. Through it there is a setup, IP phones and computers are connected to it for management of phones and conference.
The WAN port has an address of 192.168.43.1/24. It can also be used for configuration. In addition, an operator’s network can be connected to it if it provides telephony via IP protocol or, for example, to make a transit to another PBX.
On older versions of Avaya, there was no such joy and I had to buy a separate module.
So, suppose we have a bare IP Office station and go all the way to configure it from scratch.
Enable and Upgrade
After switching on, the CPU indicator on the rear panel flashes red, as well as the indicators on the board on the front panel.
Normal mode - flashing green every five seconds. The official documentation says only that this may be due to an uninstalled smart card. In the unofficial there is a mention that this will happen until an upgrade is made.
Upgrade is done through the same Manager application. Software is not included, you need to download it, for example, from here: ipofficeinfo.ru. There is still a smart selection of documentation and manuals (all in English). However, all the same can be obtained at support.avaya.com.
Absolutely necessary thing - Administrator. It includes the most important applications. We download it, but there is a remark that is not indicated anywhere and the managers initially did not say it, as it was not said about possible installation problems: switching to the current release 6.0 is a paid thing and costs about $ 100. The fifth version, almost the same as the sixth, is free. Accordingly, you need to download 5.0. The pre-installed firmware version 4.0, as I said above, is non-working.
If you even progredil to 6.0, then do not worry, download the fifth, put Admin5.0 instead of 6.0 and in the same way do Upgrade. In the sixth most of the functions will be unavailable up to the internal telephony. System Status, for example, will not work either.
How to make Upgrade? After installing the software. Assign an IP address from the 192.168.42.0/24 network to the machine connected to the PBX (it is advised to take after 200, because up to 200 are used for the DHCP pool). Next, run the Manager. You can view the PBX configuration (File> open configuration) or immediately put it on Upgrade (File> Advanced> Upgrade) in your list should automatically appear your PBX. To accelerate, you can set a fixed address at the bottom of the window instead of the broadcast 255.255.255.255. Next will be the current and available software version:
In principle, problems should not arise here. Of course, the station must respond to ping. If this is not the case, then either check the firewall or the PBX address. You can check it by connecting the console port to it during the download. The IP address will be somewhere in the hexadecimal notation.
It is advisable to connect the computer to the PBX directly so that there will be no trouble during the update process. And one more note (it is unlikely that you plan to do this): update is not possible when connecting from a virtual machine (did not check - perhaps Upgrade is impossible from another subnet in principle).
So, click Upgrade - the process is over. You can read about the Validated mode in the documentation: IP Office Installation Guide.
After the reboot, the CPU indicator flashes green, and the indicators on the board, if no connecting lines are connected, will flash in turn red-green.
You can proceed to configure.
Where to without planning? Nowhere. Develop a numbering plan first. Take all the addresses provided by the operator and decide what the correspondence will be between external and internal. Who through what will call, to whom the call which has come on this city will be directed. Also in advance should worry about redirection, and programming buttons on digital devices.
For example, choose the following numbering:
external - internal
11-11-11 - 401 Ivanov
11-11-12 - 402 Petrov
11-11-13 - 403 Sidorov
11-11-14 - 404 Pupkin
For simplicity, the correspondence is straightforward. That is, the caller on 11-11-14 gets on the internal number 404, and the call from the number 404 occurs through the city number 11-11-14.
Let us set up the same call forwarding path for the memorable Vasily Pupkin: in case of busy or unanswered, transfer the call first to 403, then to 401.
The Manager window looks frightening at first glance, but after setting up, most of it will become clear. On the left are the groups of settings, on the right a large window of the settings themselves.
The procedure for making changes in principle does not matter. But I will pass the most convenient algorithm.
Let's start with the basic station settings. Name. All clear. It is desirable to specify the address of the NTP server. This is very useful for logging and for the proper operation of the Time Profile.
LAN1 and LAN2 (aka WAN). We configure IP addresses. During the final configuration, we register the address from the desired network and do not forget that we also need the default route, which is configured in the IP Route group.
On the VoIP tab, select the parameters for the operation of IP phones. For example, I do not need SIP, so I will disable it:
The codec is selected on the Telephony tab. If the channels are good, then do not hesitate to choose G711.
When you save changes, you must first apply them with the Ok button, then select File> Save Configuration or the diskette icon in the top panel. After that, he will offer an application: now, when there will be no active calls.

After changing the IP address of the station, do not forget to change the TCP / IP settings and the IP address of the PBX in the Manager application on your computer.
Next, go to the outer lines. They are determined automatically in accordance with the installed fee and licenses. In our example, the two E1 lines. Here, on the first tab, the E1 parameters are configured (in fact, the parameters of the line, whatever type it is). In fact, all you need is to find out whether your operator (who gives you telephony) is using CRC and how you set up a synchronization source - Networkside or Userside. Normally CRC is not used, so we remove the corresponding check: CRC Checking, synchronization from the operator - check that the Network is in the field of Clock Quality. It is also recommended to set the parameter Add 'Not end-to-end ISDN' Information Element - Always.
On the last tab, we remove all channels and then any group will use any E1 timeslot. In rare cases, strict binding may be required.
Here I have a problem that I cannot solve yet. If two lines are used and one group is configured in both (to make calls on both), then when you call through the second line a tone signal is sent to the handset, the connection lasts for a few seconds longer and sometimes ends. No one has been able to help.
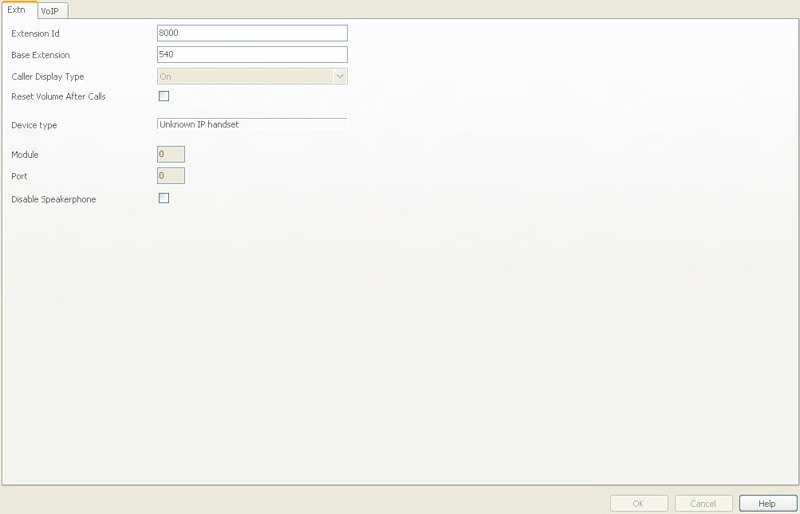
In an IPO, there is an Extension ID - this is a fixed number tied to the physical port of the PBX (starting with 101, which corresponds to the first port, 202 to the second one, and so on). Base extension is an internal number (default starts from 201). The Extension group itself allows you to customize the correspondence table between the Extension ID and the Base Extension. Here you need to stick to your numbering plan. To change the numbering, select Extension Renumber ... For example, change the numbering so that Vasily Pupkin has the number 404:
Distribution of outgoing external lines by internal numbers. If, for example, you need Vasily to call the city through the number 11-11-14, then you should add a new ARS (or copy the old one). The ARS route number is assigned automatically (it will be used in the Users settings group in the Short Codes panel), the city line number and the following patterns:
This procedure is repeated for the telephone numbers of Ivanov, Petrov and Sidorov:

Here, for each Extension (more precisely, User), a separate setting is performed for a variety of parameters. You can set a name, password for access from Phone Manager, use of voice mail, Phone Manager type (Lite or Pro) and its mode of operation.

The main tab is Short codes. Here we set the prefix for access to the city line. The Line Group ID indicates the same ARS number configured above. And if Vasily has to call through the number 11-11-14, we specify 54. When you re-open this record, he will automatically substitute the number.


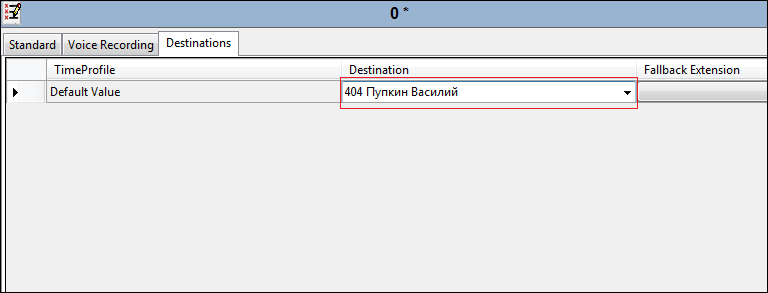
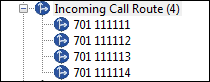
For the principle telephony operability, all other parameters of the Users group are not critical. For the user, you can configure conditional or unconditional forwarding in the Forwarding tab or Phone Manager operation mode. Incoming Call Route The name speaks for itself. Where the call will be transferred to the city.

The Destination tab simply indicates the internal telephone number.
Allows you to customize the forwarding or group of devices. Set up the redirect for Pupkin:

At the current setting, when calling to the number 404, the call will be transferred alternately with a period of 15 seconds to the numbers listed in the table. In order for forwarding to work, you need to do the following:
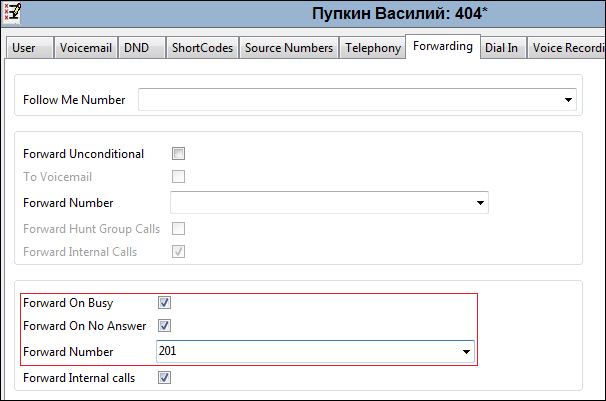
Now, when calling the number 404 (or 11-11-14) in case of no answer within 15 seconds or the phone is busy for Vasily, the call will go for a walk through the list of numbers. You can also specify a group call: all phones of the group ring at once. You can take the call on any:
Besides the fact that some functions are limited by hardware (the need to buy a fee), they are also limited by licenses. If you thought about buying IP Office, take care of the necessary licenses in advance. Actually, they are needed for everything: on expansion cards, on E1 stream cards, on all applications used (the applications themselves either come bundled or, more likely, download from the site where it is problematic to find them).
To obtain license keys, you must provide the supplier with the serial number of your smart card - this is the one that was in the delivery of the red envelope. Activating keys is simple - either by entering / copying the license key in the appropriate field, or simply by pressing Ctrl + V after you copy the key number.
At first, all licenses will have the status of Unknown, but as soon as you click Save Configuration, they must acquire the status Valid, which is good.
Saving settings
To apply the settings is not enough to click Ok, you must also select File> Save Configuration. In this case, the configuration is sent to the PBX. Each such operation requires authorization and after applying the settings, the current session is reset and you have to reconnect to the PBX. In the case when you need to restart the IP Office (global settings), this is quite logical, but in my opinion it is inconvenient to do this each time.
I will say a few more words about IP phones. Their use is also limited to licenses. The license spelled the number of simultaneous calls from IP or IP-phones with analog or digital. At the same time, calls from IP to IP are not limited. They are added as a new Extension with the appropriate settings.
On the phone, its IP, IP PBX, gateway, file server address for updating the firmware and the phone number (Extension) are configured. This is enough for the efficiency of the device.
Other applications !!!
In addition to the Manager, there are a number of other applications:
Monitor
Phone manager
Softconsole
Voicemail
X-Portal
In a separate short note I will talk about the creation of the conference and the functions of the above programs.
If you have questions that you cannot resolve on your own, get ready to pay for the support. The manufacturer sends technical questions to distributors, and they, in turn, say that they are not engaged in support. Such is the modern politics.
I don’t know how hasty my thought is, but I would like to make a small tutorial with tips and examples of IP Office configuration, based on the text above and your comments. I believe that in the conditions of so little information, especially in Russian, it will be very useful.
After a long lull, I want to devote this article to telephony and conference calling. Actually, I am a specialist of a different profile and I am engaged in networks and equipment, but on duty I ran into PBX.
I used to consider classical telephony to be a mystical sphere of knowledge, mysterious and inexplicable. Over time, of course, it turns out that this is a fallacy, but an unpleasant aftermath of the amount of information remains. If for IP on the Internet, a lot of literature, forums, FAQ and other things, and only lazy did not write their articles on this topic, then with telephony more difficult. For me, a person who came to telephony from IP networks, it looks like a secret art, a tradition passed down from generation to generation, especially when you look at the terrifying look of Soviet wall-sized plinths in which telephone wires are bolted or PBX , from which the twisted wires diverge in all directions, like the hair of the Gorgon medusa.
')
In fact, finding how complete and understandable howto to install some PBXs is not so simple. The documentation is there, but it is very voluminous, the information is fragmented and it takes quite a lot of time to get into the essence of the matter.
Of course, reading howto is only the top layer of knowledge, practice without theory. But often you start with this, and over time the theoretical base accumulates. In the end, after graduating from vocational school no one forbids to go to university.
So here is the same story with Avaya. There are not many forums (they are: http://avaya.linkme.ru/ or http://www.tek-tips.com/ , but can they be compared with the abundance of websites, blogs and forums dedicated to the same switching or routing), search engine queries are usually thrown on suppliers, on the official website, on descriptions. Elementary, I could not find the decoding of the letters CO in the term CO-Trunk from the first call.
I’ll say right away that I am not a telephony guru - just a novice specialist, but faced with such difficulties in setting up, I decided to create a small manual for setting up IP Office. Criticism is not only relevant, but desirable. I hope that the content of this publication, coupled with your competent comments, will in some way help newcomers.
This article on nag.ru led to a terrible holivar. It is possible to extract the useful grain from it, but still it is not the result that I expected. I hope now to meet a wave of criticism of the article and my actions, and not the implementation of the telephone network on different equipment.
So, it will be about setting up the hardware-software complex IP-Office. This is one of Avaya product lines that is incomparably easier and clearer to configure than, for example, Definity.
In previous Avaya models, control took place via the COM port via a CLI-like interface - Avaya Terminal Emulator. Intuitively, it is not clear and you need to spend some time to put together a general impression of the principles of management.
Those who see him for the first time turn away in disgust and at times there is reason to silently agree with them.
The IP Office has a windows-based management application that takes place via the LAN port, that is, in fact, via any IP network.
The beauty of the station is that it is modular and universal, it can work with analog, digital and IP devices, and can connect to the operator’s network via E1, analog lines and IP. Of course, everything is solved by individual boards / modules and licenses. Licenses are just Avaya's scourge. Everything is decided by their presence and capacity. In addition, out of the box (without additional modules) supports conference calls to 64 subscribers. This claimed function actually implies a huge hemorrhoids in terms of settings.
Ownership experience
So, on the table I fell IP Office 500. A nice piece of iron, similar to a switch.
Management through the Manager program, viewing station status, current alarms and events — System Status, tracing via Monitor, telephone management, and simple conference call types — Phone Manager. Soft-console - a more advanced management interface and the ability to organize two conference rooms, X-Portal - a web interface, VoiceMail Pro - a powerful program for creating IVR and conference collection.
Iron
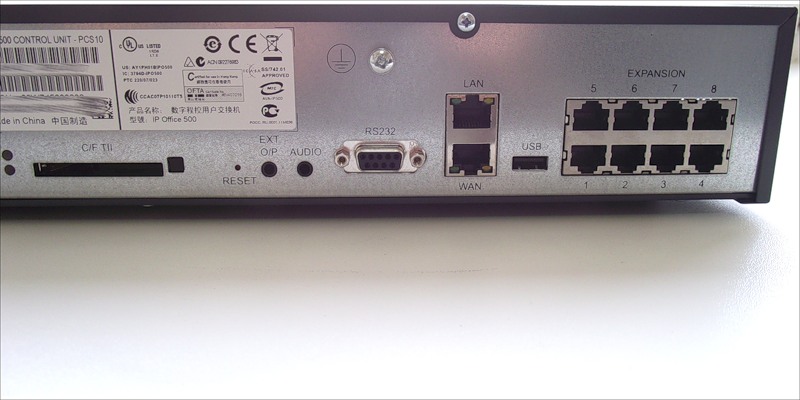
It all starts with iron. The largest box of delivery is the Avaya server. It has four slots for boards on the front panel, eight expansion ports on the back, LAN, WAN, COM, Compact Flash ports. We supplied an expansion module for 30 analog lines, a sound compression card and a daughter board for organizing trunks. Inserted one by one:
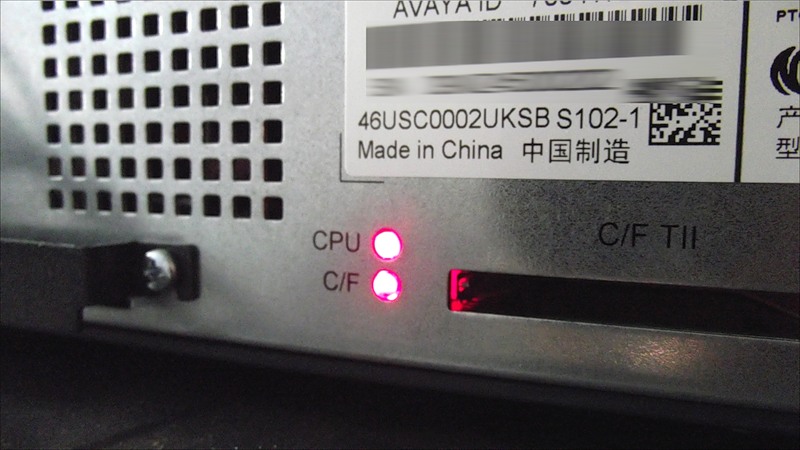
Also included must be a smart card - this is the main license key of the station. In general, there are four types of keys: a smart card (like a normal bank card with a chip), a USB key, a key for a com port and a parallel one. But for IPO500, only a smart card is suitable. This is quite convenient, because there is no need to allocate a special computer for the license server. The smart card is inserted under the metal plug on the rear panel with the serial number up.
If it is not inserted, inserted incorrectly or damaged, it will issue a corresponding message on the PBX console.
The expansion module (in my case on 30 analog lines) is connected by its Extension port to the free Extension Port on the server.
The COM port is used to monitor PBX boot logs, view errors (such as the absence of a smart card) and send AT commands. (The following parameters are used for the connection: 38400, 8N1, without flow control).
Port for Compact Flash - port for Compact Flash. The card is used as a directory of the tftp server (Hold Music storage, telephone recordings).
LAN port for connecting to a local network. The default is 192.168.42.1/24. Through it there is a setup, IP phones and computers are connected to it for management of phones and conference.
The WAN port has an address of 192.168.43.1/24. It can also be used for configuration. In addition, an operator’s network can be connected to it if it provides telephony via IP protocol or, for example, to make a transit to another PBX.
On older versions of Avaya, there was no such joy and I had to buy a separate module.
So, suppose we have a bare IP Office station and go all the way to configure it from scratch.
Station setup
Enable and Upgrade
After switching on, the CPU indicator on the rear panel flashes red, as well as the indicators on the board on the front panel.
Normal mode - flashing green every five seconds. The official documentation says only that this may be due to an uninstalled smart card. In the unofficial there is a mention that this will happen until an upgrade is made.
Upgrade is done through the same Manager application. Software is not included, you need to download it, for example, from here: ipofficeinfo.ru. There is still a smart selection of documentation and manuals (all in English). However, all the same can be obtained at support.avaya.com.
Absolutely necessary thing - Administrator. It includes the most important applications. We download it, but there is a remark that is not indicated anywhere and the managers initially did not say it, as it was not said about possible installation problems: switching to the current release 6.0 is a paid thing and costs about $ 100. The fifth version, almost the same as the sixth, is free. Accordingly, you need to download 5.0. The pre-installed firmware version 4.0, as I said above, is non-working.
If you even progredil to 6.0, then do not worry, download the fifth, put Admin5.0 instead of 6.0 and in the same way do Upgrade. In the sixth most of the functions will be unavailable up to the internal telephony. System Status, for example, will not work either.
Upgrade
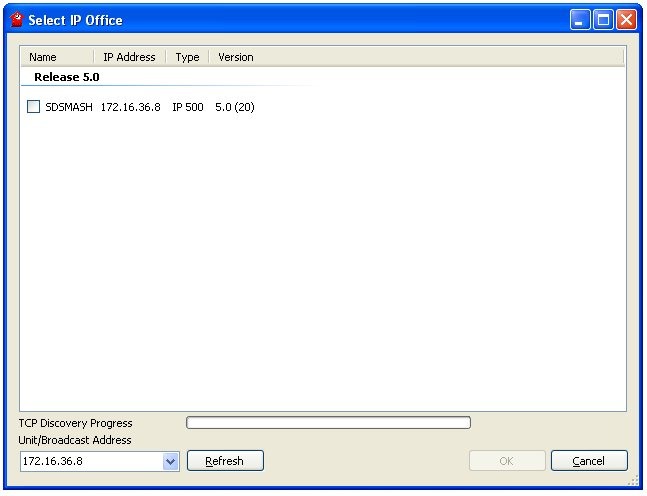
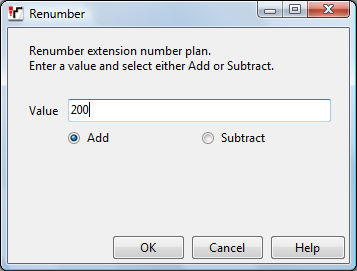
How to make Upgrade? After installing the software. Assign an IP address from the 192.168.42.0/24 network to the machine connected to the PBX (it is advised to take after 200, because up to 200 are used for the DHCP pool). Next, run the Manager. You can view the PBX configuration (File> open configuration) or immediately put it on Upgrade (File> Advanced> Upgrade) in your list should automatically appear your PBX. To accelerate, you can set a fixed address at the bottom of the window instead of the broadcast 255.255.255.255. Next will be the current and available software version:
In principle, problems should not arise here. Of course, the station must respond to ping. If this is not the case, then either check the firewall or the PBX address. You can check it by connecting the console port to it during the download. The IP address will be somewhere in the hexadecimal notation.
It is advisable to connect the computer to the PBX directly so that there will be no trouble during the update process. And one more note (it is unlikely that you plan to do this): update is not possible when connecting from a virtual machine (did not check - perhaps Upgrade is impossible from another subnet in principle).
So, click Upgrade - the process is over. You can read about the Validated mode in the documentation: IP Office Installation Guide.
After the reboot, the CPU indicator flashes green, and the indicators on the board, if no connecting lines are connected, will flash in turn red-green.
You can proceed to configure.
Dial plan
Where to without planning? Nowhere. Develop a numbering plan first. Take all the addresses provided by the operator and decide what the correspondence will be between external and internal. Who through what will call, to whom the call which has come on this city will be directed. Also in advance should worry about redirection, and programming buttons on digital devices.
For example, choose the following numbering:
external - internal
11-11-11 - 401 Ivanov
11-11-12 - 402 Petrov
11-11-13 - 403 Sidorov
11-11-14 - 404 Pupkin
For simplicity, the correspondence is straightforward. That is, the caller on 11-11-14 gets on the internal number 404, and the call from the number 404 occurs through the city number 11-11-14.
Let us set up the same call forwarding path for the memorable Vasily Pupkin: in case of busy or unanswered, transfer the call first to 403, then to 401.
Customization
The Manager window looks frightening at first glance, but after setting up, most of it will become clear. On the left are the groups of settings, on the right a large window of the settings themselves.
The procedure for making changes in principle does not matter. But I will pass the most convenient algorithm.
System
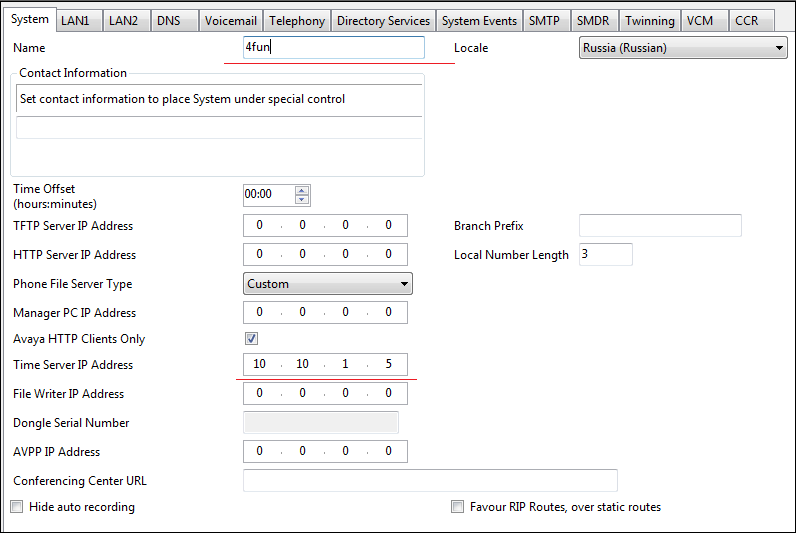
Let's start with the basic station settings. Name. All clear. It is desirable to specify the address of the NTP server. This is very useful for logging and for the proper operation of the Time Profile.
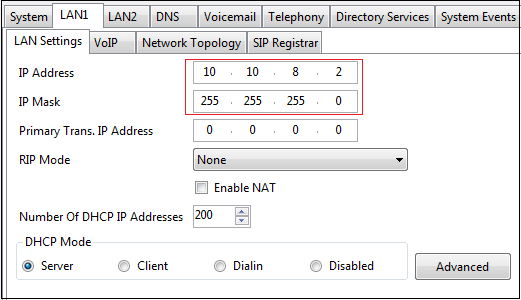
LAN1 and LAN2 (aka WAN). We configure IP addresses. During the final configuration, we register the address from the desired network and do not forget that we also need the default route, which is configured in the IP Route group.
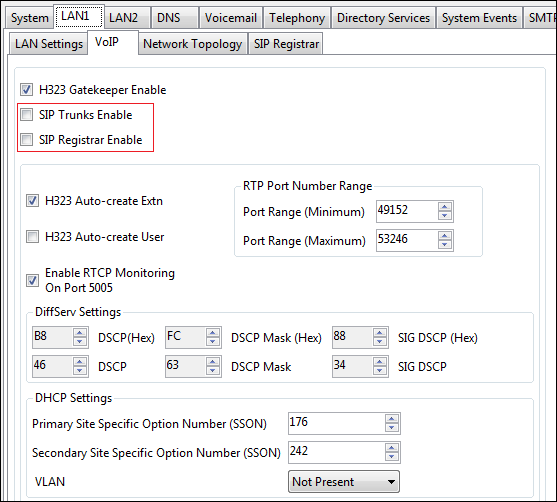
On the VoIP tab, select the parameters for the operation of IP phones. For example, I do not need SIP, so I will disable it:
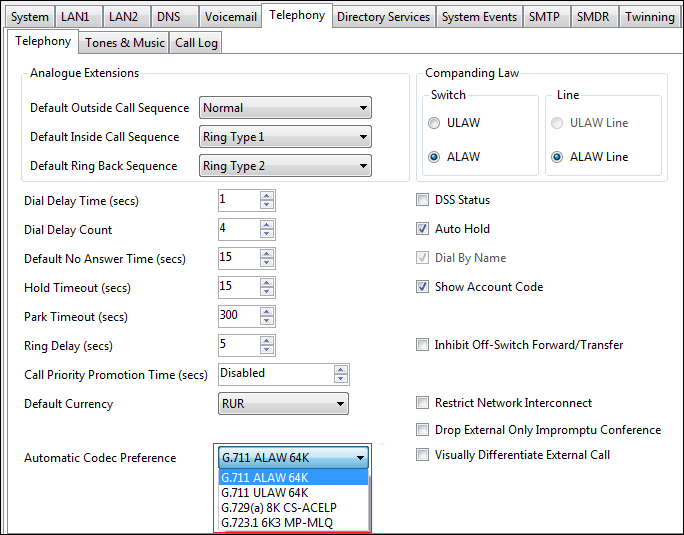
The codec is selected on the Telephony tab. If the channels are good, then do not hesitate to choose G711.
When you save changes, you must first apply them with the Ok button, then select File> Save Configuration or the diskette icon in the top panel. After that, he will offer an application: now, when there will be no active calls.
After changing the IP address of the station, do not forget to change the TCP / IP settings and the IP address of the PBX in the Manager application on your computer.
Line
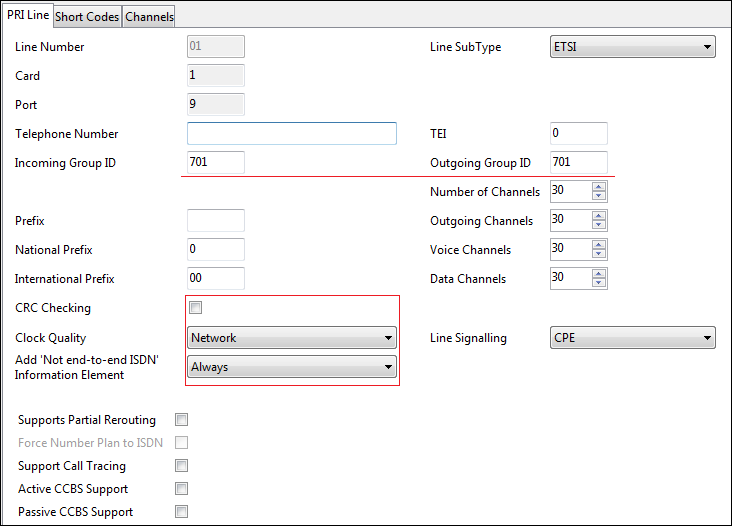
Next, go to the outer lines. They are determined automatically in accordance with the installed fee and licenses. In our example, the two E1 lines. Here, on the first tab, the E1 parameters are configured (in fact, the parameters of the line, whatever type it is). In fact, all you need is to find out whether your operator (who gives you telephony) is using CRC and how you set up a synchronization source - Networkside or Userside. Normally CRC is not used, so we remove the corresponding check: CRC Checking, synchronization from the operator - check that the Network is in the field of Clock Quality. It is also recommended to set the parameter Add 'Not end-to-end ISDN' Information Element - Always.
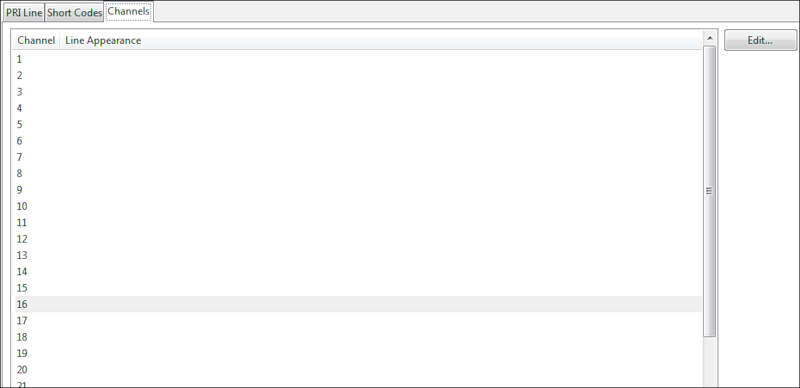
On the last tab, we remove all channels and then any group will use any E1 timeslot. In rare cases, strict binding may be required.
Here I have a problem that I cannot solve yet. If two lines are used and one group is configured in both (to make calls on both), then when you call through the second line a tone signal is sent to the handset, the connection lasts for a few seconds longer and sometimes ends. No one has been able to help.
Extension
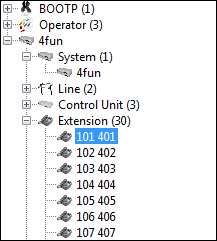
In an IPO, there is an Extension ID - this is a fixed number tied to the physical port of the PBX (starting with 101, which corresponds to the first port, 202 to the second one, and so on). Base extension is an internal number (default starts from 201). The Extension group itself allows you to customize the correspondence table between the Extension ID and the Base Extension. Here you need to stick to your numbering plan. To change the numbering, select Extension Renumber ... For example, change the numbering so that Vasily Pupkin has the number 404:
ARS (Alternate Route Selection)
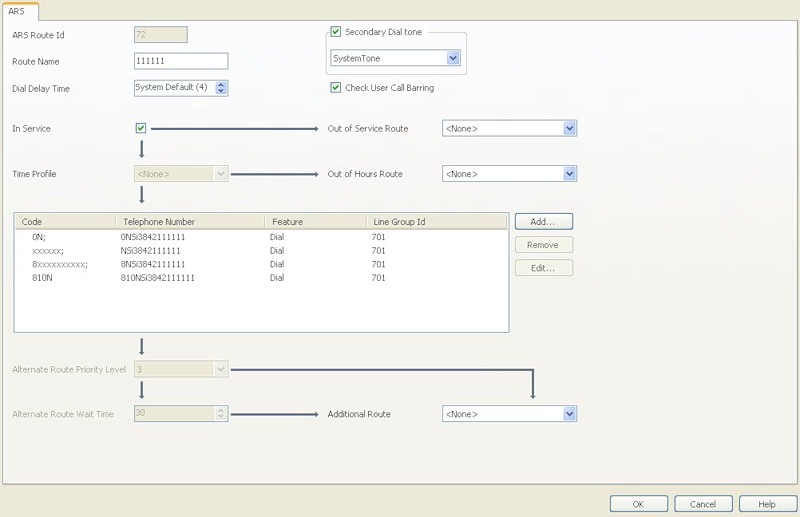
Distribution of outgoing external lines by internal numbers. If, for example, you need Vasily to call the city through the number 11-11-14, then you should add a new ARS (or copy the old one). The ARS route number is assigned automatically (it will be used in the Users settings group in the Short Codes panel), the city line number and the following patterns:
This procedure is repeated for the telephone numbers of Ivanov, Petrov and Sidorov:
Users
Here, for each Extension (more precisely, User), a separate setting is performed for a variety of parameters. You can set a name, password for access from Phone Manager, use of voice mail, Phone Manager type (Lite or Pro) and its mode of operation.
The main tab is Short codes. Here we set the prefix for access to the city line. The Line Group ID indicates the same ARS number configured above. And if Vasily has to call through the number 11-11-14, we specify 54. When you re-open this record, he will automatically substitute the number.
For the principle telephony operability, all other parameters of the Users group are not critical. For the user, you can configure conditional or unconditional forwarding in the Forwarding tab or Phone Manager operation mode. Incoming Call Route The name speaks for itself. Where the call will be transferred to the city.
The Destination tab simply indicates the internal telephone number.
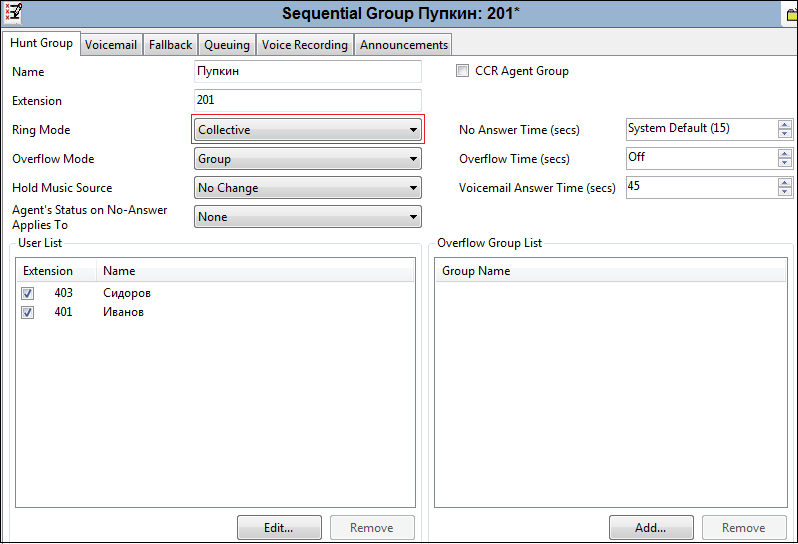
Hunt group
Allows you to customize the forwarding or group of devices. Set up the redirect for Pupkin:
At the current setting, when calling to the number 404, the call will be transferred alternately with a period of 15 seconds to the numbers listed in the table. In order for forwarding to work, you need to do the following:
Now, when calling the number 404 (or 11-11-14) in case of no answer within 15 seconds or the phone is busy for Vasily, the call will go for a walk through the list of numbers. You can also specify a group call: all phones of the group ring at once. You can take the call on any:
License
Besides the fact that some functions are limited by hardware (the need to buy a fee), they are also limited by licenses. If you thought about buying IP Office, take care of the necessary licenses in advance. Actually, they are needed for everything: on expansion cards, on E1 stream cards, on all applications used (the applications themselves either come bundled or, more likely, download from the site where it is problematic to find them).
To obtain license keys, you must provide the supplier with the serial number of your smart card - this is the one that was in the delivery of the red envelope. Activating keys is simple - either by entering / copying the license key in the appropriate field, or simply by pressing Ctrl + V after you copy the key number.
At first, all licenses will have the status of Unknown, but as soon as you click Save Configuration, they must acquire the status Valid, which is good.
Saving settings
To apply the settings is not enough to click Ok, you must also select File> Save Configuration. In this case, the configuration is sent to the PBX. Each such operation requires authorization and after applying the settings, the current session is reset and you have to reconnect to the PBX. In the case when you need to restart the IP Office (global settings), this is quite logical, but in my opinion it is inconvenient to do this each time.
IP phones
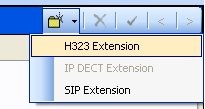
I will say a few more words about IP phones. Their use is also limited to licenses. The license spelled the number of simultaneous calls from IP or IP-phones with analog or digital. At the same time, calls from IP to IP are not limited. They are added as a new Extension with the appropriate settings.
On the phone, its IP, IP PBX, gateway, file server address for updating the firmware and the phone number (Extension) are configured. This is enough for the efficiency of the device.
Other applications !!!
In addition to the Manager, there are a number of other applications:
Monitor
Phone manager
Softconsole
Voicemail
X-Portal
In a separate short note I will talk about the creation of the conference and the functions of the above programs.
If you have questions that you cannot resolve on your own, get ready to pay for the support. The manufacturer sends technical questions to distributors, and they, in turn, say that they are not engaged in support. Such is the modern politics.
I don’t know how hasty my thought is, but I would like to make a small tutorial with tips and examples of IP Office configuration, based on the text above and your comments. I believe that in the conditions of so little information, especially in Russian, it will be very useful.
Source: https://habr.com/ru/post/108364/
All Articles