CodeRush custom test templates. Testing the order of method calls
In our work we have to write a lot of tests. To do this quickly, we use CodeRush templates. In this article we will tell you how to create your own templates for testing. As an example, let's take the following task: test the correct order of calls to protected class methods. We will use only NUnit without the use of libraries like NMock and the like.

So let's start with the experimental object. Let's write a simple class containing several methods and having a certain order of their calls.
')
In this class, you need to check that as a result of calling the DoAction method, the BeforeAction , DoActionCore and AfterAction methods are guaranteed to be executed in the required sequence and the required number of times.
Testing will be based on writing a descendant of the SimpleClass class, which, when calling a certain method, will record that this method has been called. For simplicity, we take the usual string as a trace object and add the name of the method called there. In the test, we will verify the resulting string with the expected result.
Define a naming convention for classes such as TestName_Original_Class . By this we simplify the writing of a template for tests.
Briefly about the CodeRush templates : they allow you to quickly insert frequently used code fragments in the editor, following certain rules for the substitution of names, formatting, etc. They are similar to code-snippets, but differ from them in greater intelligence, providing a number of advantages, such as application contexts, the ability to analyze existing code, the presence of commands, string providers, fields, links, and so on.
Now we start writing our own template for the heir of the class containing the trace string. Open the settings window, go to the group Editor -> Templates, a group of options for NUnit. Note that CodeRush already contains a predefined set of templates for writing NUnit tests, but we need to create another one.
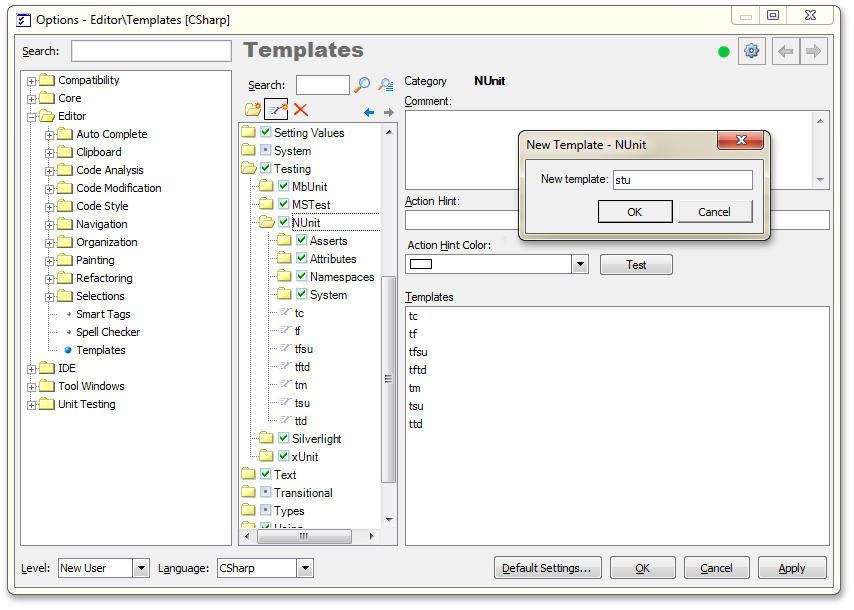
Figure 1 - Creating a new template for NUnit
Let us assign a short name to the template, for example, stu (from stub-class) and write the template body. Let's design the template in such a way that when it is activated, the name of the source class will be stored in the clipboard and after pasting, a code will be created that reflects the above rules for names.
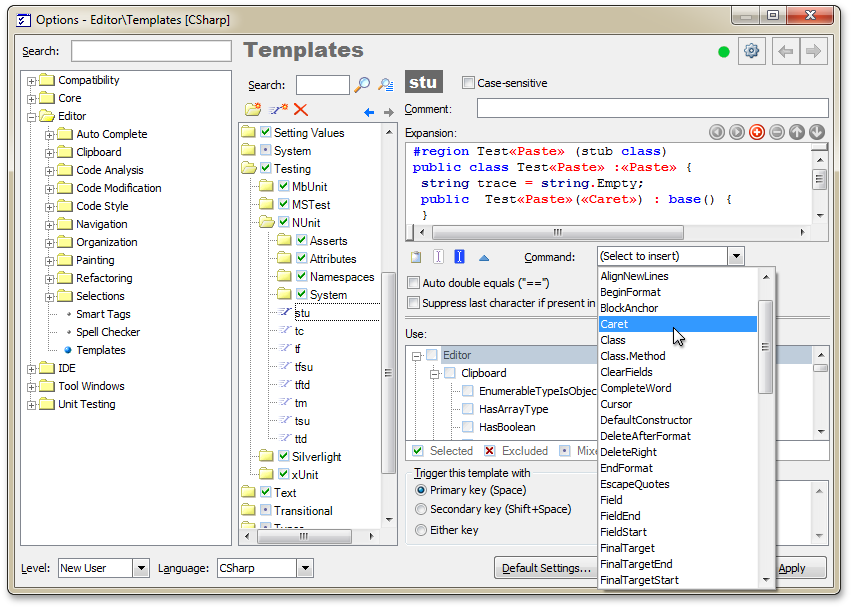
Fig. 2 - Writing the template body using predefined commands
When writing a template, we use a predefined set of commands, choosing them from the list. Such teams here are “Paste” and “Caret”.
Now it is important to indicate where this template can be run. To do this, configure the settings for using Use by setting the necessary values. We specify for it the parameter Line.OnEmptyLine.
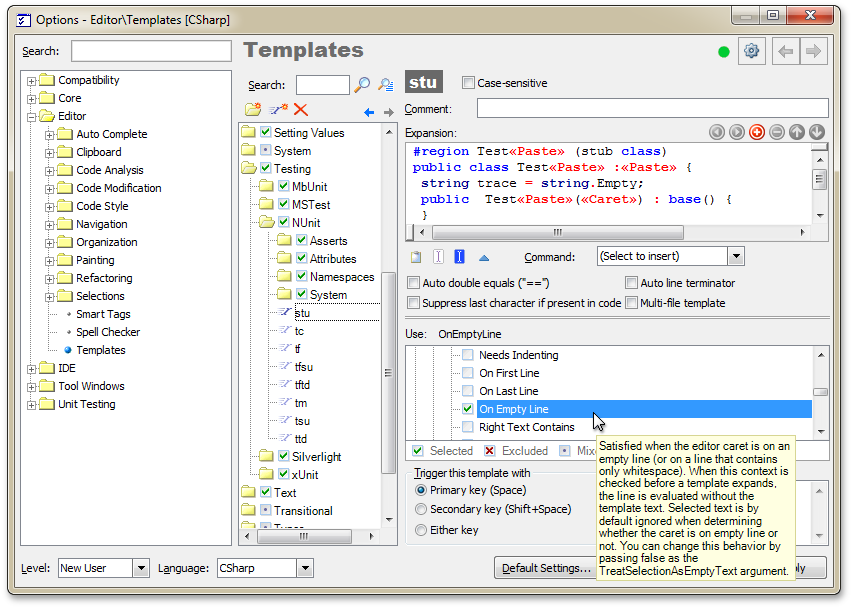
Fig. 3 - Set the scope of use of the template
Similar to the first one, we write the atr template (add trace) to add a trace string to the method.
In this case, the name of the current method will be automatically inserted when the template is activated and there is no need to first copy it to the clipboard. Define such areas of use of the template as InClass, InMethod
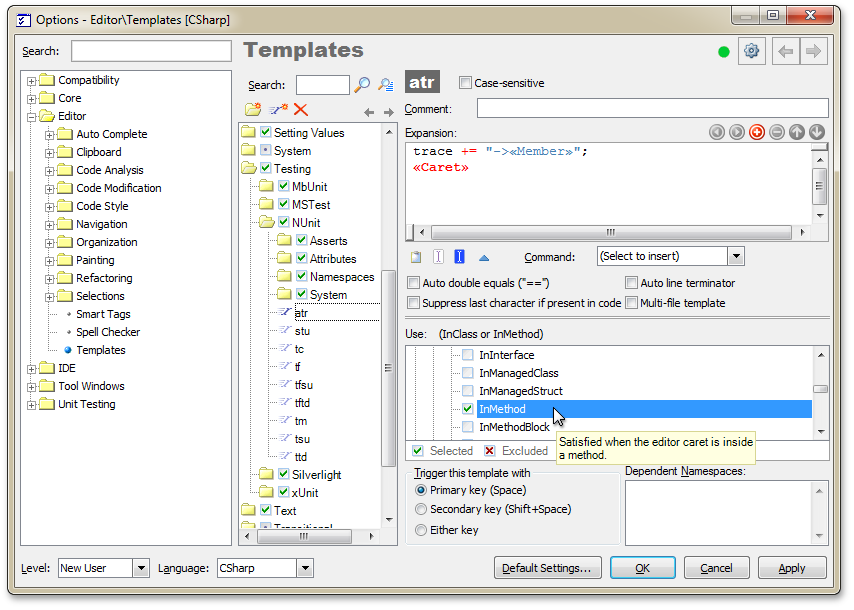
Fig. 4 - Template for inserting a trace line
Templates are ready. It should be said that you can export templates, including self-created ones, into an xml file. And, if necessary, reuse them, making the import from the previously created file, which allows you to avoid re-manual input.
How does all this work? Let's try to write a test for SimpleClass.
We need an heir class for tests. Copy the name SimpleClass to the clipboard and type stu. In place of the cursor, a template is inserted for the inherited class containing the Trace property.
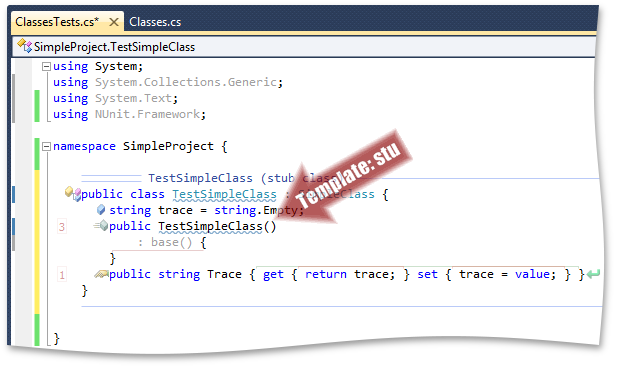
Fig. 5 - Template activation and code insertion
Now add trace information for each method we are interested in. To do this, we block these methods. For this purpose, in Visual Studio, type “over”, then press the spacebar and select the desired method names from the drop-down list, while thanking IntelliSense for not having to painfully recall their names. As a result, all necessary methods are overlapped and for the time being just call the base ones.
Now is the time to put our atr template into operation. Go through these methods, activate the template to insert a trace string. As a result, we will get methods that will add their name to the Trace property after the call.
In addition to the name, any other information related to the call can be added to the trace object, for example, call parameters, etc.
We return directly to the test. Create a TextFixture for the test group of our class. By the way, to speed up its creation, you can also write your own template, which will include methods for SetUp and TearDown. Let's declare an instance of our heir class, initialize it, and write a test for the DoAction method. The test will consist in comparing the Trace property of the inherited class after calling the method with the expected result, which reflects the correct sequence of calls to the protected class methods.
Run the test. The result is achieved - we are convinced that everything works as it should inside the class.
In conclusion, I would like to say that one of the drawbacks of the approach using trace lines is that if you change the code of the source classes and the order of calls to them, you will have to modify the tests, or rather the reference strings. Therefore, everything is good in moderation, and it is up to you to decide where and when to use this practice.
Good luck in creating convenient test patterns!
Object for testing
So let's start with the experimental object. Let's write a simple class containing several methods and having a certain order of their calls.
public class SimpleClass { public void DoAction() { BeforeAction(); try { DoActionCore(); } finally { AfterAction(); } } protected virtual void BeforeAction() { } protected virtual void AfterAction() { } protected virtual void DoActionCore() { } } ')
In this class, you need to check that as a result of calling the DoAction method, the BeforeAction , DoActionCore and AfterAction methods are guaranteed to be executed in the required sequence and the required number of times.
Testing will be based on writing a descendant of the SimpleClass class, which, when calling a certain method, will record that this method has been called. For simplicity, we take the usual string as a trace object and add the name of the method called there. In the test, we will verify the resulting string with the expected result.
Define a naming convention for classes such as TestName_Original_Class . By this we simplify the writing of a template for tests.
Customize templates
Briefly about the CodeRush templates : they allow you to quickly insert frequently used code fragments in the editor, following certain rules for the substitution of names, formatting, etc. They are similar to code-snippets, but differ from them in greater intelligence, providing a number of advantages, such as application contexts, the ability to analyze existing code, the presence of commands, string providers, fields, links, and so on.
Now we start writing our own template for the heir of the class containing the trace string. Open the settings window, go to the group Editor -> Templates, a group of options for NUnit. Note that CodeRush already contains a predefined set of templates for writing NUnit tests, but we need to create another one.
Figure 1 - Creating a new template for NUnit
Let us assign a short name to the template, for example, stu (from stub-class) and write the template body. Let's design the template in such a way that when it is activated, the name of the source class will be stored in the clipboard and after pasting, a code will be created that reflects the above rules for names.
#region Test«Paste» (stub class) public class Test«Paste» :«Paste» { string trace = string.Empty; public Test«Paste»(«Caret») : base() { } public string Trace { get { return trace; } set { trace = value; } } } #endregion Fig. 2 - Writing the template body using predefined commands
When writing a template, we use a predefined set of commands, choosing them from the list. Such teams here are “Paste” and “Caret”.
Now it is important to indicate where this template can be run. To do this, configure the settings for using Use by setting the necessary values. We specify for it the parameter Line.OnEmptyLine.
Fig. 3 - Set the scope of use of the template
Similar to the first one, we write the atr template (add trace) to add a trace string to the method.
trace += "->«Member»"; «Caret» In this case, the name of the current method will be automatically inserted when the template is activated and there is no need to first copy it to the clipboard. Define such areas of use of the template as InClass, InMethod
Fig. 4 - Template for inserting a trace line
Templates are ready. It should be said that you can export templates, including self-created ones, into an xml file. And, if necessary, reuse them, making the import from the previously created file, which allows you to avoid re-manual input.
We write tests quickly
How does all this work? Let's try to write a test for SimpleClass.
We need an heir class for tests. Copy the name SimpleClass to the clipboard and type stu. In place of the cursor, a template is inserted for the inherited class containing the Trace property.
Fig. 5 - Template activation and code insertion
Now add trace information for each method we are interested in. To do this, we block these methods. For this purpose, in Visual Studio, type “over”, then press the spacebar and select the desired method names from the drop-down list, while thanking IntelliSense for not having to painfully recall their names. As a result, all necessary methods are overlapped and for the time being just call the base ones.
Now is the time to put our atr template into operation. Go through these methods, activate the template to insert a trace string. As a result, we will get methods that will add their name to the Trace property after the call.
#region TestSimpleClass (stub class) public class TestSimpleClass : SimpleClass { string trace = string.Empty; public TestSimpleClass() : base() { } public string Trace { get { return trace; } set { trace = value; } } protected override void BeforeAction() { base.BeforeAction(); trace += "->BeforeAction"; } protected override void AfterAction() { base.AfterAction(); trace += "->AfterAction"; } protected override void DoActionCore() { base.DoActionCore(); trace += "->DoActionCore"; } } #endregion In addition to the name, any other information related to the call can be added to the trace object, for example, call parameters, etc.
We return directly to the test. Create a TextFixture for the test group of our class. By the way, to speed up its creation, you can also write your own template, which will include methods for SetUp and TearDown. Let's declare an instance of our heir class, initialize it, and write a test for the DoAction method. The test will consist in comparing the Trace property of the inherited class after calling the method with the expected result, which reflects the correct sequence of calls to the protected class methods.
#region SimpleClassTests [TestFixture] public class SimpleClassTests { TestSimpleClass testClass; [SetUp] public void Setup() { testClass = new TestSimpleClass(); } [TearDown] public void Teardown() { testClass = null; } [Test] public void DoActionMethod() { testClass.Trace = string.Empty; testClass.DoAction(); string expectedTrace = "->BeforeAction->DoActionCore->AfterAction"; Assert.AreEqual(expectedTrace, testClass.Trace); } } #endregion Run the test. The result is achieved - we are convinced that everything works as it should inside the class.
In conclusion, I would like to say that one of the drawbacks of the approach using trace lines is that if you change the code of the source classes and the order of calls to them, you will have to modify the tests, or rather the reference strings. Therefore, everything is good in moderation, and it is up to you to decide where and when to use this practice.
Good luck in creating convenient test patterns!
Source: https://habr.com/ru/post/108238/
All Articles