Porting and preprocessing psto
And how many of you, dear ones, didn’t have to think about how to collect two independent versions of the application - one full and one not so much - from a single set of sources, without undue stress of your spiritual strength? I will say to everyone who raised his hand: I still have to, oh, how about having to break my head over this issue. Well, or you can use the recipe below.
If you are still not completely aware of all these movements with banners and clicks in the applications, and are only going to join the Chistopol, I will briefly describe the nature of the problem. The nonhumanoids from Google (may the nonhumanoids from Apple forgive me), not only did they not take Eclipse as an IDE, but also carefully avoided (and ignore to this moment!) Such an important stage of building the project as preprocessing the source code and resources . And he is needed! And let OOP lovers curse me hard-working, just like me, but it’s unrealistic to make a dead code section for import and package directives - only a preprocessor can save here. To much grief, the three-eyed also tied everything to the package, absolutely everything. As a result, an unpleasant situation turns out: if we change the name of the package in the manifest, it needs to be changed everywhere, in all source codes. And it is also necessary to regenerate the class R, without which for some reason it was impossible to do, well, no way. And if you do not change the name of the package, the application completely replaces the previous application in the device with the same assembly name, which is a very serious potential trouble - the lucky owner of the paid version can inadvertently make an upgrade to the free version.
Here it is.
It was a cry from the heart, and in the article we will try to solve a specific task in the most budgetary way: to get an extremely simple method for switching application options, leaving everything “as is” in the development environment and not making significant changes to the project structure. Project materials should have minimal redundancy. In general, as the classic said, "so that we have everything, and we did not have anything for it."
')
Anyone who has been developing MIDP games on the NetBeans Mobility Pack should remember the best tools for working with multiple configurations of a single project. One of the components of MP is the Antenna preprocessor , which is part of the Apache Ant automation tool. I will not describe Ant here - I’m generally not very familiar with it and can’t even give a precise definition of this monstrous automation tool. I will not begin to describe Antenna exhaustively - everything you need to know to solve our problem is given below, and the rest can be found on the websites of these applications.
In general, Antenna was created to work with mobile application projects. This is me to the fact that there, in addition to the preprocessor, quite a lot of things that we do not need. You do not pay attention to them, the main thing is that it performs what we need from it.
The general principle of all of the following is as follows: the preprocessor we set up will modify the source code of the application, placing comments and replacing the values where indicated by the corresponding directives. That is, for each configuration, you can write an individual code. Also, some values are modified in AndroidManifest.xml and implies the possibility of conditional processing of any xml file in the project. Since all actions are performed by Ant tasks, they can be incorporated into the Ant script build.xml, through which a project can be compiled without Eclipse. But this is up to you.
1. Download Ant from here , from the section “Current Release of Ant” and install it on your computer .
2. Download Antenna from here . What we need looks like “antenna-bin-1.2.1-beta.jar”. For now, we will rename the file to antenna.jar , and how to use it will be written below.
3. Load the XmlTask ( xmltask.jar ) from here and also set aside for now.
Next, we need to prepare a project.
4. Create the most common project. We call the assembly, for example, ru.habr.hello , the project is HelloPorting , and let our Activity be called Main .
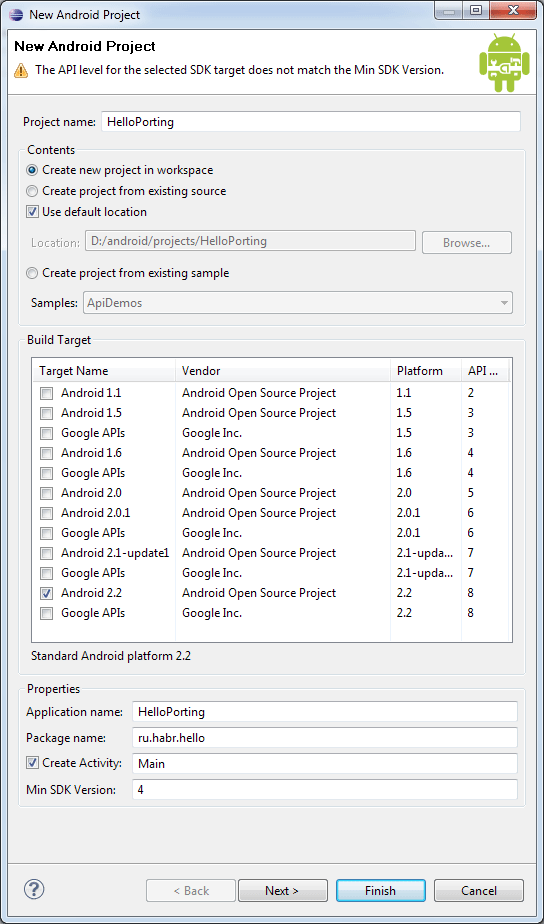
We have a project with the following structure:
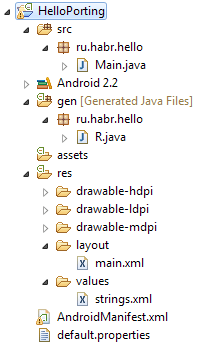
Now we adapt our project for preprocessing.
5. In the project folder, create the tools folder and place the previously loaded antenna.jar and xmltask.jar there .
6. In the project folder create a file preprocess.xml with the following contents:
7. Next to preprocess.xml, create the preprocess.properties file with the following contents:
8. Our Main class should look like this:
9. Create a new assembly ru.habr.hello.full and in it a class HelloPorting.java with the following content:
10. Create a new assembly ru.habr.hello.lite and in it the class HelloPorting.java with the following content:
11. In AndroidManifest.xml , in the manifest / application / activity node, change the android: name attribute to " .HelloPorting "

12. In Eclipse, in res \ values, open the strings.xml file and add the HelloPorting LITE line with the name app_name_lite .
Preparation of the project is completed, and we can check how everything works.
In the project folder, from the command line we command:
or
After that, we compile the application and run it. If everything is correct, in LogCat in the app section we will see a line notifying us about what project configuration is built.
As a result of our actions, we received a “two-headed” project, preparation for building any of its configurations takes a few seconds: exactly as much as the preprocessor needs in order to go through the source texts and slightly modify them. We do not need to control the correspondence of different versions of source files to each other, since each file is stored in a single copy. Most of the differences in functionality we can describe directly in the source text using preprocessor directives .
But it is necessary to take into account some new features:
Now in each class that uses resources from the res folder and class R , it is necessary to add a line after all import directives:
which, during preprocessing, inserts the import string relevant for this configuration below. What also needs to be considered when deleting a macro.
The HelloPorting.java classes in assemblies ru.habr.hello.full and ru.helr.hello.lite , since they are “spoofs” for the system and inherit the Main class from the assembly ru.habr.hello , as far as possible should remain hollow so as not to it was necessary to synchronize them with changes. However, they can serve their intended purpose if they implement code specific for this configuration. For example, in the Main class we can have an empty or abstract method createScreen , which in the heir from the assembly ru.habr.hello.lite can implement a screen with a banner, and in ru.habr.hello.full - just a screen.
Naturally, this is not an ideal solution. And not even close to the ideal. Picking up countless myriads of different Java-tools, I sat and dreamed that someone would sit down and write a plug-in to Eclipse or even NetBeans ... It’s not bad to dream, but what if? ..
Thanks for attention. Suggestions, additions and criticism (even unhealthy) are welcome.
Long, tedious and whining intro
If you are still not completely aware of all these movements with banners and clicks in the applications, and are only going to join the Chistopol, I will briefly describe the nature of the problem. The nonhumanoids from Google (may the nonhumanoids from Apple forgive me), not only did they not take Eclipse as an IDE, but also carefully avoided (and ignore to this moment!) Such an important stage of building the project as preprocessing the source code and resources . And he is needed! And let OOP lovers curse me hard-working, just like me, but it’s unrealistic to make a dead code section for import and package directives - only a preprocessor can save here. To much grief, the three-eyed also tied everything to the package, absolutely everything. As a result, an unpleasant situation turns out: if we change the name of the package in the manifest, it needs to be changed everywhere, in all source codes. And it is also necessary to regenerate the class R, without which for some reason it was impossible to do, well, no way. And if you do not change the name of the package, the application completely replaces the previous application in the device with the same assembly name, which is a very serious potential trouble - the lucky owner of the paid version can inadvertently make an upgrade to the free version.
Here it is.
It was a cry from the heart, and in the article we will try to solve a specific task in the most budgetary way: to get an extremely simple method for switching application options, leaving everything “as is” in the development environment and not making significant changes to the project structure. Project materials should have minimal redundancy. In general, as the classic said, "so that we have everything, and we did not have anything for it."
')
Anyone who has been developing MIDP games on the NetBeans Mobility Pack should remember the best tools for working with multiple configurations of a single project. One of the components of MP is the Antenna preprocessor , which is part of the Apache Ant automation tool. I will not describe Ant here - I’m generally not very familiar with it and can’t even give a precise definition of this monstrous automation tool. I will not begin to describe Antenna exhaustively - everything you need to know to solve our problem is given below, and the rest can be found on the websites of these applications.
In general, Antenna was created to work with mobile application projects. This is me to the fact that there, in addition to the preprocessor, quite a lot of things that we do not need. You do not pay attention to them, the main thing is that it performs what we need from it.
Let's start.
The general principle of all of the following is as follows: the preprocessor we set up will modify the source code of the application, placing comments and replacing the values where indicated by the corresponding directives. That is, for each configuration, you can write an individual code. Also, some values are modified in AndroidManifest.xml and implies the possibility of conditional processing of any xml file in the project. Since all actions are performed by Ant tasks, they can be incorporated into the Ant script build.xml, through which a project can be compiled without Eclipse. But this is up to you.
1. Download Ant from here , from the section “Current Release of Ant” and install it on your computer .
2. Download Antenna from here . What we need looks like “antenna-bin-1.2.1-beta.jar”. For now, we will rename the file to antenna.jar , and how to use it will be written below.
3. Load the XmlTask ( xmltask.jar ) from here and also set aside for now.
Next, we need to prepare a project.
4. Create the most common project. We call the assembly, for example, ru.habr.hello , the project is HelloPorting , and let our Activity be called Main .
We have a project with the following structure:
Now we adapt our project for preprocessing.
5. In the project folder, create the tools folder and place the previously loaded antenna.jar and xmltask.jar there .
6. In the project folder create a file preprocess.xml with the following contents:
<?xml version="1.0" encoding="Utf-8"?> <project name="Preprocess source" default="lite" basedir="."> <property file="preprocess.properties" /> <property name="wtk.home" value="." /> <property name="source.path" value="src" /> <taskdef resource="antenna.properties" classpath="tools\antenna.jar" /> <taskdef name="xmltask" classname="com.oopsconsultancy.xmltask.ant.XmlTask" classpath="tools\xmltask.jar" /> <target name="full"> <echo>Preprocessing FULL VERSION</echo> <wtkpreprocess verbose="false" version="2" srcdir="${source.path}" destdir="${source.path}" symbols="distr=full" /> <xmltask source="AndroidManifest.xml" dest="AndroidManifest.xml"> <attr path="manifest" attr="package" value="${androidmanifest.package.full}" /> <attr path="manifest/application" attr="android:label" value="${androidmanifest.application.label.full}" /> <attr path="manifest/application/activity" attr="android:label" value="${androidmanifest.application.label.full}" /> </xmltask> </target> <target name="lite"> <echo>Preprocessing LITE VERSION</echo> <wtkpreprocess verbose="false" version="2" srcdir="${source.path}" destdir="${source.path}" symbols="distr=lite" /> <xmltask source="AndroidManifest.xml" dest="AndroidManifest.xml"> <attr path="manifest" attr="package" value="${androidmanifest.package.lite}" /> <attr path="manifest/application" attr="android:label" value="${androidmanifest.application.label.lite}" /> <attr path="manifest/application/activity" attr="android:label" value="${androidmanifest.application.label.lite}" /> </xmltask> </target> </project> 7. Next to preprocess.xml, create the preprocess.properties file with the following contents:
# Full version properties
androidmanifest.package.full=ru.habr.hello.full
androidmanifest.application.label.full=@string/app_name

# Lite version properties
androidmanifest.package.lite=ru.habr.hello.lite
androidmanifest.application.label.lite=@string/app_name_lite
8. Our Main class should look like this:
package ru.habr.hello; import android.app.Activity; import android.os.Bundle; import android.util.Log; //#expand import ru.habr.hello.%distr%.*; public class Main extends Activity { /** Called when the activity is first created. */ @Override public void onCreate(Bundle savedInstanceState) { super.onCreate(savedInstanceState); setContentView(R.layout.main); //#if distr == "lite" Log.d("app", "Lite version"); //#elif distr == "full" Log.d("app", "Full version"); //#else Log.d("app", "Whatelse version"); //#endif } } 9. Create a new assembly ru.habr.hello.full and in it a class HelloPorting.java with the following content:
package ru.habr.hello.full; import ru.habr.hello.*; public class HelloPorting extends Main { } 10. Create a new assembly ru.habr.hello.lite and in it the class HelloPorting.java with the following content:
package ru.habr.hello.lite; import ru.habr.hello.*; public class HelloPorting extends Main { } 11. In AndroidManifest.xml , in the manifest / application / activity node, change the android: name attribute to " .HelloPorting "
12. In Eclipse, in res \ values, open the strings.xml file and add the HelloPorting LITE line with the name app_name_lite .
Preparation of the project is completed, and we can check how everything works.
In the project folder, from the command line we command:
ant -f preprocess.xml lite or
ant -f preprocess.xml full After that, we compile the application and run it. If everything is correct, in LogCat in the app section we will see a line notifying us about what project configuration is built.
What's next.
As a result of our actions, we received a “two-headed” project, preparation for building any of its configurations takes a few seconds: exactly as much as the preprocessor needs in order to go through the source texts and slightly modify them. We do not need to control the correspondence of different versions of source files to each other, since each file is stored in a single copy. Most of the differences in functionality we can describe directly in the source text using preprocessor directives .
But it is necessary to take into account some new features:
Now in each class that uses resources from the res folder and class R , it is necessary to add a line after all import directives:
//#expand import ru.habr.hello.%distr%.*; which, during preprocessing, inserts the import string relevant for this configuration below. What also needs to be considered when deleting a macro.
The HelloPorting.java classes in assemblies ru.habr.hello.full and ru.helr.hello.lite , since they are “spoofs” for the system and inherit the Main class from the assembly ru.habr.hello , as far as possible should remain hollow so as not to it was necessary to synchronize them with changes. However, they can serve their intended purpose if they implement code specific for this configuration. For example, in the Main class we can have an empty or abstract method createScreen , which in the heir from the assembly ru.habr.hello.lite can implement a screen with a banner, and in ru.habr.hello.full - just a screen.
Conclusion
Naturally, this is not an ideal solution. And not even close to the ideal. Picking up countless myriads of different Java-tools, I sat and dreamed that someone would sit down and write a plug-in to Eclipse or even NetBeans ... It’s not bad to dream, but what if? ..
Thanks for attention. Suggestions, additions and criticism (even unhealthy) are welcome.
Source: https://habr.com/ru/post/107652/
All Articles