The tale of how I put an unsupported Wimax / Wifi card in Lenovo X201
I somehow got into the hands of the personal use of the laptop Lenovo X201 - a great working machine.
Everything seems good and everything seems to be there, but as usual I want more - I wanted to have built-in WiMax (I already have a 3G modem and works pretty well).
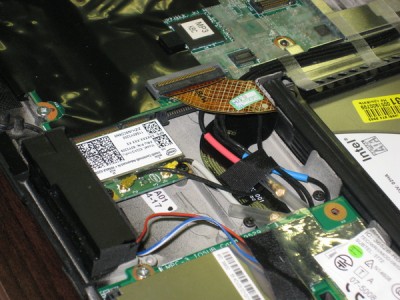
For WiMax, an Intel WiMax / Wifi Link 5150 PCIe Mini Card was purchased.
After installation, it turned out that most modern laptops (in particular, Lenovo) are equipped with White-list devices that they support. This is done apparently so that users buy only branded devices in retail stores. Honestly, I would be glad to buy such a device if they were sold freely with us (correct me, if that is the case, maybe I didn’t look well enough).
In particular, my laptop was upset when he saw that the card I slipped to him is not in the White-list and issued a message to:
In case of installation of an unsupported 3G modem, you will receive a message:
Just want to draw attention to one feature, for those who do not know. In fact, WiFi and WiMax being on the same board are connected via two different channels - one PCIe, the second USB, respectively.
')
Maybe this will surprise someone (like, for example, me earlier) - WiMax is connected via the USB bus, although both devices are on the same board. Such a connection is not obvious and the most important thing - the presence of USB desoldering on the PCIe connector is not mandatory (which is what I pinned on a Lenovo x61s laptop) - it is necessary to check it with a tester or read the internal docks.
Some information about USB on the mini-PCIe connector is on Wikipedia - conclusions 36, 38.
And by the way, such a hybrid card (at least mine) cannot work in two modes at once. Those. or wifi or wimax, switching software. This, in theory, can cause problems with powering up the card. Judging by the forums, problems are solved, but it feels like you can't do without a soldering iron. Fortunately for me - it cost.
So if suddenly this article encourages someone to buy a Wifi / Wimax card, you first need to make sure that there is a USB in the PCIe connector, otherwise you will have to be pretty thorough.
Despite the lack of USB, some craftsmen still managed to dissolve USB on the MiniPCI - all you need is desire, hands, wires, a soldering iron and a circuit, but this is already extreme.
Began research problems with the forum:
(1) forum.thinkpads.com/viewtopic.php?t=55837
and in consequence
(2) www.thinkwiki.org/wiki/Problem_with_unauthorized_MiniPCI_network_card
(3) http://web.dodds.net/~vorlon/wiki/blog/Upgrading_a_ThinkPad_BIOS.html
(4) www.endeer.cz/bios.tools
(5) www.endeer.cz/bios.tools/bios.html
(6) http://forums.mydigitallife.info/threads/20223-Remove-whitelist-check-add-ID-s-to-break-hardware-restrictions-mod-requests.?p=338719#post338719
(7) www.endeer.cz/bios.tools/modz.html?machine=ALL
I found myself in a rather difficult case - the BIOS of the new modification and the ways of editing a couple of bytes in the CMOS did not work anymore, and there was no ready BIOS for my model by reference (7). In my case, there were 3 ways to solve the problem:
The third method looked somehow not beautiful and threatened with problems with firewood.
The second method was seductive and seemed easier - because You do not have to bother with the search for ASM-code and the manufacture of the patch, but still I aimed at the first method - because It is more versatile and beautiful.
Decide which way to choose you. Method 3 is described by reference (2).
Method 2 - stupidly replacing a sequence of bytes to the ones of interest. The BIOS checksum, as I understand it, is not specifically checked anywhere, at least for my version. Perhaps there are some traps, but because I did not try to go this way - I do not know about them.
After reading the links (4), (5) I kind of got inspired by the idea to make a patched bios myself, but after a few hours of working with the tools on the 4th link + IDA, I was a little tired and thought about scoring this idea.
However, the line seen from the link (3) suddenly opened a second wind

Once again I read the contents of the links (4) and (5) more carefully and slowly began to pick the BIOS. I will not translate what is written there, because unfortunately, the author of these pages in my opinion is not very good with the availability of the presentation and the general availability of information (although the articles are literate), and I didn’t quite understand the part of the article concerning the actual search for the code and thinking about the replacement. Probably being an avid connoisseur of IDA and assembler, you can understand what he writes - but I would rather measure out several times in bios issues than once unsuccessfully cut off (it was a sad experience). There is also a feeling that the information in the article is a bit outdated. Of course, I did have some knowledge of the assembler, but they are clearly not enough to understand what needs to be done.
In general, my research did not lead to anything understandable, but fortunately at the right moment, when I almost dropped my hands a second time, a good acquaintance kmeaw helped me - and quickly found the check function on the White-list in the right file and corrected several byte. On this lyric part, I will probably finish and proceed to the description of my actions.
Working with the BIOS (especially if you do everything yourself) is a very responsible and dangerous process.
All the steps below are related to BIOS v1.22 for Lenovo X201 and may differ from the actions needed for other laptops, although I will try to describe the general principle.
All utilities for working with BIOS can be found at the link at the end of the article.
The BIOS hack consists of several stages:
Let's start.
The first thing to do is to get the BIOS file itself for further work. This can be done in two ways:
* Make backup of the current BIOS and work with it. For some reason I decided not to use this method and I can’t tell you anything about it.
* Download from the official site file with firmware, unpack.
The file of interest $ 01C2100.FL1 will be located at \ DRIVERS \ FLASH \ 6quj08us \ 6QET52WW
This file is a compressed system BIOS image. All other files (other than FL1) belong to some other parts of the system that I was not interested in and do not know what they are intended for - they are not really needed in the future.
After the file of interest is found, it will be necessary to unpack it.
To do this, enter the command:
Then you need to gut the resulting file to the modules with the command
(for phnxsplit.exe, the cygwin1.dll library is required)
I think it’s worth paying attention to the fact that most of the files were unpacked using the lzint algorithm and to get everything back - you need to pack the corrected file back - but more on that later.
After executing the command, you will receive a bunch of files with the extension * .rom. Among this disgrace, you need to find the desired file, on which we will continue to mock. First of all, you need to find a device that is 100% in the while-list. For this you need (the method for XP will be described below, if you have another OS - try to find a way to find out the data yourself) go to
"Device Manager \ (wifi device or 3g modem) \ information \ device instance code"
Let it be, for example:
The data of interest are:
This results in the following search string:
In the case of a 3G modem
I think it is clear how this happened (inverse byte order for each part of the record).
You can use this straight line from the example, I think it should be in your bios.
After receiving such a line, you need to somehow look in all the unpacked files. Most likely it will be a single file BIOSCODEXX.rom
I personally did this using FAR (Alt + F7, look for hexadecimal code).
In my case, the file with the check function of interest turned out to be the file BIOSCODE06.rom
This is where the fun begins.
Having opened it through IDA, for quite a long time I tried to understand what is being said on the link (5). By the way, to open a file with a bios, you must first rename the source file to a file with the .hex extension.
The file consists of a 27-byte header and the body of a binary hexadecimal application. In the header there is an indication of the offset, relative to the main BIOS. What I understood is that the offset is indicated there, since during operation all the modules are in the same memory area and the function pointers in the module are referenced taking into account the offset.
In practice, it turned out that in the code part of interest to us, all jmp on functions are relative and the offset does not play any value.
Attempts to understand the module independently didn’t lead to anything - due to the lack of even minimal experience in disassembling matters, in spite of a small knowledge of the assembler, so I had to turn to a friend for advice.
After 10 minutes, he sent me such a screenshot
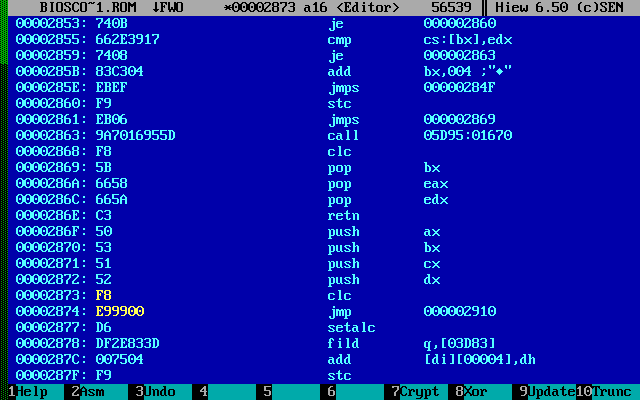
The screenshot itself contained what needs to be corrected.
After seeing the screenshot, I decided to use hiew 6.50 (which can be found in the archive) to edit the file, since It turned out to be simpler than IDM.
A little help on using HIEW:
The edit shown in the screenshot is quite clear and simple after the white-list check function was found.
The function is called only from one place, it has clear boundaries. The change is that at the beginning of the function jmp occurs at the end of the function. The output looks as if the card has successfully passed the test.
It seems that the check function was killed, it would seem that everything, but no - the function was responsible only for Wifi / Wimax cards (error 1802). There is one more function - to check the WAN (error 1804). It didn’t take long to find it - the principle turned out to be identical, but it took a long time to make the patch, because after editing, the module in compressed form did not want to become the right size (the same size as it was before the changes were made).
The same size is necessary because the phnxmod.exe utility, which later replaces the module in the $ 01C2100.FLh file, cannot work with files if the new one differs from the old one by at least.
Actually, in order to make the necessary change and adjust the size, I had to fix a lot and wipe a piece of the check function (since after adding jmp, it was no longer needed).
Result on the picture:

The top screenshot is a detour for the WAN card check function.
The bottom screenshot is a detour for Wfi / Wimax card check functions.
The change was made to the file, after the file was back packaged.
It is worth noting that the file is not packaged by the phcomp command, as you might think. A set of commands from the kit to the BIOS.
Determine the old from the new - you can by what comes with the BIOS in the folder \ DRIVERS \ FLASH \ 6quj08us
In general, I was taking a long time with this until I realized. At the end of the article there is a ready-made set of utilities for packing a patched file, in particular, for my BIOS with a bat-nick (based on logo.bat).
Also, you need to pack the source file, which I called BIOSCODE06.rom
The result was two BIOSCODE06.rom-lz (patched) files, BIOSCODE06.rom-orig-lz (original) of the same size.
The final step on the way to the finished patched BIOS is replacing the module in the compiled basic BIOS file $ 01C2100.FLh
To do this, you must use the command:
The syntax is:
phnxmod.exe (unpacked version $ 01C2100.FL1) (original packed module) (modified packed module).
After executing the command, you should see something like this:
This is the last stage of the hack.
The resulting patched $ 01C2100.FLh file can be used for flashing using WinPhlash.
For this I took the archive from the link (6), corrected the rom-file and the config and reshooted my laptop.
After flashing, I successfully launched an unsupported Wimax / wifi card on my laptop, checked the connection to Wifi, Wimax (Comstar, Yota) - everything is fine.
Also, the Sierra MC8775 3G module was tested, which should not be supported on this model. The laptop has successfully booted. After installing the drivers, I managed to successfully connect to the 3G network.
Files:
1. Ready archive with patched BIOS 1.22 for Lenovo X201 (no white-list) bypass 1802/1804 error
2. Patched BIOSCODE06.rom file ($ 01C2100.FLh in the archive is already patched)
3. A set of utilities for working with BIOS
4. Utilities for packing the module
In conclusion, I want to once again remind you that everything you do with the BIOS is very responsible and serious. If there is uncertainty in something, it is better to double-check a hundred times and make sure that you are doing everything correctly. When reflashing, be sure to turn off all programs and applications (if you are flashing from windows), or better - flashing from a bootable CD or flash drive. It is also better to use already patched and checked BIOS versions (you can try to find by reference (7) than to do them yourself, and if you do, read as much information as possible, except for this article, at least by the links indicated above.
ps. Thanks to kmeaw for helping me with the ASM code editing and the guidance on the true path.
Everything seems good and everything seems to be there, but as usual I want more - I wanted to have built-in WiMax (I already have a 3G modem and works pretty well).
For WiMax, an Intel WiMax / Wifi Link 5150 PCIe Mini Card was purchased.
After installation, it turned out that most modern laptops (in particular, Lenovo) are equipped with White-list devices that they support. This is done apparently so that users buy only branded devices in retail stores. Honestly, I would be glad to buy such a device if they were sold freely with us (correct me, if that is the case, maybe I didn’t look well enough).
In particular, my laptop was upset when he saw that the card I slipped to him is not in the White-list and issued a message to:
1802: Unauthorized network card is plugged in - Power off and remove the miniPCI network card.In case of installation of an unsupported 3G modem, you will receive a message:
1804: Unauthorized WAN card is plugged in - Power off and remove the WAN card.Just want to draw attention to one feature, for those who do not know. In fact, WiFi and WiMax being on the same board are connected via two different channels - one PCIe, the second USB, respectively.
')
Maybe this will surprise someone (like, for example, me earlier) - WiMax is connected via the USB bus, although both devices are on the same board. Such a connection is not obvious and the most important thing - the presence of USB desoldering on the PCIe connector is not mandatory (which is what I pinned on a Lenovo x61s laptop) - it is necessary to check it with a tester or read the internal docks.
Some information about USB on the mini-PCIe connector is on Wikipedia - conclusions 36, 38.
And by the way, such a hybrid card (at least mine) cannot work in two modes at once. Those. or wifi or wimax, switching software. This, in theory, can cause problems with powering up the card. Judging by the forums, problems are solved, but it feels like you can't do without a soldering iron. Fortunately for me - it cost.
So if suddenly this article encourages someone to buy a Wifi / Wimax card, you first need to make sure that there is a USB in the PCIe connector, otherwise you will have to be pretty thorough.
Despite the lack of USB, some craftsmen still managed to dissolve USB on the MiniPCI - all you need is desire, hands, wires, a soldering iron and a circuit, but this is already extreme.
Began research problems with the forum:
(1) forum.thinkpads.com/viewtopic.php?t=55837
and in consequence
(2) www.thinkwiki.org/wiki/Problem_with_unauthorized_MiniPCI_network_card
(3) http://web.dodds.net/~vorlon/wiki/blog/Upgrading_a_ThinkPad_BIOS.html
(4) www.endeer.cz/bios.tools
(5) www.endeer.cz/bios.tools/bios.html
(6) http://forums.mydigitallife.info/threads/20223-Remove-whitelist-check-add-ID-s-to-break-hardware-restrictions-mod-requests.?p=338719#post338719
(7) www.endeer.cz/bios.tools/modz.html?machine=ALL
I found myself in a rather difficult case - the BIOS of the new modification and the ways of editing a couple of bytes in the CMOS did not work anymore, and there was no ready BIOS for my model by reference (7). In my case, there were 3 ways to solve the problem:
- Disable white-list checking
- Writing VEN / DEV / SUBSYS from my card in the white-list to replace some unnecessary card
- Change the VEN / DEV / SUBSYS in my map to those already in the white-list.
The third method looked somehow not beautiful and threatened with problems with firewood.
The second method was seductive and seemed easier - because You do not have to bother with the search for ASM-code and the manufacture of the patch, but still I aimed at the first method - because It is more versatile and beautiful.
Decide which way to choose you. Method 3 is described by reference (2).
Method 2 - stupidly replacing a sequence of bytes to the ones of interest. The BIOS checksum, as I understand it, is not specifically checked anywhere, at least for my version. Perhaps there are some traps, but because I did not try to go this way - I do not know about them.
After reading the links (4), (5) I kind of got inspired by the idea to make a patched bios myself, but after a few hours of working with the tools on the 4th link + IDA, I was a little tired and thought about scoring this idea.
However, the line seen from the link (3) suddenly opened a second wind
Once again I read the contents of the links (4) and (5) more carefully and slowly began to pick the BIOS. I will not translate what is written there, because unfortunately, the author of these pages in my opinion is not very good with the availability of the presentation and the general availability of information (although the articles are literate), and I didn’t quite understand the part of the article concerning the actual search for the code and thinking about the replacement. Probably being an avid connoisseur of IDA and assembler, you can understand what he writes - but I would rather measure out several times in bios issues than once unsuccessfully cut off (it was a sad experience). There is also a feeling that the information in the article is a bit outdated. Of course, I did have some knowledge of the assembler, but they are clearly not enough to understand what needs to be done.
In general, my research did not lead to anything understandable, but fortunately at the right moment, when I almost dropped my hands a second time, a good acquaintance kmeaw helped me - and quickly found the check function on the White-list in the right file and corrected several byte. On this lyric part, I will probably finish and proceed to the description of my actions.
A little warning.
ALL THE FURTHER ACTIONS YOU DO AT YOUR OWN RISK !!!
Working with the BIOS (especially if you do everything yourself) is a very responsible and dangerous process.
All the steps below are related to BIOS v1.22 for Lenovo X201 and may differ from the actions needed for other laptops, although I will try to describe the general principle.
All utilities for working with BIOS can be found at the link at the end of the article.
The BIOS hack consists of several stages:
- Downloading, unpacking, decomposing modules.
- Search for verification functions (for WAN, one function, for WWAN, another)
- Organization of circumvention of the verification functions
- Fit the packaged version of the file to the size of the original version (the size must match)
- Making changes to the main BIOS module by comparing the original and patched version of the module.
Let's start.
1. Downloading, unpacking, decomposing modules.
The first thing to do is to get the BIOS file itself for further work. This can be done in two ways:
* Make backup of the current BIOS and work with it. For some reason I decided not to use this method and I can’t tell you anything about it.
* Download from the official site file with firmware, unpack.
The file of interest $ 01C2100.FL1 will be located at \ DRIVERS \ FLASH \ 6quj08us \ 6QET52WW
This file is a compressed system BIOS image. All other files (other than FL1) belong to some other parts of the system that I was not interested in and do not know what they are intended for - they are not really needed in the future.
After the file of interest is found, it will be necessary to unpack it.
To do this, enter the command:
phcomp /D $01C2100.FL1Then you need to gut the resulting file to the modules with the command
phnxsplit.exe $01C2100.FLh(for phnxsplit.exe, the cygwin1.dll library is required)
I think it’s worth paying attention to the fact that most of the files were unpacked using the lzint algorithm and to get everything back - you need to pack the corrected file back - but more on that later.
2. Search for verification functions (for WAN, one function, for WWAN, another)
After executing the command, you will receive a bunch of files with the extension * .rom. Among this disgrace, you need to find the desired file, on which we will continue to mock. First of all, you need to find a device that is 100% in the while-list. For this you need (the method for XP will be described below, if you have another OS - try to find a way to find out the data yourself) go to
"Device Manager \ (wifi device or 3g modem) \ information \ device instance code"
Let it be, for example:
Intel Wifi Link 1000BGN, PCI\VEN_8086&DEV_0084&SUBSYS_13158086&REV_00The data of interest are:
VEN_8086&DEV_0084&SUBSYS_13158086This results in the following search string:
0x8680840086801513In the case of a 3G modem
0xc6050592I think it is clear how this happened (inverse byte order for each part of the record).
You can use this straight line from the example, I think it should be in your bios.
After receiving such a line, you need to somehow look in all the unpacked files. Most likely it will be a single file BIOSCODEXX.rom
I personally did this using FAR (Alt + F7, look for hexadecimal code).
In my case, the file with the check function of interest turned out to be the file BIOSCODE06.rom
This is where the fun begins.
Having opened it through IDA, for quite a long time I tried to understand what is being said on the link (5). By the way, to open a file with a bios, you must first rename the source file to a file with the .hex extension.
The file consists of a 27-byte header and the body of a binary hexadecimal application. In the header there is an indication of the offset, relative to the main BIOS. What I understood is that the offset is indicated there, since during operation all the modules are in the same memory area and the function pointers in the module are referenced taking into account the offset.
3. Organization of bypassing the verification functions
In practice, it turned out that in the code part of interest to us, all jmp on functions are relative and the offset does not play any value.
Attempts to understand the module independently didn’t lead to anything - due to the lack of even minimal experience in disassembling matters, in spite of a small knowledge of the assembler, so I had to turn to a friend for advice.
After 10 minutes, he sent me such a screenshot
The screenshot itself contained what needs to be corrected.
After seeing the screenshot, I decided to use hiew 6.50 (which can be found in the archive) to edit the file, since It turned out to be simpler than IDM.
A little help on using HIEW:
F4 - (Text, Hex, Decode)
------ Hex
------ - Decode
------ Hex Ctrl+F5
Ctrl+F5 - . 27- . , -1B
F5 - ( hex)
F3 -
F9 - .
The edit shown in the screenshot is quite clear and simple after the white-list check function was found.
The function is called only from one place, it has clear boundaries. The change is that at the beginning of the function jmp occurs at the end of the function. The output looks as if the card has successfully passed the test.
It seems that the check function was killed, it would seem that everything, but no - the function was responsible only for Wifi / Wimax cards (error 1802). There is one more function - to check the WAN (error 1804). It didn’t take long to find it - the principle turned out to be identical, but it took a long time to make the patch, because after editing, the module in compressed form did not want to become the right size (the same size as it was before the changes were made).
The same size is necessary because the phnxmod.exe utility, which later replaces the module in the $ 01C2100.FLh file, cannot work with files if the new one differs from the old one by at least.
Actually, in order to make the necessary change and adjust the size, I had to fix a lot and wipe a piece of the check function (since after adding jmp, it was no longer needed).
Result on the picture:
The top screenshot is a detour for the WAN card check function.
The bottom screenshot is a detour for Wfi / Wimax card check functions.
4. Fit the packaged version of the file to the size of the original version.
The change was made to the file, after the file was back packaged.
It is worth noting that the file is not packaged by the phcomp command, as you might think. A set of commands from the kit to the BIOS.
- prepare.exe
------ , , -.
------ , logo.scr.
------ "LOGO logo.." "BIOSCODE file.rom"
- fi.exe, fp.exe, ceimain.bin, rom2mod.exe
------ , , -.
------ , logo.scr.
------ "LOGO logo.." "BIOSCODE file.rom"
------ linux wine
Determine the old from the new - you can by what comes with the BIOS in the folder \ DRIVERS \ FLASH \ 6quj08us
In general, I was taking a long time with this until I realized. At the end of the article there is a ready-made set of utilities for packing a patched file, in particular, for my BIOS with a bat-nick (based on logo.bat).
Also, you need to pack the source file, which I called BIOSCODE06.rom
The result was two BIOSCODE06.rom-lz (patched) files, BIOSCODE06.rom-orig-lz (original) of the same size.
5. Making changes to the main BIOS module by comparing the original and patched versions of the module.
The final step on the way to the finished patched BIOS is replacing the module in the compiled basic BIOS file $ 01C2100.FLh
To do this, you must use the command:
phnxmod.exe 01C2100.FLh BIOSCODE06.ro2 BIOSCODE06.ro2.patchedThe syntax is:
phnxmod.exe (unpacked version $ 01C2100.FL1) (original packed module) (modified packed module).
After executing the command, you should see something like this:
Okay, all files open.
ROM size 200000h, old module 7B66h+1Bh, new module 7B66h+1Bh.
Loading data...Old module (without header) found at 1EA565h. Replaced.
Writing modified ROM back... Done.

---------------- WARNING! ----------------
If you don't know what you're doing there's a very high risk of rendering your
computer unusable by flashing a modified BIOS. This is not a safe playground.
---------------- WARNING! ----------------
This is the last stage of the hack.
The resulting patched $ 01C2100.FLh file can be used for flashing using WinPhlash.
For this I took the archive from the link (6), corrected the rom-file and the config and reshooted my laptop.
After flashing, I successfully launched an unsupported Wimax / wifi card on my laptop, checked the connection to Wifi, Wimax (Comstar, Yota) - everything is fine.
Also, the Sierra MC8775 3G module was tested, which should not be supported on this model. The laptop has successfully booted. After installing the drivers, I managed to successfully connect to the 3G network.
Files:
1. Ready archive with patched BIOS 1.22 for Lenovo X201 (no white-list) bypass 1802/1804 error
:
WinPhlash.exe . "Advanced Settings" - :

("Flags" Tab):
[ ] Verify BIOS part number
[ ] Flash only if BIOS version is different
[ ] Flash only if BIOS version is newer
[ ] Verify BIOS image size
[ ] Verify BIOS checksum
[ ] Zero block before erasing
[x] Verify block after programming
[x] Disable Axx swaping automatic detection (if present)
[ ] Clear CMOS Checksum

("DMI" tab)
"Update": Select "Update the BIOS and not DMI"
2. Patched BIOSCODE06.rom file ($ 01C2100.FLh in the archive is already patched)
3. A set of utilities for working with BIOS
4. Utilities for packing the module
In conclusion, I want to once again remind you that everything you do with the BIOS is very responsible and serious. If there is uncertainty in something, it is better to double-check a hundred times and make sure that you are doing everything correctly. When reflashing, be sure to turn off all programs and applications (if you are flashing from windows), or better - flashing from a bootable CD or flash drive. It is also better to use already patched and checked BIOS versions (you can try to find by reference (7) than to do them yourself, and if you do, read as much information as possible, except for this article, at least by the links indicated above.
ps. Thanks to kmeaw for helping me with the ASM code editing and the guidance on the true path.
Source: https://habr.com/ru/post/107598/
All Articles