Creating GTK + Applications Using the Glade Environment
This post is about building applications using the GTK + cross-platform library. Is it mainly focused on beginners? Therefore, some things are possible for many seem very simple and banal, but I tried to describe everything as much as possible, so that it was clear to everyone.
A considerable advantage of this library is that it is free for commercial use. There are not so many documents and really high-quality articles on working with GTK + on the Internet. In many examples, the program interface is written in "pens", which is sometimes very inconvenient. I myself came across this and quite often spent more time on properly positioning widgets (objects) on the form, in containers, rather than focusing on solving the problem.
I will demonstrate how to very quickly create an interface for GTK + using the Glade GUI application for visual creation and integrate it into your program. Glade is neither a compiler nor a debugger. It only allows you to describe the interface and present it in GladeXML XML format files.
')
The base interface for the GTK + library is the C language. But I will use C ++ in this example. Accordingly, there will be small features, which I will tell you. The Linux distribution I use is Ubuntu 10.04.
The task will be as follows: write a small application consisting of a canvas, a side menu (choose what to draw on the canvas), the main menu and the status bar. At the same time, the side menu and the canvas when resizing the entire application window should remain a constant size. But the container in which the canvas is located can change its size depending on increasing / decreasing the size of the main window. And if necessary, scroll bars should appear.
The plan will be:
It is assumed that you have GTK + dev-package already installed, if not, then you can do it through the console:
You can install Glade through the Ubuntu Update Center or again using the console:
After installation, run through Applications - Programming - Glade Interface Designer
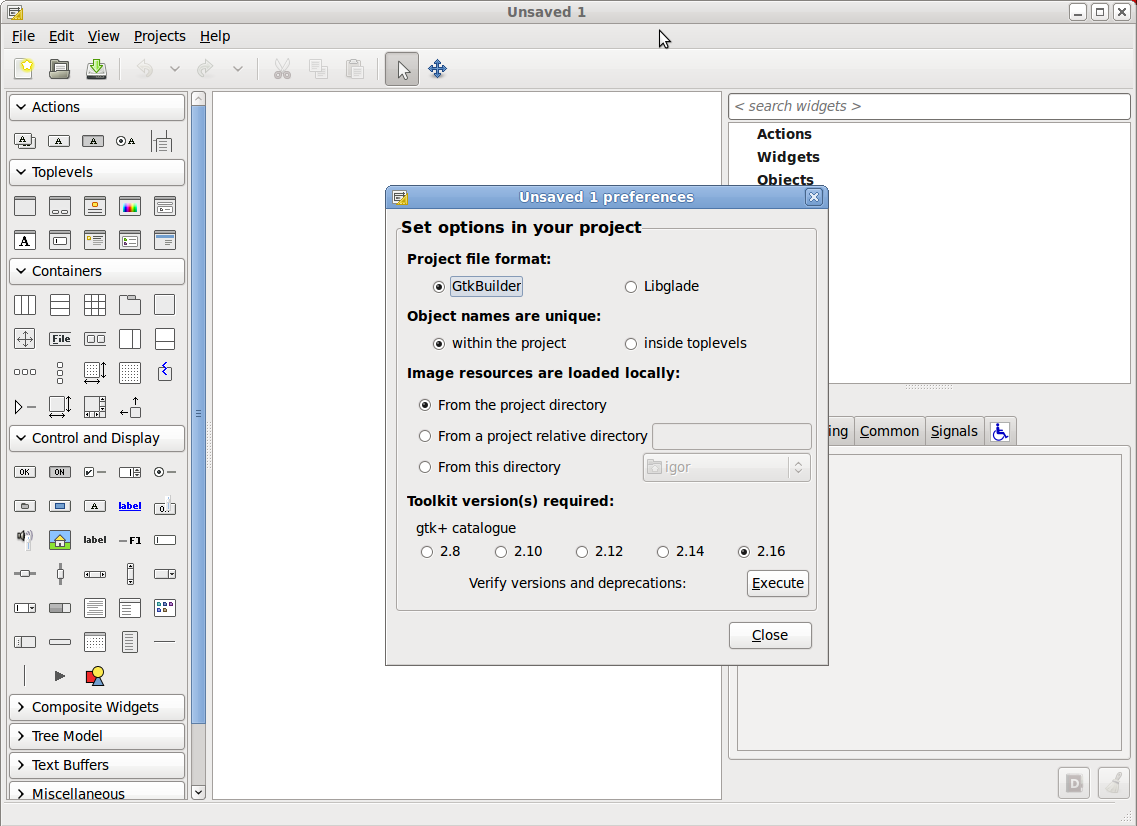
Set all parameters as shown in the figure. Version toolkit (Toolkit Version) select 2.16
On the left you can see a window with a set of various widgets. Those who worked with Windows Forms, or in the Delphi development environment will quickly understand. To the right are two menus: one shows the hierarchy of the widgets, and the second window the widget properties window.
Creating a graphical interface for your GTK + application begins with specifying the main form - the main window of the program. We find in the left menu in the TopLevels section the Window widget.
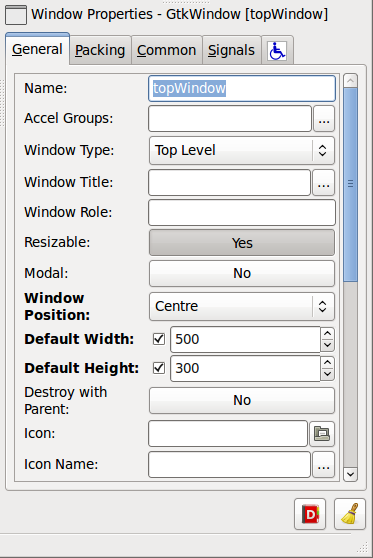
In the Properties window on the right, set the properties of this widget:
Name: topWindow
Windows position: Center
Default Width: 500
Default Height: 320
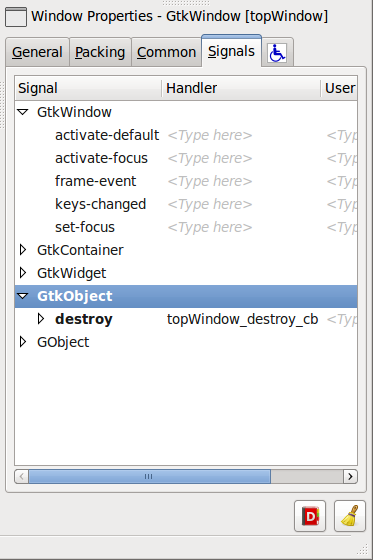
Go to the Signals tab (signal, event) and GtkObject looking for destroy, in the Handler column (handler) write topWindow_destroy_cb or select from the list. This will be the name of the procedure that will process the destroy signal - closing the main form.
Next, we plan to have in our application the main menu, the main functional part (this is the canvas and the menu for selecting what to draw) and the status bar. We take the Vertical Box widget container in the left menu in the Containers section and put it in our main form. In the dialog that appears, select Number of Items: 3. This means that you can put 3 widgets in the container we create.
We have 3 so-called cells or bays in the vbox1 container. In the second (center) compartment we put the Frame (the Containers section of the widget menu). We look at the tree of widgets on the right. Inside frame1 widget will be two widgets: alignment1 and label1 - they can be removed. At this, we will deviate a little and turn to the theory.
Understanding how GTK + controls the size of widgets is very important for creating correct and efficient graphical interfaces. This process is often called the approval process, consisting of two components (2 stages): the requested size and the allocated size.
The request stage is a recursive question: “How much space do you need?”. The main window sets its child windows, the child windows sets it to its child windows and so on until all the widgets are answered throughout this hierarchy.
There are 2 important points here:
Now that the main window knows how much space is needed ideally, a decision is made about how much space will actually be available. If a reasonable value has come to the request, it is the default. But if the window size is set to manual (for example, using gtk_window_setdefault_size) or otherwise, the window discards the requested size and sets another.
At the second stage (size allocation), a command from parent to child widget occurs: "Here you have some space, do everything to fit in it." If the widget has more than one child widget, then the task of this stage is to properly divide the free space between the child widgets.
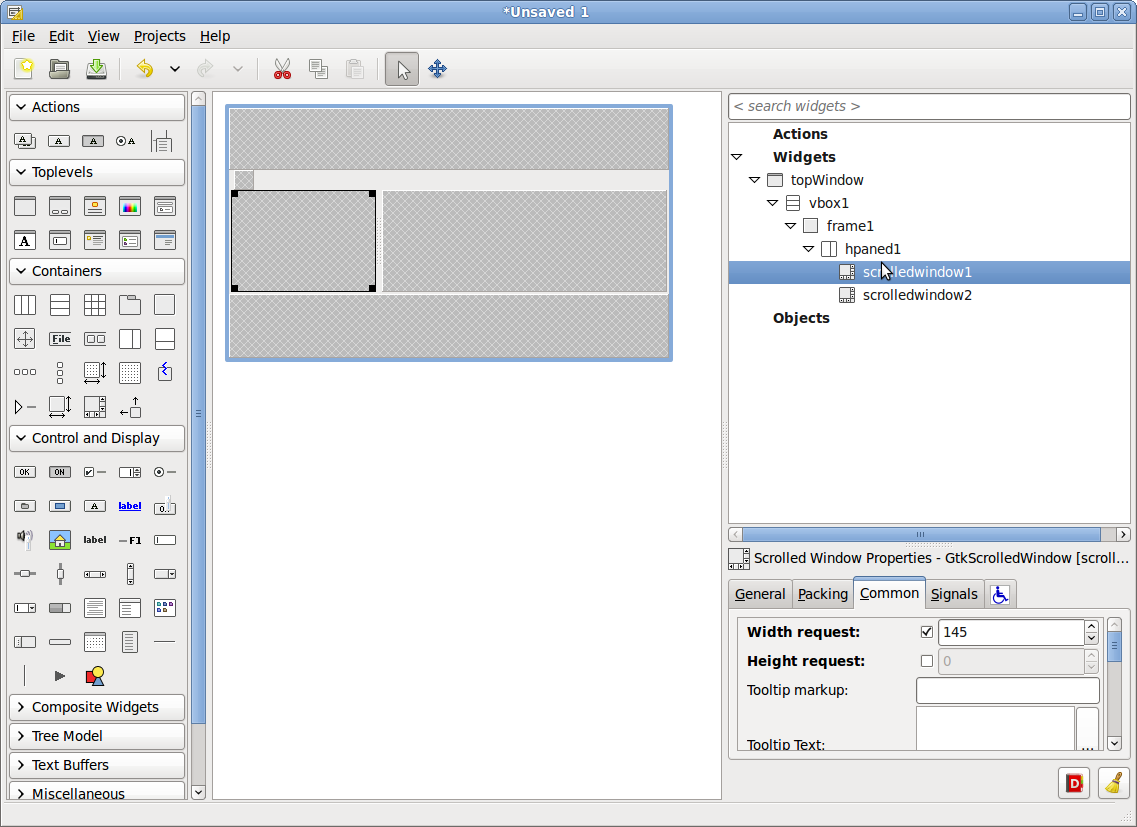
Now go to the main part of our application. Go to the widget menu and select Horizontal Panes in the Containers section and put it on frame1. We need our left side to be a fixed size, the right one not. Go back to the widget menu and look for the Scrolled Window there. And we put first one, and then the second Scrolled Window in the left and right hpand1 compartment (Horizontal Panes). On the left Scrolled Window, which is called scrolledwindow1, set the property (in the Common tab) Width reguest equal to 145 - this will mean the requested size (for the matching process). You should also check that in the Packing tab, the Resize property of scrolledwindow1 is No , and that of scrolledwindow2 is Yes .
From the Containers section, we first put the first ViewPort widget, and then the second one on both our scrolledwindow1 and scrolledwindow2, respectively.
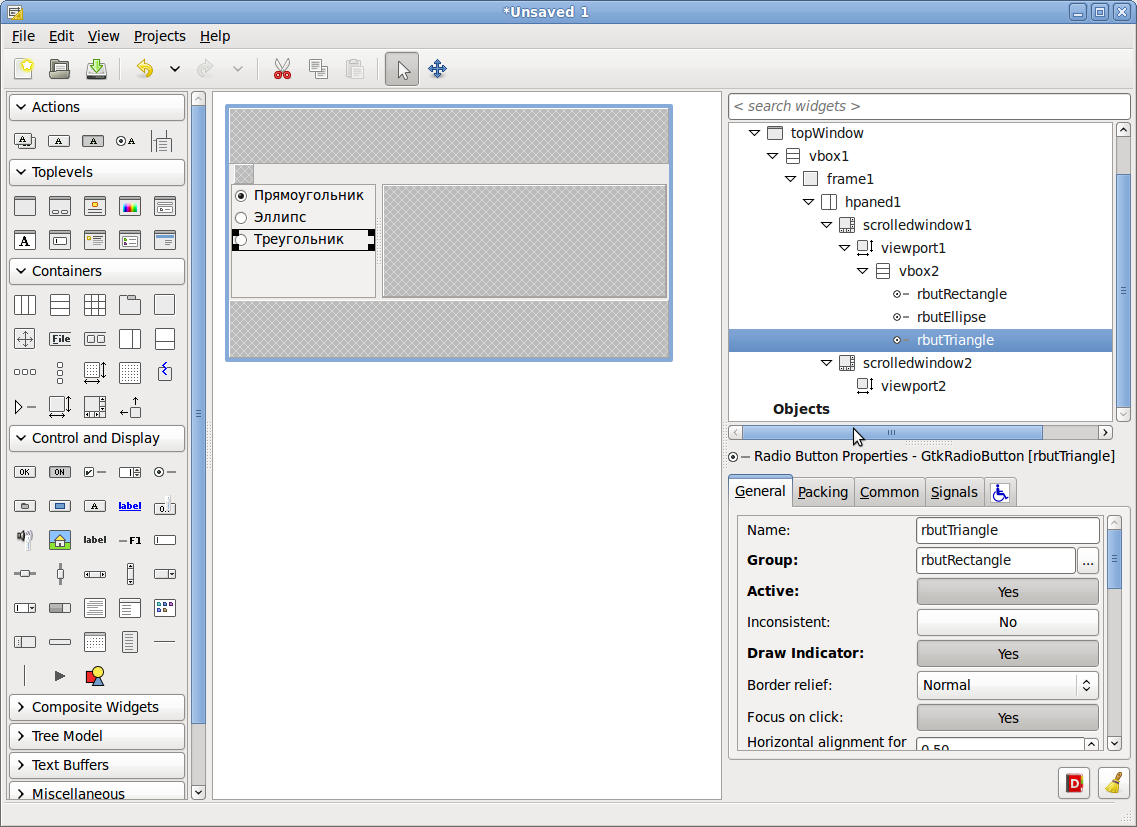
Let's do our side menu. Add to ViewPort1 Vertical Box with 3 compartments. And in each compartment add Radio Button. For each Radio Button, set the Expand No property so that they do not stretch as the size of the parent widget increases. Also in the Common tab, you can set the Width and Height request then they will be the size that we specify, and not by default. But in any case, they will change in size. Let's change their properties in the General tab:
Name respectively on rbutRectangle , rbutEllipse , rbutTriangle
Label respectively on Rectangle , Ellipse , Triangle
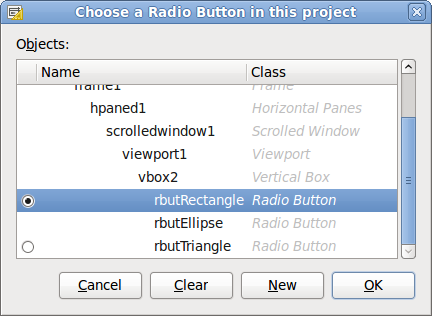
and for rbutEllipse and rbutTriangle, specify the Group rbutRectangle property using a special dialog.
It should turn out like this:
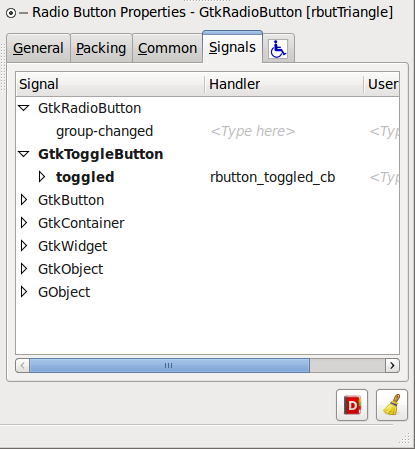
Now you need to register events for each Radio Button. In the Signals tab, no difference for either the GroupChanged event, or for toggled (I will do for it), we write the handler rbutton_toggled_cb :
Now turn to the right side of our window. Add a vertical container with two compartments to the ViewPort2. In the top we put the usual Label, and in the bottom Drawing Area it will be a canvas. In Label1, in the label property, we write a 300 x 200 Canvas . Go to the Packing tab and set Expand to No.
Now our canvas.
Name: drawingarea
Expend: No
Width request: 300
Height request: 200
Event: put a tick Exposure
In Signals, look for an expose-event and write or select from the list:
drawingarea_expose_event_cb

Now we need to add a status bar (to the lowest bay) and a main menu (to the uppermost bay). In the uppermost we put the Menu Bar (the Containers section of the widgets menu), In the lowermost section of the Status Bar (the Control and Display section of the widgets menu), to add it, a dialog will appear, select Number of Items: 1.

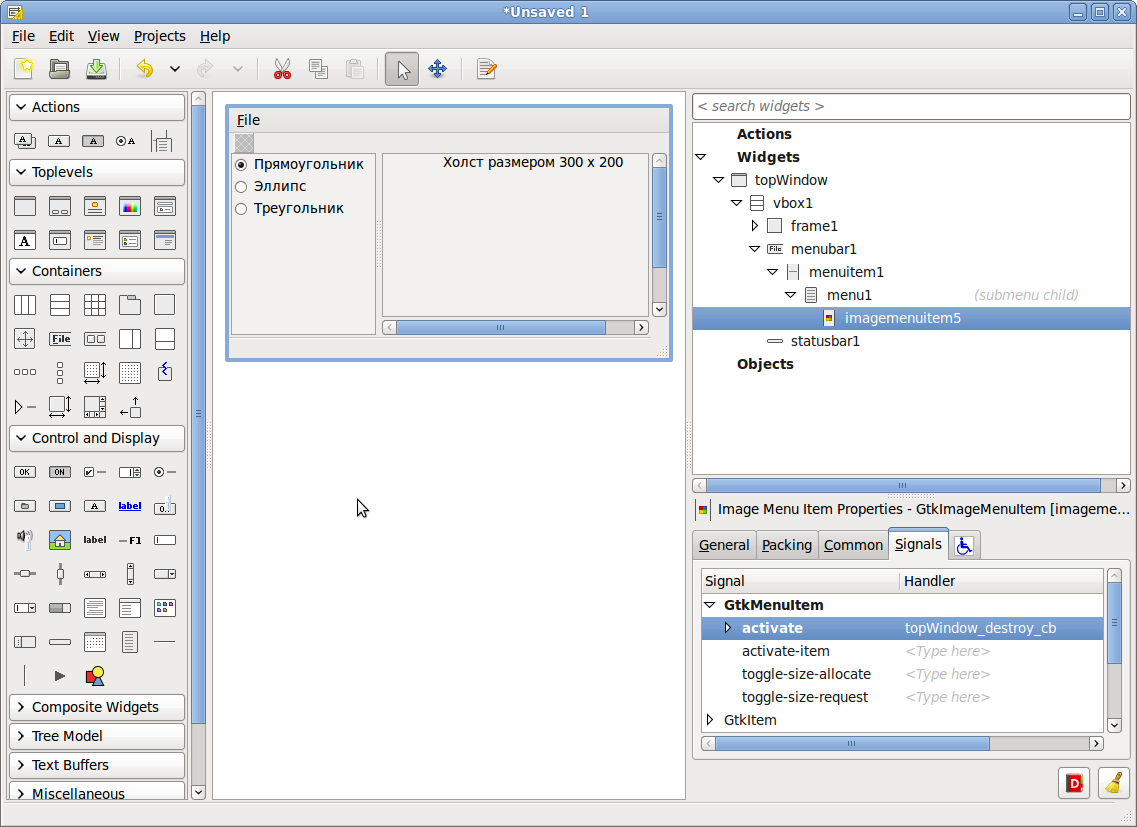
In menubar1 for our example, we leave only one menu item - exit from the program. Accordingly, you can delete: menuitem2, menuitem3, menuitem4. Then open the menuitem1, go to menu1 and delete everything except imagemenuitem5. This is a Quit item. You can click on it and see the property in the General tab of the properties window of the Stock Item property, in which gtk-quit is written. There you can "play". You can generally select Custom label and image and set everything yourself. This is not so important. For imagemenuitem5 in the Signals tab, we set the same signal for the activate signal (by clicking on the menu item) as for closing the form: topWindow_destroy_cb .
This is how our interface should look like. We save our project with the name mainForm. The file will be called mainForm.glade
Create a file Example1.cpp in the same folder where mainForm.glade was saved. First I will give the whole code, and then I will explain some important points.
We first declare those objects. with whom we will work. Then we start to prescribe signal handlers. Because we write in C ++, using extern "C", declare topWindow_destroy_cb, drawingarea_expose_event_cb, rbutton_toggled_cb external functions and indicate that they should be linked according to the binding order in C. GtkBuilder contains references to all objects from the description in Glade. The gtk_builder_get_object function gets a reference to an object with the corresponding name from GtkBuilder (in this case from the builder). The gtk_builder_connect_signals function serves to connect handler functions in the code with prescribed corresponding signal handlers in GladeXML. This happens automatically. It is important that the names in Glade and in the code match. The application will compile normally, signals will not be processed simply, and if you run a program through the console, warning's will be displayed there that it is impossible to find a handler for such a signal.
Also, because we write in C ++ very often we have to use explicit type conversion. for example
if we wrote in C, then we could do without the explicit ghost GTK_RADIO_BUTTON.
In order to compile your program you need to use either an automatic build system (for example, CMake), or to prescribe a makefile yourself. I will not dwell on this in detail. And just give an example of the description of the makefile. At the end of the post, the two most recent links concern the creation of a make file.
Compilation is done with the command:
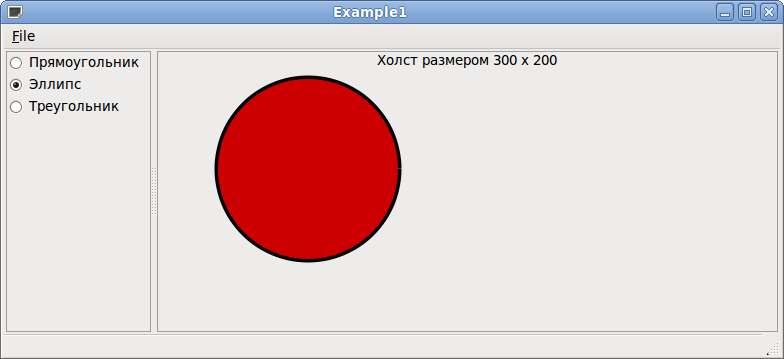
Running ...

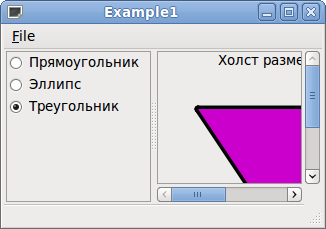
... and then resize the window
As we can see, the side menu and the canvas did not stretch out and remained in the same dimensions, but the container in which the canvas is resized. And moreover, all the free space that appeared with an increase in the size of the form went to him. This is all because we have set Width reguest = 145 and resize Yes for scrolledwindow1. Here is an example of the appearance of scroll bars as the main window has become smaller
And now I’ll go to Glade3 and change the Expand property to Yes in label1. The project does not need to be recompiled. Simply save the mainForm file. And here is the result:
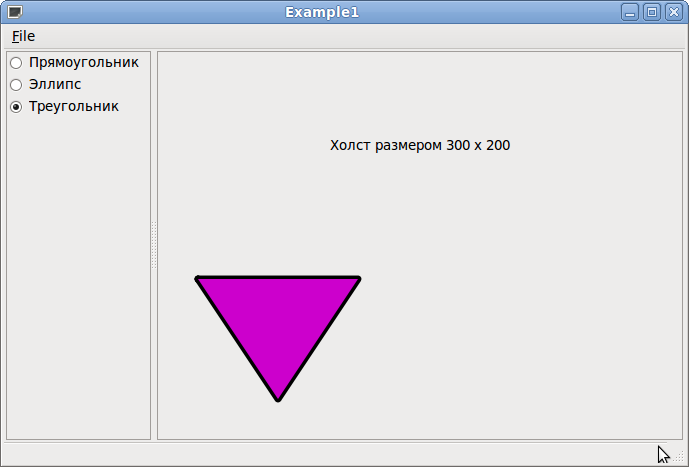
Why is that? Canvas we have a fixed size. And all the space that is obtained by increasing the main window is given to the label1 widget. You can play around with this whole thing. For example, setting Expand back to No and specifying the exact Height value, for example 70. And then there will again be a fixed size, but not by default, but one that you specify.
On this this post ends. If this topic is interesting, I have a desire to write more posts in this direction.
A bit of theory is taken from Glade3 tutorial - Size negotiation .
I advise you to read: Packing Widgets , The Cairo graphics tutorial , Makefiles by example , GNU `make '
A considerable advantage of this library is that it is free for commercial use. There are not so many documents and really high-quality articles on working with GTK + on the Internet. In many examples, the program interface is written in "pens", which is sometimes very inconvenient. I myself came across this and quite often spent more time on properly positioning widgets (objects) on the form, in containers, rather than focusing on solving the problem.
I will demonstrate how to very quickly create an interface for GTK + using the Glade GUI application for visual creation and integrate it into your program. Glade is neither a compiler nor a debugger. It only allows you to describe the interface and present it in GladeXML XML format files.
')
The base interface for the GTK + library is the C language. But I will use C ++ in this example. Accordingly, there will be small features, which I will tell you. The Linux distribution I use is Ubuntu 10.04.
The task will be as follows: write a small application consisting of a canvas, a side menu (choose what to draw on the canvas), the main menu and the status bar. At the same time, the side menu and the canvas when resizing the entire application window should remain a constant size. But the container in which the canvas is located can change its size depending on increasing / decreasing the size of the main window. And if necessary, scroll bars should appear.
The plan will be:
- Installing and running Glade3
- Create a graphical interface of our application in Glade3, placing the main widgets (objects) in the main window and containers, defining events (Singnals, signals) for widgets and their handler (Handler), i.e. procedure in the code of our program, which will be called when this signal occurs
- We will write the program code: we integrate the XML file with the graphical interface, we will write handlers and some functionality for demonstration
- we test our application a little
Installing and running Glade3
It is assumed that you have GTK + dev-package already installed, if not, then you can do it through the console:
sudo aptitude install libgtk2.0-dev You can install Glade through the Ubuntu Update Center or again using the console:
sudo apt-get install glade-gnome After installation, run through Applications - Programming - Glade Interface Designer
Set all parameters as shown in the figure. Version toolkit (Toolkit Version) select 2.16
On the left you can see a window with a set of various widgets. Those who worked with Windows Forms, or in the Delphi development environment will quickly understand. To the right are two menus: one shows the hierarchy of the widgets, and the second window the widget properties window.
GUI creation
Creating a graphical interface for your GTK + application begins with specifying the main form - the main window of the program. We find in the left menu in the TopLevels section the Window widget.
In the Properties window on the right, set the properties of this widget:
Name: topWindow
Windows position: Center
Default Width: 500
Default Height: 320
Go to the Signals tab (signal, event) and GtkObject looking for destroy, in the Handler column (handler) write topWindow_destroy_cb or select from the list. This will be the name of the procedure that will process the destroy signal - closing the main form.
Next, we plan to have in our application the main menu, the main functional part (this is the canvas and the menu for selecting what to draw) and the status bar. We take the Vertical Box widget container in the left menu in the Containers section and put it in our main form. In the dialog that appears, select Number of Items: 3. This means that you can put 3 widgets in the container we create.
We have 3 so-called cells or bays in the vbox1 container. In the second (center) compartment we put the Frame (the Containers section of the widget menu). We look at the tree of widgets on the right. Inside frame1 widget will be two widgets: alignment1 and label1 - they can be removed. At this, we will deviate a little and turn to the theory.
Understanding how GTK + controls the size of widgets is very important for creating correct and efficient graphical interfaces. This process is often called the approval process, consisting of two components (2 stages): the requested size and the allocated size.
The request stage is a recursive question: “How much space do you need?”. The main window sets its child windows, the child windows sets it to its child windows and so on until all the widgets are answered throughout this hierarchy.
There are 2 important points here:
- Child widgets do not know anything about the size of parent widgets
- The size of the parent widgets depends on the size of the child widgets.
Now that the main window knows how much space is needed ideally, a decision is made about how much space will actually be available. If a reasonable value has come to the request, it is the default. But if the window size is set to manual (for example, using gtk_window_setdefault_size) or otherwise, the window discards the requested size and sets another.
At the second stage (size allocation), a command from parent to child widget occurs: "Here you have some space, do everything to fit in it." If the widget has more than one child widget, then the task of this stage is to properly divide the free space between the child widgets.
Now go to the main part of our application. Go to the widget menu and select Horizontal Panes in the Containers section and put it on frame1. We need our left side to be a fixed size, the right one not. Go back to the widget menu and look for the Scrolled Window there. And we put first one, and then the second Scrolled Window in the left and right hpand1 compartment (Horizontal Panes). On the left Scrolled Window, which is called scrolledwindow1, set the property (in the Common tab) Width reguest equal to 145 - this will mean the requested size (for the matching process). You should also check that in the Packing tab, the Resize property of scrolledwindow1 is No , and that of scrolledwindow2 is Yes .
From the Containers section, we first put the first ViewPort widget, and then the second one on both our scrolledwindow1 and scrolledwindow2, respectively.
Let's do our side menu. Add to ViewPort1 Vertical Box with 3 compartments. And in each compartment add Radio Button. For each Radio Button, set the Expand No property so that they do not stretch as the size of the parent widget increases. Also in the Common tab, you can set the Width and Height request then they will be the size that we specify, and not by default. But in any case, they will change in size. Let's change their properties in the General tab:
Name respectively on rbutRectangle , rbutEllipse , rbutTriangle
Label respectively on Rectangle , Ellipse , Triangle
and for rbutEllipse and rbutTriangle, specify the Group rbutRectangle property using a special dialog.
It should turn out like this:
Now you need to register events for each Radio Button. In the Signals tab, no difference for either the GroupChanged event, or for toggled (I will do for it), we write the handler rbutton_toggled_cb :
Now turn to the right side of our window. Add a vertical container with two compartments to the ViewPort2. In the top we put the usual Label, and in the bottom Drawing Area it will be a canvas. In Label1, in the label property, we write a 300 x 200 Canvas . Go to the Packing tab and set Expand to No.
Now our canvas.
Name: drawingarea
Expend: No
Width request: 300
Height request: 200
Event: put a tick Exposure
In Signals, look for an expose-event and write or select from the list:
drawingarea_expose_event_cb
Now we need to add a status bar (to the lowest bay) and a main menu (to the uppermost bay). In the uppermost we put the Menu Bar (the Containers section of the widgets menu), In the lowermost section of the Status Bar (the Control and Display section of the widgets menu), to add it, a dialog will appear, select Number of Items: 1.
In menubar1 for our example, we leave only one menu item - exit from the program. Accordingly, you can delete: menuitem2, menuitem3, menuitem4. Then open the menuitem1, go to menu1 and delete everything except imagemenuitem5. This is a Quit item. You can click on it and see the property in the General tab of the properties window of the Stock Item property, in which gtk-quit is written. There you can "play". You can generally select Custom label and image and set everything yourself. This is not so important. For imagemenuitem5 in the Signals tab, we set the same signal for the activate signal (by clicking on the menu item) as for closing the form: topWindow_destroy_cb .
This is how our interface should look like. We save our project with the name mainForm. The file will be called mainForm.glade
Code of our program
Create a file Example1.cpp in the same folder where mainForm.glade was saved. First I will give the whole code, and then I will explain some important points.
/* Example1.cpp */ #include <cairo.h> #include <gtk/gtk.h> #define UI_FILE "mainForm.glade" // GtkBuilder *builder; GtkWidget *topWindow; GtkRadioButton *rbutRectangle, *rbutEllipse, *rbutTriangle; GtkDrawingArea *drawingarea; // extern "C" void topWindow_destroy_cb (GtkObject *object, gpointer user_data); extern "C" gboolean drawingarea_expose_event_cb(GtkWidget *widget, GdkEventExpose *event, gpointer data); extern "C" void rbutton_toggled_cb (GtkObject *object); int main( int argc, char **argv ) { GError *error = NULL; // GTK+ gtk_init( &argc, &argv ); // GtkBuilder builder = gtk_builder_new(); // , Glade if( ! gtk_builder_add_from_file( builder, UI_FILE, &error ) ) { g_warning( "%s", error->message ); g_free( error ); return( 1 ); } // GladeXML topWindow = GTK_WIDGET(gtk_builder_get_object(builder, "topWindow")); rbutRectangle = GTK_RADIO_BUTTON(gtk_builder_get_object(builder, "rbutRectangle")); rbutEllipse = GTK_RADIO_BUTTON(gtk_builder_get_object(builder, "rbutEllipse")); rbutTriangle = GTK_RADIO_BUTTON(gtk_builder_get_object(builder, "rbutTriangle")); drawingarea = GTK_DRAWING_AREA(gtk_builder_get_object(builder, "drawingarea")); // gtk_builder_connect_signals (builder, NULL); // g_object_unref( G_OBJECT( builder ) ); // gtk_widget_show( topWindow ); // gtk_main(); return( 0 ); } // void topWindow_destroy_cb (GtkObject *object, gpointer user_data) { // gtk_main_quit(); } // gboolean drawingarea_expose_event_cb(GtkWidget *widget, GdkEventExpose *event, gpointer data) { cairo_t *cr; cr = gdk_cairo_create (widget->window); cairo_set_line_width (cr, 7); cairo_set_source_rgb (cr, 0, 0, 0); // if (gtk_toggle_button_get_active (GTK_TOGGLE_BUTTON(rbutRectangle))) { // cairo_rectangle (cr, 20, 20, 200, 100); cairo_stroke_preserve(cr); cairo_set_source_rgb(cr, 0, 0.8, 0); } // if (gtk_toggle_button_get_active (GTK_TOGGLE_BUTTON(rbutEllipse))) { // cairo_arc(cr, 150, 100, 90, 0, 2 * 3.14); cairo_stroke_preserve(cr); cairo_set_source_rgb(cr, 0.8, 0, 0); } // if (gtk_toggle_button_get_active (GTK_TOGGLE_BUTTON(rbutTriangle))) { // cairo_set_line_cap(cr, CAIRO_LINE_CAP_ROUND); cairo_move_to (cr, 40, 40); cairo_line_to (cr, 200, 40); cairo_line_to (cr, 120, 160); cairo_line_to (cr, 40, 40); cairo_set_line_join(cr, CAIRO_LINE_JOIN_ROUND); cairo_stroke_preserve(cr); cairo_set_source_rgb(cr, 0.8, 0, 0.8); } cairo_fill(cr); cairo_destroy(cr); return FALSE; } void rbutton_toggled_cb (GtkObject *object) { // drawingarea gtk_widget_queue_draw (GTK_WIDGET(drawingarea)); } We first declare those objects. with whom we will work. Then we start to prescribe signal handlers. Because we write in C ++, using extern "C", declare topWindow_destroy_cb, drawingarea_expose_event_cb, rbutton_toggled_cb external functions and indicate that they should be linked according to the binding order in C. GtkBuilder contains references to all objects from the description in Glade. The gtk_builder_get_object function gets a reference to an object with the corresponding name from GtkBuilder (in this case from the builder). The gtk_builder_connect_signals function serves to connect handler functions in the code with prescribed corresponding signal handlers in GladeXML. This happens automatically. It is important that the names in Glade and in the code match. The application will compile normally, signals will not be processed simply, and if you run a program through the console, warning's will be displayed there that it is impossible to find a handler for such a signal.
Also, because we write in C ++ very often we have to use explicit type conversion. for example
rbutRectangle = GTK_RADIO_BUTTON(gtk_builder_get_object(builder, "rbutRectangle")); if we wrote in C, then we could do without the explicit ghost GTK_RADIO_BUTTON.
In order to compile your program you need to use either an automatic build system (for example, CMake), or to prescribe a makefile yourself. I will not dwell on this in detail. And just give an example of the description of the makefile. At the end of the post, the two most recent links concern the creation of a make file.
CC=g++ LDLIBS=`pkg-config --libs gtk+-2.0 gmodule-2.0` CFLAGS=-Wall -g `pkg-config --cflags gtk+-2.0 gmodule-2.0` Example1: Example1.o $(CC) $(LDLIBS) Example1.o -o Example1 Example1.o: Example1.cpp $(CC) $(CFLAGS) -c Example1.cpp clean: rm -f Example1 rm -f *.o Compilation is done with the command:
make A little testing of our program
Running ...
... and then resize the window
As we can see, the side menu and the canvas did not stretch out and remained in the same dimensions, but the container in which the canvas is resized. And moreover, all the free space that appeared with an increase in the size of the form went to him. This is all because we have set Width reguest = 145 and resize Yes for scrolledwindow1. Here is an example of the appearance of scroll bars as the main window has become smaller
And now I’ll go to Glade3 and change the Expand property to Yes in label1. The project does not need to be recompiled. Simply save the mainForm file. And here is the result:
Why is that? Canvas we have a fixed size. And all the space that is obtained by increasing the main window is given to the label1 widget. You can play around with this whole thing. For example, setting Expand back to No and specifying the exact Height value, for example 70. And then there will again be a fixed size, but not by default, but one that you specify.
On this this post ends. If this topic is interesting, I have a desire to write more posts in this direction.
A bit of theory is taken from Glade3 tutorial - Size negotiation .
I advise you to read: Packing Widgets , The Cairo graphics tutorial , Makefiles by example , GNU `make '
Source: https://habr.com/ru/post/107403/
All Articles