What is behind the editing form of a complex object?
In this article, we continue to acquaint you with the approaches implemented in the XtraScheduler scheduler. In the previous article we talked about the data synchronizer, this time we will talk about forms.
Quite often in applications you can find forms that are designed to enter or edit objects with a large number of dependent properties. Building such input forms causes a “headache” for developers: routine work on placing editors, writing initialization code, validation, event handlers ...
')
So how to make such forms quickly and reliably?
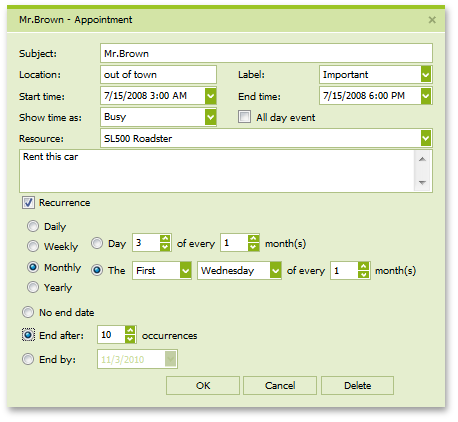
As an example of an editable object, take an Appointment , an object that represents some kind of scheduling event. The structure of this class is shown in the diagram below:
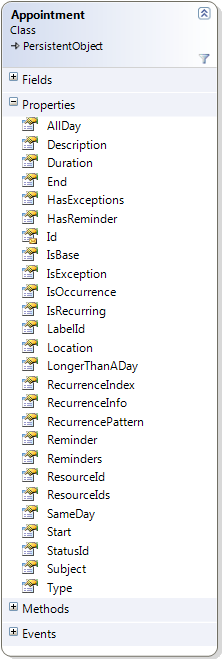
The object we selected has a fairly large set of properties. At the same time, depending on the values already set, only a certain part of the properties should be available for editing. In addition, the object implements the business logic for setting values - changing one property can lead to setting / zeroing another, depending on the first.
Therefore, when developing the interface of a form, it is necessary to take into account all these factors and make sure that the interface elements react in a certain way to a change in the state of the edited object.
To edit this object, we used the following approach: all editors on the form will edit or display not the properties of the object itself, but the properties of some object related to the edited one.
You have probably already guessed that the discussion will deal with the controller and the use of the Adapter pattern, since the interface of the form may differ from the interface of the object itself.
Create a controller by passing to it the original editable object as a parameter, as well as other objects necessary for editing.
In our case, the change of the original object in the editing process was extremely undesirable, and when you clicked the Cancel button in the form, you would need to restore the original values of all its properties. Therefore, along with the original object, the controller also contains a copy of this object created in the constructor:
What does having a copy? While editing is carried out in the form, the properties of the duplicated object are changed, and only when applying the changes from the copy are “rolled” onto the original object. This is done by a special controller method:
In the case of closing the form without changing the need for any action is eliminated, because the original object remained intact.
Note that with a different architecture, the scheme for applying / reversing changes may differ from the one described here and there may be no need for a copy.
We turn to properties. In the controller, we implement the Facade pattern and duplicate the necessary properties from the copy object into the controller properties:
If the input editors interfaces and the object properties are incompatible, we do the necessary transformations directly in the controller properties:
If necessary, for example, separate display and editing of date and time, we split the property of an object into two properties of the controller:
We supplement the controller with the necessary utility properties that are missing in the edited object, but may be needed when designing the interface of the form:
In addition, we create in the controller a set of methods that implement all the necessary logic, including validation methods, obtaining additional objects, etc., which will request form objects.
Validation is performed in event handlers of form controls and the correct values are written to the controller properties. When you change the dependent properties in the controller, you need to update the data in the appropriate editors, and maybe even hide or make it unavailable for input.
In WinForms, this is done in the following way: we unsubscribe from the editors' events, reread new data from the controller to the editors, and subscribe to the events again.
Validation of values on the web can be done not in a form, but in a callback command that accesses the values of editors. After analyzing the entered values, it may be decided to close the form or not and issue an informational message.
As a result, our form controller encapsulates all the necessary functionality and being a simple class can be reused, be it WinForms, web or WPF / SL.
If necessary, for each platform there may be a controller successor implementing platform-specific actions.
We illustrate with code fragments examples of using AppointmentFormControllerBase on various platforms.
The controller instance is created in the form constructor, the editors are initialized by the controller properties, when changes are made to the editors' values, the controller properties are modified, and there is code to apply the changes.
On the web, the input form is UserControl and is loaded as a template. To bind editors' values to controller properties, Data Binding Expressions are used using the syntax of the form "<% #%>". The controller instance is created in the template container class and is accessible from the form via the Container property.
The ascx file of the form looks like this
Below is the form template and container code:
On this platform, a form template is represented by System.Windows.Controls.UserControl. Similar to WinForms, an instance of the controller is created in the form designer. But the "binding" to the values of editors is done in xaml through the mechanism of two-way Binding.
Using a form controller provides the following benefits:
We hope that the material presented in the article will be useful for you.
Quite often in applications you can find forms that are designed to enter or edit objects with a large number of dependent properties. Building such input forms causes a “headache” for developers: routine work on placing editors, writing initialization code, validation, event handlers ...
')
So how to make such forms quickly and reliably?
Editable object
As an example of an editable object, take an Appointment , an object that represents some kind of scheduling event. The structure of this class is shown in the diagram below:
The object we selected has a fairly large set of properties. At the same time, depending on the values already set, only a certain part of the properties should be available for editing. In addition, the object implements the business logic for setting values - changing one property can lead to setting / zeroing another, depending on the first.
Therefore, when developing the interface of a form, it is necessary to take into account all these factors and make sure that the interface elements react in a certain way to a change in the state of the edited object.
Editing method
To edit this object, we used the following approach: all editors on the form will edit or display not the properties of the object itself, but the properties of some object related to the edited one.
You have probably already guessed that the discussion will deal with the controller and the use of the Adapter pattern, since the interface of the form may differ from the interface of the object itself.
Create a controller by passing to it the original editable object as a parameter, as well as other objects necessary for editing.
public class AppointmentFormControllerBase : INotifyPropertyChanged { InnerSchedulerControl innerControl; Appointment sourceApt; public AppointmentFormControllerBase(InnerSchedulerControl innerControl, Appointment apt) { this.innerControl = innerControl; this.sourceApt = apt; //... } protected internal Appointment SourceAppointment { get { return sourceApt; } } //... } In our case, the change of the original object in the editing process was extremely undesirable, and when you clicked the Cancel button in the form, you would need to restore the original values of all its properties. Therefore, along with the original object, the controller also contains a copy of this object created in the constructor:
public AppointmentFormControllerBase(InnerSchedulerControl innerControl, Appointment apt) { //... CreateAppointmentCopies(); } public Appointment EditedAppointmentCopy { get { return editedAptCopy; } } protected internal virtual void CreateAppointmentCopies() { editedAptCopy = sourceApt.Copy(); //... } What does having a copy? While editing is carried out in the form, the properties of the duplicated object are changed, and only when applying the changes from the copy are “rolled” onto the original object. This is done by a special controller method:
public virtual void ApplyChanges() { // … sourceApt.BeginUpdate(); try { ApplyChangesCore(); } finally { sourceApt.EndUpdate(); } } protected internal virtual void ApplyChangesCore() { AppointmentFormAppointmentCopyHelper helper = new AppointmentFormAppointmentCopyHelper(this); helper.AssignSimpleProperties(editedAptCopy, sourceApt); helper.AssignCollectionProperties(editedAptCopy, sourceApt); } In the case of closing the form without changing the need for any action is eliminated, because the original object remained intact.
Note that with a different architecture, the scheme for applying / reversing changes may differ from the one described here and there may be no need for a copy.
Controller interface
We turn to properties. In the controller, we implement the Facade pattern and duplicate the necessary properties from the copy object into the controller properties:
public string Subject { get { return editedAptCopy.Subject; } set { editedAptCopy.Subject = value; NotifyPropertyChanged("Subject"); } } If the input editors interfaces and the object properties are incompatible, we do the necessary transformations directly in the controller properties:
public DateTime Start { get { return InnerControl.TimeZoneHelper.ToClientTime(editedAptCopy.Start); } set { editedAptCopy.Start = InnerControl.TimeZoneHelper.FromClientTime(value); } } If necessary, for example, separate display and editing of date and time, we split the property of an object into two properties of the controller:
public DateTime StartDate { get { return editedAptCopy.Start.Date; } set { editedAptCopy.Start = value.Date + editedAptCopy.Start.TimeOfDay; NotifyPropertyChanged("StartDate"); } } public TimeSpan StartTime { get { return editedAptCopy.Start.TimeOfDay; } set { editedAptCopy.Start = editedAptCopy.Start.Date + value; NotifyPropertyChanged("StartTime"); } } We supplement the controller with the necessary utility properties that are missing in the edited object, but may be needed when designing the interface of the form:
public virtual bool IsNewAppointment { get { … } } public bool CanDeleteAppointment { get { … } } In addition, we create in the controller a set of methods that implement all the necessary logic, including validation methods, obtaining additional objects, etc., which will request form objects.
Validation is performed in event handlers of form controls and the correct values are written to the controller properties. When you change the dependent properties in the controller, you need to update the data in the appropriate editors, and maybe even hide or make it unavailable for input.
In WinForms, this is done in the following way: we unsubscribe from the editors' events, reread new data from the controller to the editors, and subscribe to the events again.
protected internal virtual void edtStartDate_Validated(object sender, EventArgs e) { controller.DisplayStart = edtStartDate.DateTime.Date + edtStartTime.Time.TimeOfDay; UpdateIntervalControls(); } protected internal virtual void UpdateIntervalControls() { UnsubscribeControlsEvents(); try { UpdateIntervalControlsCore(); } finally { SubscribeControlsEvents(); } } protected virtual void UpdateIntervalControlsCore() { edtEndDate.EditValue = controller.DisplayEnd.Date; edtEndTime.EditValue = new DateTime(controller.DisplayEnd.TimeOfDay.Ticks); //... bool enableTime = !controller.AllDay; edtEndTime.Visible = enableTime; edtEndTime.Enabled = enableTime; } Validation of values on the web can be done not in a form, but in a callback command that accesses the values of editors. After analyzing the entered values, it may be decided to close the form or not and issue an informational message.
As a result, our form controller encapsulates all the necessary functionality and being a simple class can be reused, be it WinForms, web or WPF / SL.
If necessary, for each platform there may be a controller successor implementing platform-specific actions.
Using the form controller
We illustrate with code fragments examples of using AppointmentFormControllerBase on various platforms.
1. Windows Forms
The controller instance is created in the form constructor, the editors are initialized by the controller properties, when changes are made to the editors' values, the controller properties are modified, and there is code to apply the changes.
public partial class AppointmentForm : DevExpress.XtraEditors.XtraForm { readonly AppointmentFormController controller; public AppointmentForm(SchedulerControl control, Appointment apt, bool openRecurrenceForm) { // … this.controller = CreateController(control, apt); UpdateForm(); } protected internal AppointmentFormController Controller { get { return controller; } } protected virtual AppointmentFormController CreateController(SchedulerControl control, Appointment apt) { return new AppointmentFormController(control, apt); } protected virtual void UpdateForm () { tbSubject.Text = controller.Subject; edtShowTimeAs.Status = controller.GetStatus(); bool resourceSharing = controller.ResourceSharing; edtResource.Visible = !resourceSharing; bool canEditResource = controller.CanEditResource; edtResource.Enabled = canEditResource; //… } protected internal virtual void tbSubject_EditValueChanged(object sender, EventArgs e) { controller.Subject = tbSubject.Text; } protected internal virtual void OnOkButton() { if (controller.IsConflictResolved()) { controller.ApplyChanges(); } //… } 2. ASP.NET
On the web, the input form is UserControl and is loaded as a template. To bind editors' values to controller properties, Data Binding Expressions are used using the syntax of the form "<% #%>". The controller instance is created in the template container class and is accessible from the form via the Container property.
The ascx file of the form looks like this
<%@ Control Language="C#" AutoEventWireup="true" Inherits="AppointmentForm" CodeFile="AppointmentForm.ascx.cs" %> <%@ Register Assembly="DevExpress.Web.ASPxEditors.v10.2, … Namespace="DevExpress.Web.ASPxEditors" TagPrefix="dxe" %> <table class="dxscAppointmentForm"> </table> <tr> //… <td> <dxe:ASPxDateEdit ID="edtStartDate" runat="server" Date='<%# ((AppointmentFormTemplateContainer)Container).Start %>' EditFormat="DateTime" /> </td> <td> <dxe:ASPxComboBox ID="edtResource" runat="server" DataSource='<%# ResourceDataSource %>' Enabled='<%# ((AppointmentFormTemplateContainer)Container).CanEditResource %>' /> </td> //… </tr> </table> <dxsc:AppointmentRecurrenceForm ID="AppointmentRecurrenceForm1" runat="server" Start='<%# ((AppointmentFormTemplateContainer)Container).RecurrenceStart %>' > </dxsc:AppointmentRecurrenceForm> //… <dxe:ASPxButton runat="server" ID="btnOk" Text="OK" UseSubmitBehavior="false" /> Below is the form template and container code:
using System.Web.UI; public partial class AppointmentForm : UserControl { public override void DataBind() { base.DataBind(); AppointmentFormTemplateContainer container = (AppointmentFormTemplateContainer)Parent; AppointmentRecurrenceForm1.Visible = container.ShouldShowRecurrence; //… btnOk.ClientSideEvents.Click = container.SaveHandler; } public class AppointmentFormTemplateContainer : Control, IDataItemContainer, INamingContainer { AppointmentFormController controller; public AppointmentFormTemplateContainer(ASPxScheduler control) { this.controller = CreateController(control, Appointment); // … } public DateTime Start { get { return TimeZoneHelper.ToClientTime(Controller.EditedAppointmentCopy.Start); } } public bool CanEditResource { get { return Controller.CanEditResource; } } public bool ShouldShowRecurrence { get { return Controller.SourceAppointment.IsOccurrence && Controller.ShouldShowRecurrenceButton; } } public DateTime RecurrenceStart { get { return TimeZoneHelper.ToClientTime(Controller.EditedPattern != null ? Controller.EditedPattern.RecurrenceInfo.Start : DateTime.Now); } } public string SaveHandler { get { return String.Format("function() {{ aspxAppointmentSave(\"{0}\"); }}", ControlClientId); } } // … } 3. WPF / SL
On this platform, a form template is represented by System.Windows.Controls.UserControl. Similar to WinForms, an instance of the controller is created in the form designer. But the "binding" to the values of editors is done in xaml through the mechanism of two-way Binding.
<UserControl x:Class="DevExpress.Xpf.Scheduler.UI.AppointmentForm" xmlns="http://schemas.microsoft.com/winfx/2006/xaml/presentation" xmlns:x="http://schemas.microsoft.com/winfx/2006/xaml" xmlns:dxe="http://schemas.devexpress.com/winfx/2008/xaml/editors" xmlns:dxsch="clr-namespace:DevExpress.Xpf.Scheduler" x:Name="AptForm" MinWidth="600" > // … <Grid> // … <dxe:TextEdit Text="{Binding Controller.Subject, UpdateSourceTrigger=PropertyChanged}" /> <dxe:DateEdit Name="edtStartDate" EditValue ="{Binding Controller.DisplayStartDate}" /> <!--Resources--> <TextBlock IsEnabled="{Binding Controller.CanEditResource}"/> <ContentControl Content="{Binding ElementName=AptForm, Path=Controller}" ContentTemplateSelector="{StaticResource ResTemplateSelector}" IsEnabled="{Binding Controller.CanEditResource}"> </ContentControl> <Button Click="OnDeleteButtonClick" Visibility="{Binding Controller.CanDeleteAppointment, Converter={local:BoolToVisibilityConverter}}" /> // … </Grid> </UserControl> So let's summarize
Using a form controller provides the following benefits:
- combining all object editing business logic in one class
- the ability to extend editable properties when the interface of the object does not match the interface of the input form
- the possibility of using a platform-independent controller object on various platforms and reducing the time it takes to port code from one platform to another
We hope that the material presented in the article will be useful for you.
Source: https://habr.com/ru/post/107359/
All Articles