We enter the Android Market using AppInventor
The material contains the experience of developing an application for the Google Android mobile operating system with the tool of the company-developer of this OS — AppInventor, registering a Google developer account, placing the created application in the Android Market and updating it.
The experience can be useful both as a complex and in parts for those who are interested in writing a fairly simple program for this OS without going into the subtleties of Java, Eclipse and other joys of the Android SDK.
In this part:
To complete the task - writing and publishing the application under the Google Android OS, you need to perform several manipulations in the browser. Go through the points:
a . if you have ... if you do not have a Google account, you need to create one. To do this, just go to the site, for example, http://gmail.com/ , find the inscription “Create an account” / “Create an account”, find the language switch on the page, select your native language from the list and answer a few questions in the process registration. In addition, you will have a great e-mail service, and, if you wish, a large number of other useful Google services;
b . You need to have an account in the Google AppInventor Developer Toolkit. At this stage, Google does not provide access to the toolkit to anyone. Therefore, you need to go to http://appinventor.googlelabs.com/ , log in with your Google account and submit an application in the automatically opened form by filling it out. (Just like in Habré, it is not necessary to have a ready-made useful program.) After this step, you need to wait for the favor from Google. I waited for him for about 2 weeks;
')
In principle, these are the basic actions that need to be performed in order to be able to write, or more precisely to assemble programs using AppInventor. And in order not to waste time waiting for the satisfaction of your application, you can download and install the necessary software for work (see below).
If the developer is interested in the distribution of the collected program, then you need to perform another item, namely:
c . "Buy a Google developer site." Today these places cost $ 25 (twenty-five US dollars) per piece. According to the company, such measures are designed to protect the Android ecosystem from the stream of shit programs. (You don’t need to go far for an example, it’s enough to read sections 2-4, but we have other goals ...) Nevertheless, to register yourself as a programmer for Android you need to follow the link http://market.android.com/ where to go through the registration procedure (currently in English) and payment using Google Checkout. For this you need a plastic card of international payment systems (purchased separately). The registration process is described in more detail in section 5.
However, since perhaps not everyone will want to break into the Android Market, and someone who does not have programming skills will want to write a program for himself - this last point should not be done by everyone.
Directly for writing programs need to do a couple of things. You need to install the client Java module and configure the connection to the Android phone. How to perform these procedures and solve the problems described here http://appinventor.googlelabs.com/learn/gettingstarted.html . Briefly run through the stages:
- if Java is not installed on your computer, you should download the latest version from http://java.com/ and install it on your computer (check whether Java is installed here: http://www.java.com/en/download/ help / testvm.xml , recommend installing the latest version);
- then you need to download and install the AppInventor Extras Software package containing the drivers and other software. Links for various operating systems: Mac OS X , Windows , Linux . Developers recommend not changing any parameters during installation;
- Finally, you need to change a few settings in the phone. I would like to note here that in order to write a program it is not at all necessary to connect the phone to AppInventor, the compiled program (.apk) can be downloaded from the web-based toolkit and installed on the phone manually at any time. However, when you connect to the phone, at the last, in real time, the developed project is executed, which is very convenient for catching various bugs, so we will continue. So, in the phone you need to turn off the auto-rotate screen (Settings-Screen-Auto-rotate screen), allow installation from unknown sources (Settings-Applications-Unknown sources), enable USB debugging (Settings-Applications-Development-USB Debugging) and setting, not allowing the screen to turn off when connected to a computer (Settings-Applications-Development-Leave on). And by connecting the phone to the computer in any case, do not mount the SD card as a USB flash drive.
It is also necessary to take into account that after the connection, the AppInventorPhoneApp program with a size of 3.81 MB will be installed on the phone, i.e. free phone memory is needed.
After numerous preparatory operations and acceptance of your application in AppInventor, you receive an email and access to this web application. You can start the implementation of creative plans!
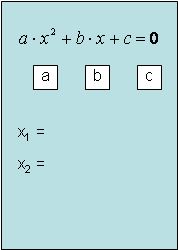
The application that I decided to create for publishing in the Android Market is not replete with the complexity of things. Let the program calculate the roots of the quadratic equation. Updates will smoothly bring the program to solve systems of equations, and if a couple is enough, to solve a system of inequalities. Anything is better than making a picture of a cat meow.
We will determine the requirements for it: since our program will calculate the roots of the quadratic equation, at least the input of coefficients and the output of results must be implemented.
The proposed interface can be estimated on paper or sketched a presentation. For the first version, something like this will come down:
Well, let's start the implementation!
We connect the phone to the computer, do not mount the card as a drive, go to the page http://appinventor.googlelabs.com/ , enter the registration data, click "Sign in" and get into AppInventor BETA.
Describing the page that appears does not make much sense (only the “Learn” link in the center of the upper part of the page is useful).
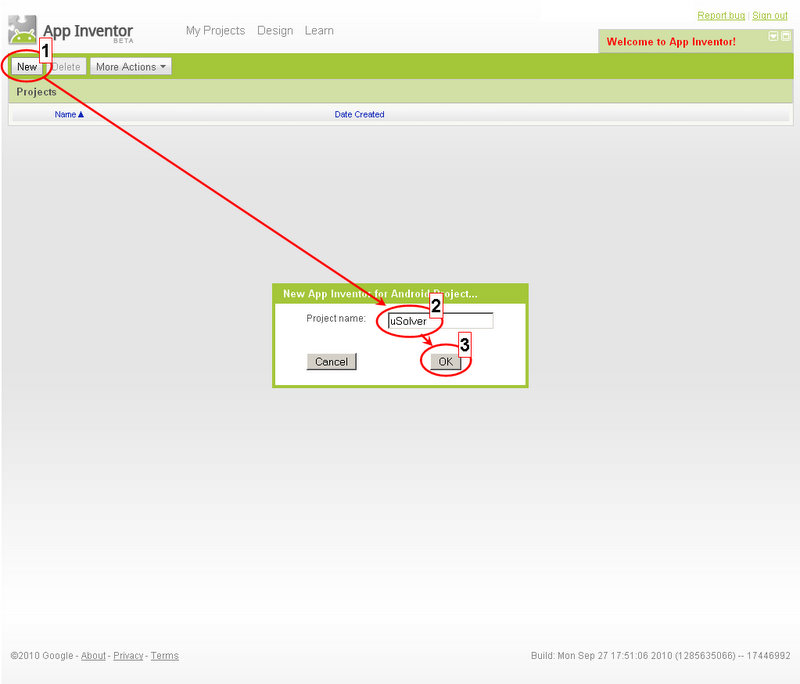
Therefore, we boldly press the “New” button and enter the name of the new project in the appeared window - uSolver, which should mean Universal Solver, i.e. universal solver (not to be confused with Deep Thought).
We press on “OK” and get into the “Design” module:
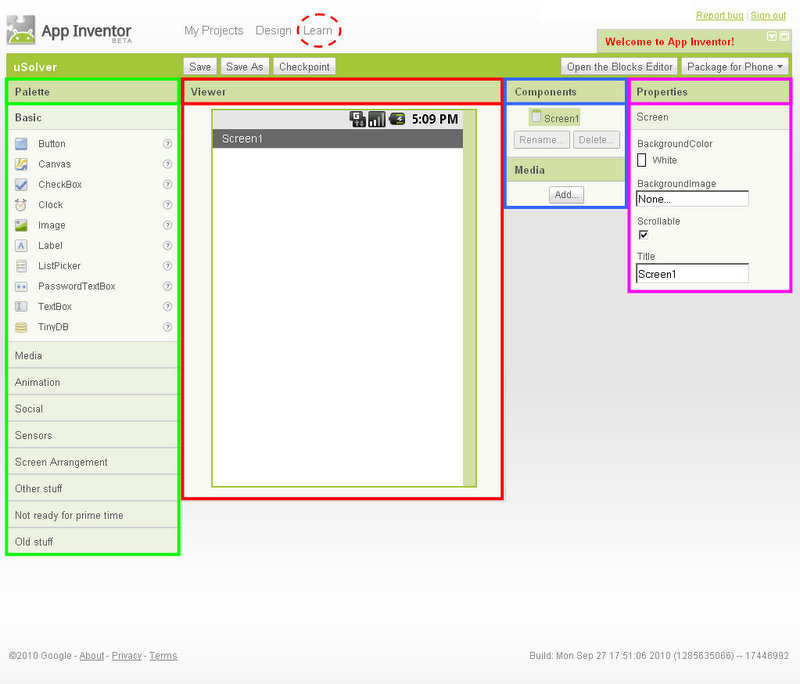
There is already something to describe.
In the center of the window is the “Viewer” panel, which serves to preview the interface of the application being developed and select controls (this is not an emulator or simulator window!). The interface elements themselves and some other control structures are contained in the Palette panel, where they are divided into categories. The settings for each element used are available in the “Properties” palette. The overall structure of the interface elements is displayed in the “Components” palette, where elements can be deleted and renamed.
You can immediately click the "Open the Block Editor" button and establish a connection to the phone there to track the design changes live, but for the first time I do not recommend cluttering your head with another toy.
Better get to the interface. Rename the title of the start screen and change the background color (so that white does not tire):

To control the location of control elements (controls) there is a category “Screen Arrangments”. We are interested in the consistent following elements from top to bottom. Select the desired category (KO: Picky, naturally, on it with the left button), its contents are revealed, grab the desired alignment and drag it to the empty space of the screen of our application, then slightly adjust its appearance in the “Properties” panel:

If the selection of the component is lost, you should click on it in the “Viewer” or “Components” and it will be available to set properties.
Let's start filling the screen according to the chosen concept ...
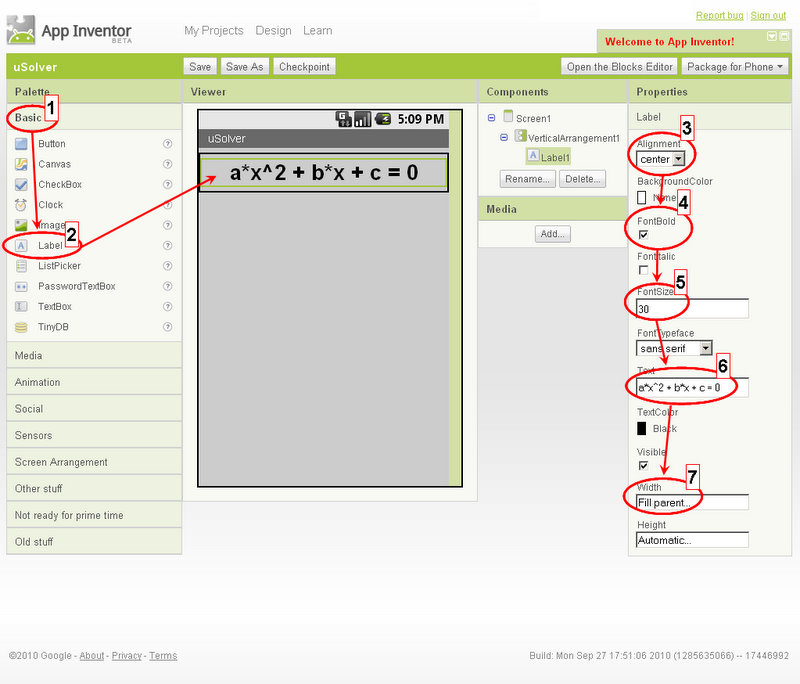
First we should have a general view of the equation to be solved. We push it in Label. Palette-> Basic-> Label, dragging it into alignment and adjusting the parameters:
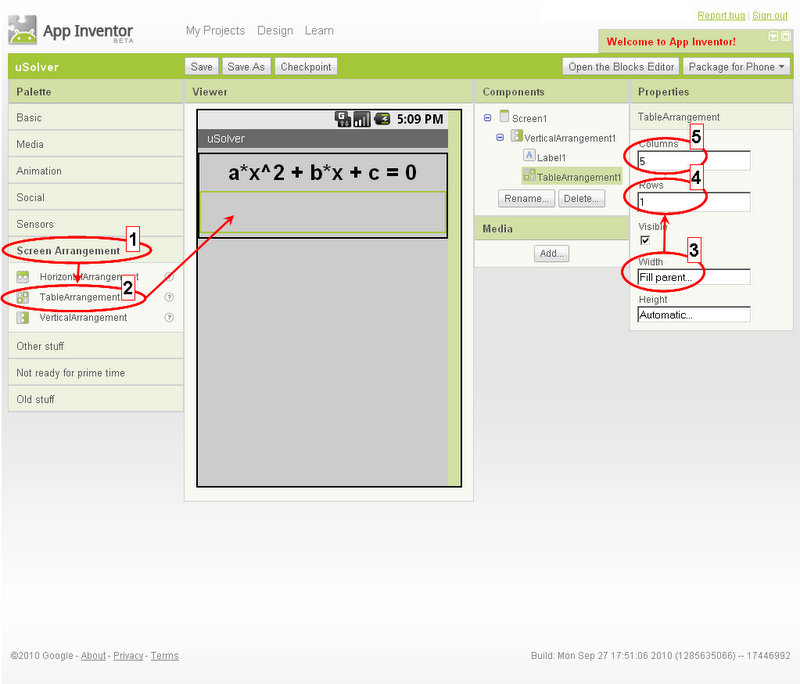
Next, you need to place the input fields of the coefficients in one horizontal line and arrange their group in the center of the screen. To do this, we use the table alignment of 5 cells in one line:
Three central cells will occupy the input fields. To do this, drag the fields to the approximate locations of the cells:
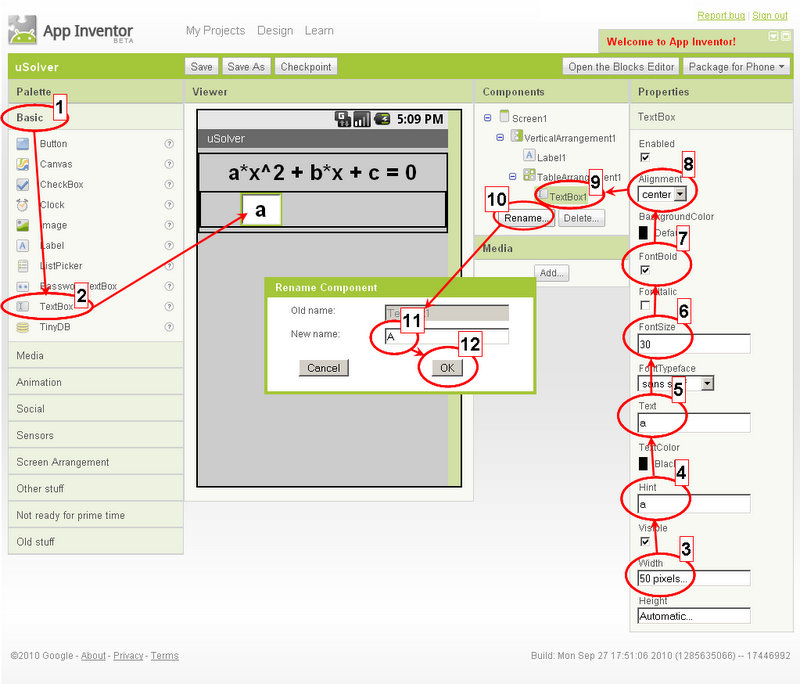
Do not forget to adjust the parameters to your taste.
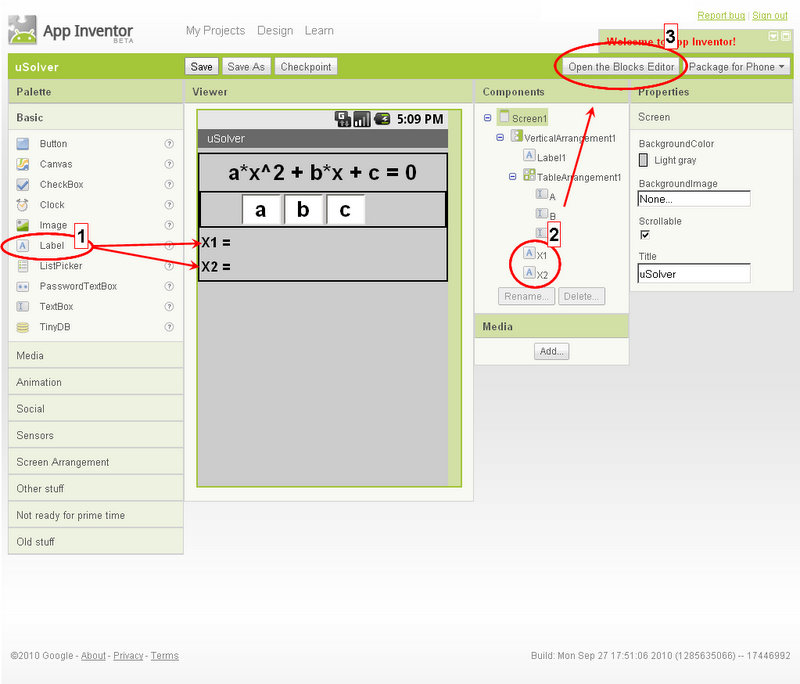
To derive solutions to the equation, we will provide two “Label” controls. They can be inserted one above the other into a vertical alignment after the block with a table alignment:
That seems to be all that was planned. I want to draw attention to the names of some input fields (TextBox) and labels (Label). These names will be used in the future and they must carry at least some semantic meaning, otherwise misunderstandings are possible in the process of drawing up a block “code”. However, we renamed only those that are needed.
After creating the interface, it is time to “gather” the logic of the program. To do this, click on the button "Open the Block Editor".
The browser will have to download a file, which you need to open using previously installed Java. Usually all actions happen automatically. After the start of Java, it can issue a question about the location of the AppInventors Extra files that were downloaded and installed by us in advance.
It is worth noting that the manipulation should be carried out if you need to provide a connection to the phone. If the connection is not needed - click "Cancel".
I also want to note that the process of loading the Block Editor is not fast, but I don’t need to be nervous about it.
After its launch, click "Connect to phone", if, of course, you need a connection. There will be a connection to the phone, software installation and the launch of the program being developed, but unworkable.

If everything worked out, let's go back to the block editor.
The Block Editor interface is very similar to the Interface Editor interface, which symbolizes. Built-in blocks (Built-In) contain control blocks, “My Blocks” blocks interact with the program interface elements. If it became clear not everything, it will be possible to sort it out in the course of the text, and now we will get down to business.
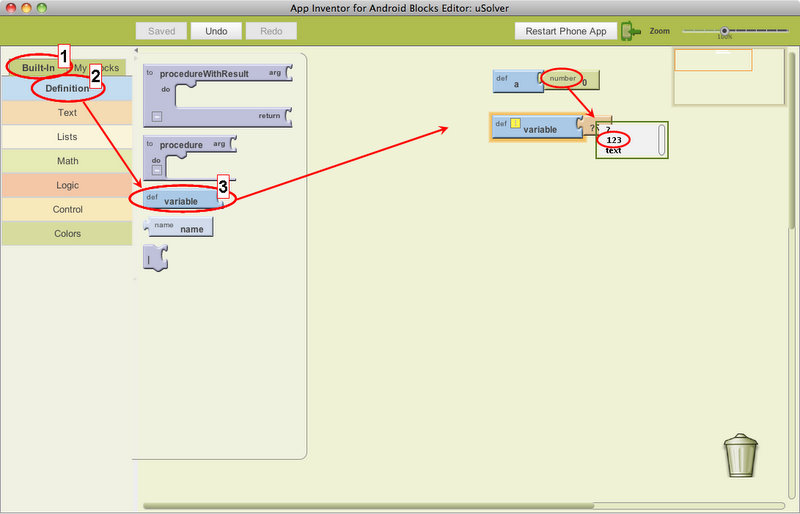
To begin with, we define several variables — the coefficients of the equation and its roots: a, b, c, x1, and x2. To do this, in the “Built-In” block, select Definition -> variable and drag its block to the empty field. Rename it by clicking on the word "variable" in "a", set the type of the variable - number by pointing at the question in the attached block of light brown color and selecting "123" in the menu. The default value of the variable is set to “0” by clicking on “123” and entering “0” instead of 123. After entering values, you must press Enter, because it does not always work.
Repeat the same steps for the remaining variables. Unfortunately, I didn’t find a way to copy the blocks, so I’ll have to be patient here and in some places further (it’s worth saying that developers are notified by interested users and are already working on copying / pasting blocks).
Now variables a, b, c need to assign user-entered values. Let's start with the variable a.
On the “My Blocks” tab, select the “A” block (this is the text field for entering the coefficient a) and drag the “A.LostFocus” construct to the empty space (this kagbe means that the block will be executed when the text field loses t. n focus, i.e., the user moves to another control element). In the “My Definitions” field, select the “set global a to” construction and drag it inside the “A.FostFocus” block so that it is fixed in it (this will happen with a characteristic sound). Then again click on the “A” block and drag the “A.Text” design into the “global global” puzzle slot. As a result, it should turn out like this (the process is shown on the example of the “B” component):
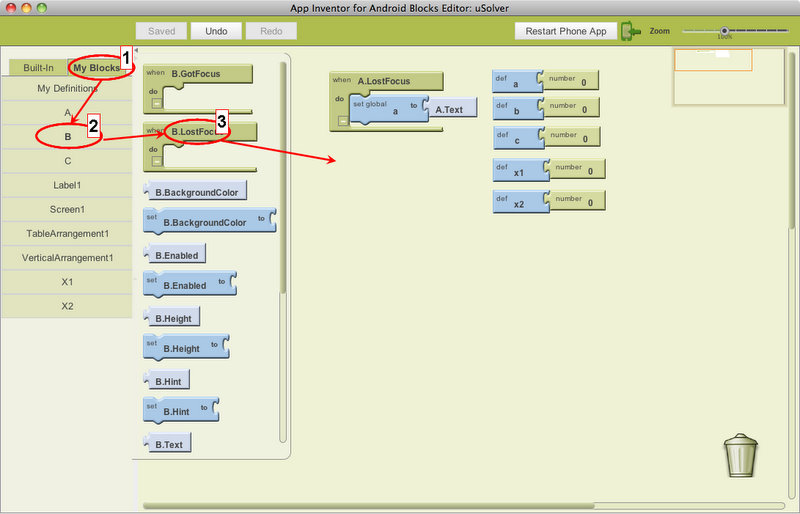
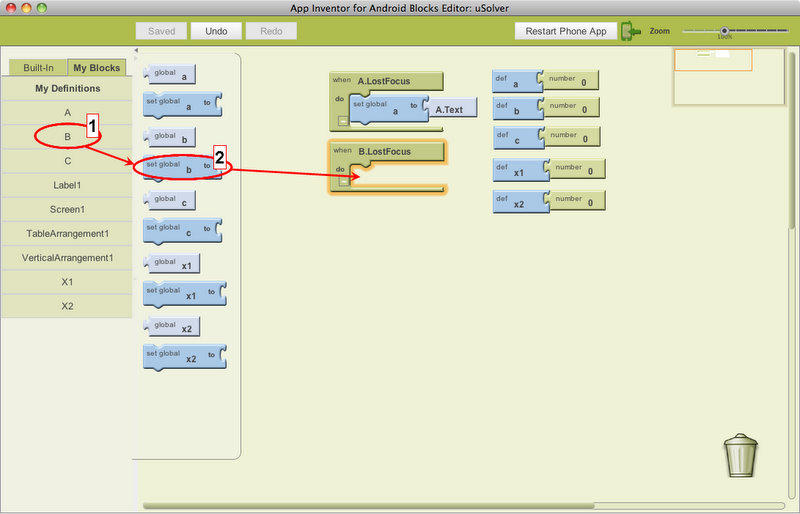
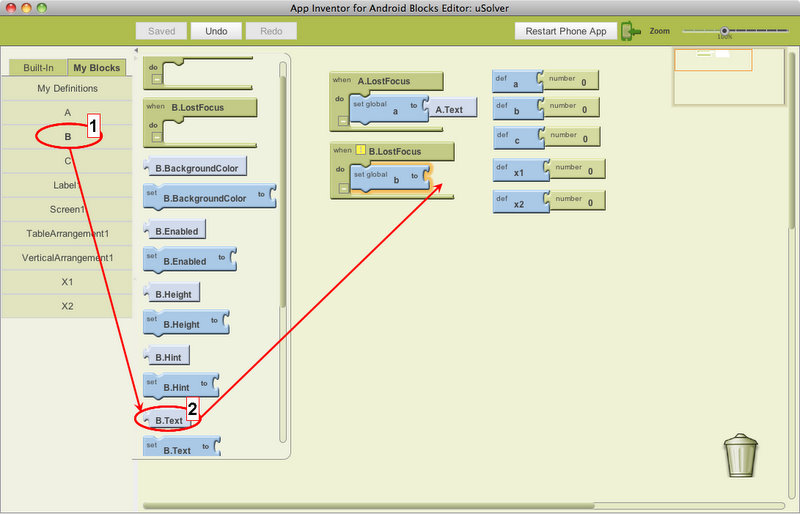
This block diagram means that when the focus is lost, the input field “a” of the variable “a” is assigned the text contained in this field. Repeat the same actions for blocks “B” and “C”.
In the next step, we define the variables x1 and x2, i.e. find the roots of the equation.
As I understand it, implementing mathematical calculations in the current version of AppInventor is not just a formula written. We will fence the procedure and introduce additional variables ...
We calculate the discriminant value (which is D = b ^ 2-4ac ), for this we introduce an additional numeric variable - “D” according to the scheme specified for variables a, b, c, x1 and x2 and pull the “set global D to” block into the workspace . Here the most unpleasant begins: combining mathematical operators into a sequence to calculate the desired value — just pull the necessary operators out of the Built-In -> Math blocks and put them in the slots of the set global D to block. Substitute variables into the operator arguments. Perhaps it is easier to see in the picture than to describe with the words:
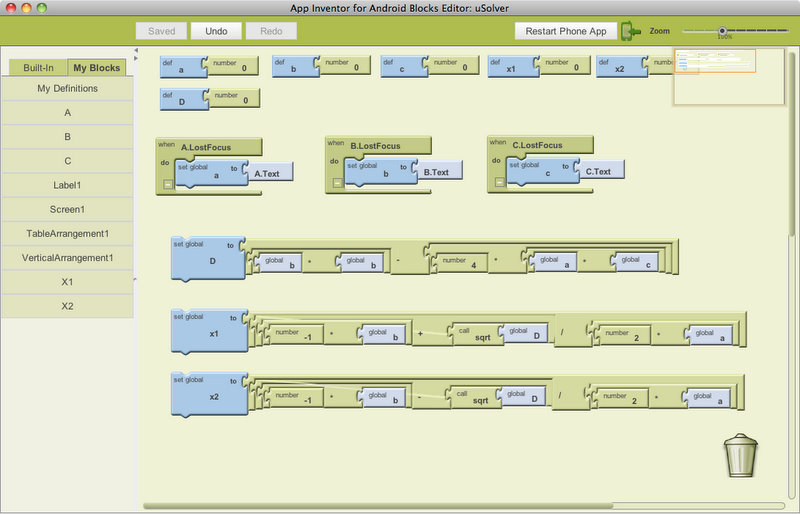
Hint: it should be understood that the discriminant is primarily a difference. The difference between the product of b by b and the product of 4 by the product of a by c. Where 4 is a numeric constant.
By the way, it is convenient to get the numeric constants by pressing the left button on the empty space, select Math -> 123 there and replace this 123 with the desired numeric value. The same can be done with all the other built-in blocks!
We will not enter the verification of the discriminant's sign yet, we will calculate the roots with what is.
Let us extend the “set global x1 to” construction from My Definitions to the empty space and adjust the value of the variable x1 to the formula: x1 = (- b + sqrt (D)) / (2 * a) . We will do the same with x2, where x2 = (- b-sqrt (D)) / (2 * a) .
Now all the necessary values are calculated.
Since it is supposed to issue counted roots after losing the “focus” of any of the input fields of the coefficients of the equation, and in the absence of copy-paste to type a few more “formulas” well, we are too lazy, we will write a procedure that we will call in the “.
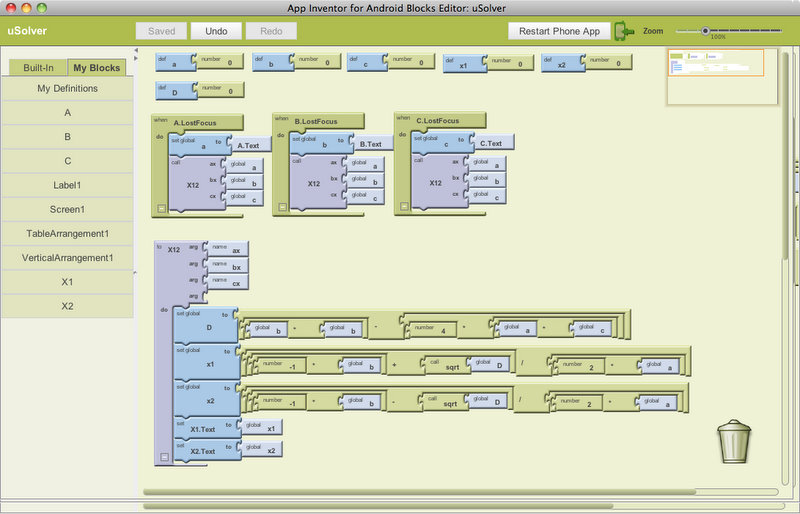
Let's start. We take out the Built-In-> Definition-> procedure block, rename it to X12 (by clicking on the word “procedure”) and stick it to the slots “arg” Built-In-> Definition-> name blocks, calling them “ax”, “bx "," Cx "(all variables are global, therefore their renaming is required).
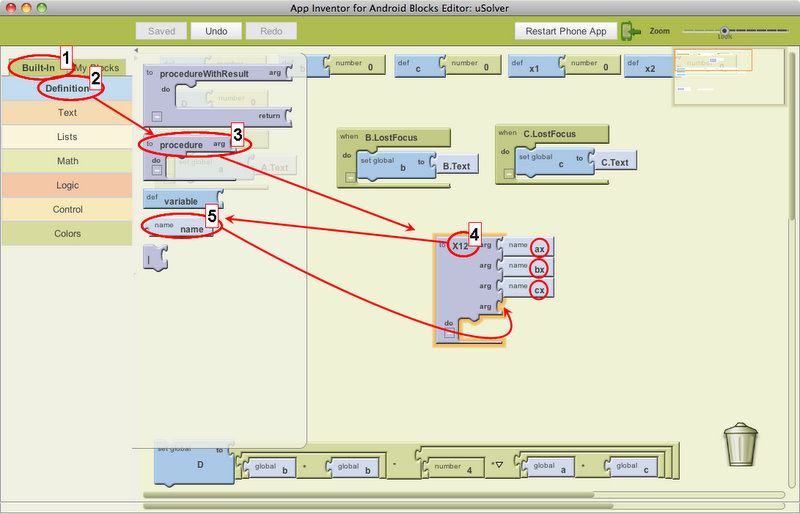
Inside the procedure we put the calculation “D”, “x1” and “x2”, as well as the My Blocks-> X1-> set X1.Text to block, in the slot to which we set the root value x1 (My Blocks-> My Definitions- > global x1) and similar for text label "X2":
We will call this procedure in each block of "loss of focus". The call is made by the My Blocks-> My Definitions-> call X12 block with the “global a”, “global b” and “global c” parameters:
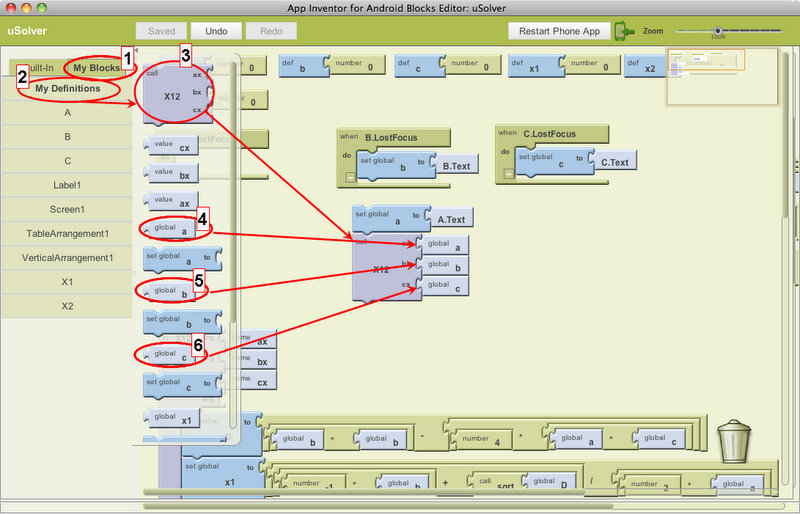
In the picture above you can see that I disassembled the “A.LostFocus” block and build up a chain of its contents in empty space. This is due to the fact that it was quite difficult for me to put the procedure call in the right place in the chain. Such a problem occurs quite often and I found the way of composing a chain of blocks outside the call, and then sticking everything inside.
Exactly the same calls are placed in the remaining ". LostFocus" blocks. Finally, everything should look like this:
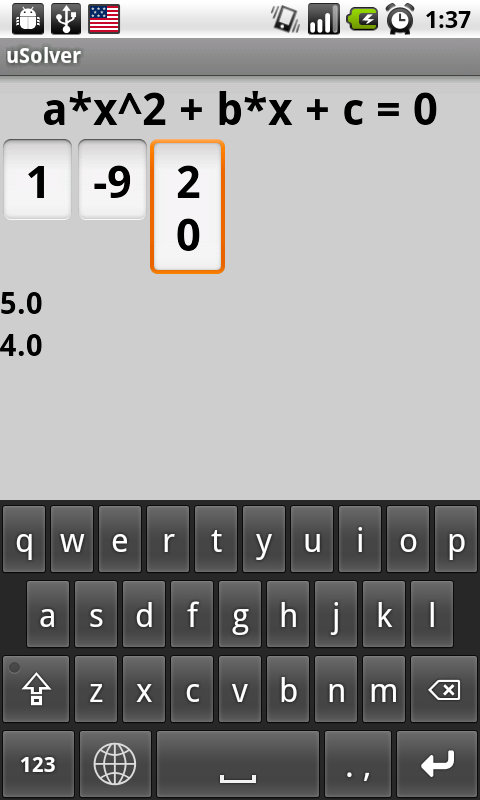
On the phone, solving the equation x ^ 2-9x + 20 = 0 will look like this:
Immediately, the flaws in the settings of some of the controls have fallen out ... there will be something to fix with the update.
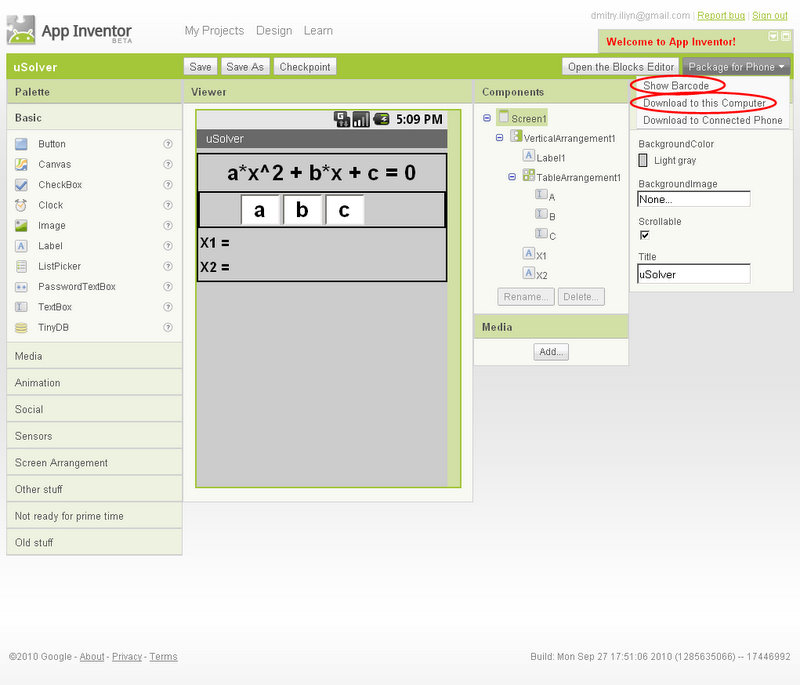
If the phone was not connected to the computer, you can compile the application in the AppInventor web interface, as well as create a Barcode:
The application is created, it's time for some conclusions.
I can say that Google provides a very simple tool for the ability to create which are not difficult applications. This tool is certainly raw, there are not many functions, methods and all that are in the SDK. However, the Google team responds to suggestions and plans to implement many new features. Suggestions and noticed bugs can be viewed and added here: http://code.google.com/p/app-inventor-for-android/ .
The main disadvantages in my opinion and at the moment (Build: Mon Sep 27 17:51:06 2010 (1285635066) - 17446992):
But, despite these shortcomings, I believe that there is a place for this tool, because without immersion in the SDK, they can do nothing at all.
In any case, the protection from the govnoprog available in the Android Market will be a fee for getting a developer's place. Those same $ 25.
By the way, wasn’t it time for us to stuff our creation there? ..
The experience can be useful both as a complex and in parts for those who are interested in writing a fairly simple program for this OS without going into the subtleties of Java, Eclipse and other joys of the Android SDK.
In this part:
- 1. Preliminary training
- 2. Development of the program interface
- 3. Block program description (programming)
- 4. Conclusions on the writing and the resulting result
1. Preliminary training
To complete the task - writing and publishing the application under the Google Android OS, you need to perform several manipulations in the browser. Go through the points:
a . if you have ... if you do not have a Google account, you need to create one. To do this, just go to the site, for example, http://gmail.com/ , find the inscription “Create an account” / “Create an account”, find the language switch on the page, select your native language from the list and answer a few questions in the process registration. In addition, you will have a great e-mail service, and, if you wish, a large number of other useful Google services;
b . You need to have an account in the Google AppInventor Developer Toolkit. At this stage, Google does not provide access to the toolkit to anyone. Therefore, you need to go to http://appinventor.googlelabs.com/ , log in with your Google account and submit an application in the automatically opened form by filling it out. (Just like in Habré, it is not necessary to have a ready-made useful program.) After this step, you need to wait for the favor from Google. I waited for him for about 2 weeks;
')
In principle, these are the basic actions that need to be performed in order to be able to write, or more precisely to assemble programs using AppInventor. And in order not to waste time waiting for the satisfaction of your application, you can download and install the necessary software for work (see below).
If the developer is interested in the distribution of the collected program, then you need to perform another item, namely:
c . "Buy a Google developer site." Today these places cost $ 25 (twenty-five US dollars) per piece. According to the company, such measures are designed to protect the Android ecosystem from the stream of shit programs. (You don’t need to go far for an example, it’s enough to read sections 2-4, but we have other goals ...) Nevertheless, to register yourself as a programmer for Android you need to follow the link http://market.android.com/ where to go through the registration procedure (currently in English) and payment using Google Checkout. For this you need a plastic card of international payment systems (purchased separately). The registration process is described in more detail in section 5.
However, since perhaps not everyone will want to break into the Android Market, and someone who does not have programming skills will want to write a program for himself - this last point should not be done by everyone.
Directly for writing programs need to do a couple of things. You need to install the client Java module and configure the connection to the Android phone. How to perform these procedures and solve the problems described here http://appinventor.googlelabs.com/learn/gettingstarted.html . Briefly run through the stages:
- if Java is not installed on your computer, you should download the latest version from http://java.com/ and install it on your computer (check whether Java is installed here: http://www.java.com/en/download/ help / testvm.xml , recommend installing the latest version);
- then you need to download and install the AppInventor Extras Software package containing the drivers and other software. Links for various operating systems: Mac OS X , Windows , Linux . Developers recommend not changing any parameters during installation;
- Finally, you need to change a few settings in the phone. I would like to note here that in order to write a program it is not at all necessary to connect the phone to AppInventor, the compiled program (.apk) can be downloaded from the web-based toolkit and installed on the phone manually at any time. However, when you connect to the phone, at the last, in real time, the developed project is executed, which is very convenient for catching various bugs, so we will continue. So, in the phone you need to turn off the auto-rotate screen (Settings-Screen-Auto-rotate screen), allow installation from unknown sources (Settings-Applications-Unknown sources), enable USB debugging (Settings-Applications-Development-USB Debugging) and setting, not allowing the screen to turn off when connected to a computer (Settings-Applications-Development-Leave on). And by connecting the phone to the computer in any case, do not mount the SD card as a USB flash drive.
It is also necessary to take into account that after the connection, the AppInventorPhoneApp program with a size of 3.81 MB will be installed on the phone, i.e. free phone memory is needed.
After numerous preparatory operations and acceptance of your application in AppInventor, you receive an email and access to this web application. You can start the implementation of creative plans!
2. Development of the program interface
The application that I decided to create for publishing in the Android Market is not replete with the complexity of things. Let the program calculate the roots of the quadratic equation. Updates will smoothly bring the program to solve systems of equations, and if a couple is enough, to solve a system of inequalities. Anything is better than making a picture of a cat meow.
We will determine the requirements for it: since our program will calculate the roots of the quadratic equation, at least the input of coefficients and the output of results must be implemented.
The proposed interface can be estimated on paper or sketched a presentation. For the first version, something like this will come down:
Well, let's start the implementation!
We connect the phone to the computer, do not mount the card as a drive, go to the page http://appinventor.googlelabs.com/ , enter the registration data, click "Sign in" and get into AppInventor BETA.
Describing the page that appears does not make much sense (only the “Learn” link in the center of the upper part of the page is useful).
Therefore, we boldly press the “New” button and enter the name of the new project in the appeared window - uSolver, which should mean Universal Solver, i.e. universal solver (not to be confused with Deep Thought).
We press on “OK” and get into the “Design” module:
There is already something to describe.
In the center of the window is the “Viewer” panel, which serves to preview the interface of the application being developed and select controls (this is not an emulator or simulator window!). The interface elements themselves and some other control structures are contained in the Palette panel, where they are divided into categories. The settings for each element used are available in the “Properties” palette. The overall structure of the interface elements is displayed in the “Components” palette, where elements can be deleted and renamed.
You can immediately click the "Open the Block Editor" button and establish a connection to the phone there to track the design changes live, but for the first time I do not recommend cluttering your head with another toy.
Better get to the interface. Rename the title of the start screen and change the background color (so that white does not tire):
To control the location of control elements (controls) there is a category “Screen Arrangments”. We are interested in the consistent following elements from top to bottom. Select the desired category (KO: Picky, naturally, on it with the left button), its contents are revealed, grab the desired alignment and drag it to the empty space of the screen of our application, then slightly adjust its appearance in the “Properties” panel:
If the selection of the component is lost, you should click on it in the “Viewer” or “Components” and it will be available to set properties.
Let's start filling the screen according to the chosen concept ...
First we should have a general view of the equation to be solved. We push it in Label. Palette-> Basic-> Label, dragging it into alignment and adjusting the parameters:
Next, you need to place the input fields of the coefficients in one horizontal line and arrange their group in the center of the screen. To do this, we use the table alignment of 5 cells in one line:
Three central cells will occupy the input fields. To do this, drag the fields to the approximate locations of the cells:
Do not forget to adjust the parameters to your taste.
To derive solutions to the equation, we will provide two “Label” controls. They can be inserted one above the other into a vertical alignment after the block with a table alignment:
That seems to be all that was planned. I want to draw attention to the names of some input fields (TextBox) and labels (Label). These names will be used in the future and they must carry at least some semantic meaning, otherwise misunderstandings are possible in the process of drawing up a block “code”. However, we renamed only those that are needed.
3. Block program description (programming)
After creating the interface, it is time to “gather” the logic of the program. To do this, click on the button "Open the Block Editor".
The browser will have to download a file, which you need to open using previously installed Java. Usually all actions happen automatically. After the start of Java, it can issue a question about the location of the AppInventors Extra files that were downloaded and installed by us in advance.
It is worth noting that the manipulation should be carried out if you need to provide a connection to the phone. If the connection is not needed - click "Cancel".
I also want to note that the process of loading the Block Editor is not fast, but I don’t need to be nervous about it.
After its launch, click "Connect to phone", if, of course, you need a connection. There will be a connection to the phone, software installation and the launch of the program being developed, but unworkable.
If everything worked out, let's go back to the block editor.
The Block Editor interface is very similar to the Interface Editor interface, which symbolizes. Built-in blocks (Built-In) contain control blocks, “My Blocks” blocks interact with the program interface elements. If it became clear not everything, it will be possible to sort it out in the course of the text, and now we will get down to business.
To begin with, we define several variables — the coefficients of the equation and its roots: a, b, c, x1, and x2. To do this, in the “Built-In” block, select Definition -> variable and drag its block to the empty field. Rename it by clicking on the word "variable" in "a", set the type of the variable - number by pointing at the question in the attached block of light brown color and selecting "123" in the menu. The default value of the variable is set to “0” by clicking on “123” and entering “0” instead of 123. After entering values, you must press Enter, because it does not always work.
Repeat the same steps for the remaining variables. Unfortunately, I didn’t find a way to copy the blocks, so I’ll have to be patient here and in some places further (it’s worth saying that developers are notified by interested users and are already working on copying / pasting blocks).
Now variables a, b, c need to assign user-entered values. Let's start with the variable a.
On the “My Blocks” tab, select the “A” block (this is the text field for entering the coefficient a) and drag the “A.LostFocus” construct to the empty space (this kagbe means that the block will be executed when the text field loses t. n focus, i.e., the user moves to another control element). In the “My Definitions” field, select the “set global a to” construction and drag it inside the “A.FostFocus” block so that it is fixed in it (this will happen with a characteristic sound). Then again click on the “A” block and drag the “A.Text” design into the “global global” puzzle slot. As a result, it should turn out like this (the process is shown on the example of the “B” component):
This block diagram means that when the focus is lost, the input field “a” of the variable “a” is assigned the text contained in this field. Repeat the same actions for blocks “B” and “C”.
In the next step, we define the variables x1 and x2, i.e. find the roots of the equation.
As I understand it, implementing mathematical calculations in the current version of AppInventor is not just a formula written. We will fence the procedure and introduce additional variables ...
We calculate the discriminant value (which is D = b ^ 2-4ac ), for this we introduce an additional numeric variable - “D” according to the scheme specified for variables a, b, c, x1 and x2 and pull the “set global D to” block into the workspace . Here the most unpleasant begins: combining mathematical operators into a sequence to calculate the desired value — just pull the necessary operators out of the Built-In -> Math blocks and put them in the slots of the set global D to block. Substitute variables into the operator arguments. Perhaps it is easier to see in the picture than to describe with the words:
Hint: it should be understood that the discriminant is primarily a difference. The difference between the product of b by b and the product of 4 by the product of a by c. Where 4 is a numeric constant.
By the way, it is convenient to get the numeric constants by pressing the left button on the empty space, select Math -> 123 there and replace this 123 with the desired numeric value. The same can be done with all the other built-in blocks!
We will not enter the verification of the discriminant's sign yet, we will calculate the roots with what is.
Let us extend the “set global x1 to” construction from My Definitions to the empty space and adjust the value of the variable x1 to the formula: x1 = (- b + sqrt (D)) / (2 * a) . We will do the same with x2, where x2 = (- b-sqrt (D)) / (2 * a) .
Now all the necessary values are calculated.
Since it is supposed to issue counted roots after losing the “focus” of any of the input fields of the coefficients of the equation, and in the absence of copy-paste to type a few more “formulas” well, we are too lazy, we will write a procedure that we will call in the “.
Let's start. We take out the Built-In-> Definition-> procedure block, rename it to X12 (by clicking on the word “procedure”) and stick it to the slots “arg” Built-In-> Definition-> name blocks, calling them “ax”, “bx "," Cx "(all variables are global, therefore their renaming is required).
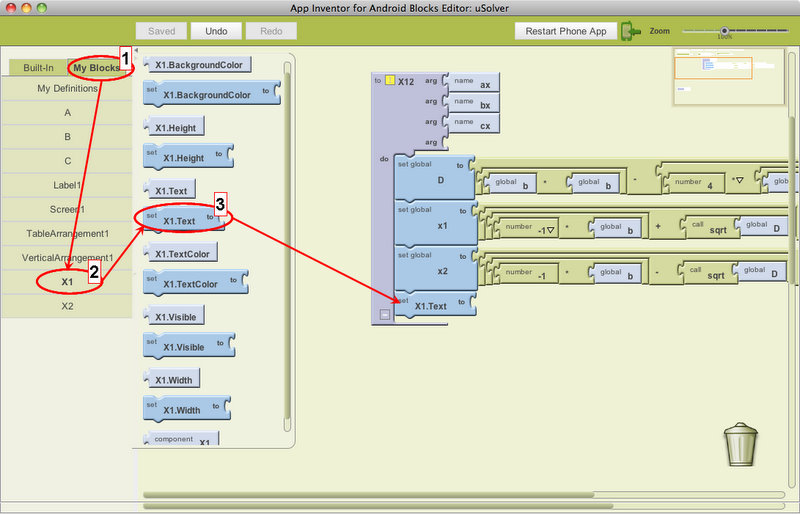
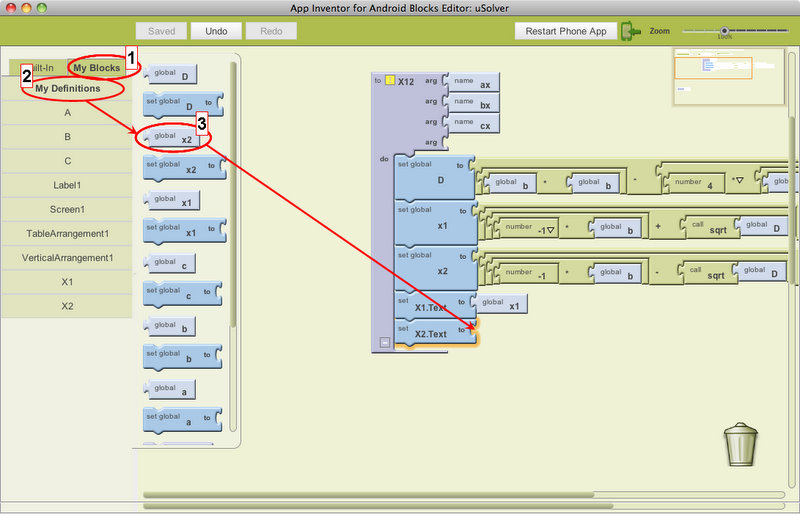
Inside the procedure we put the calculation “D”, “x1” and “x2”, as well as the My Blocks-> X1-> set X1.Text to block, in the slot to which we set the root value x1 (My Blocks-> My Definitions- > global x1) and similar for text label "X2":
We will call this procedure in each block of "loss of focus". The call is made by the My Blocks-> My Definitions-> call X12 block with the “global a”, “global b” and “global c” parameters:
In the picture above you can see that I disassembled the “A.LostFocus” block and build up a chain of its contents in empty space. This is due to the fact that it was quite difficult for me to put the procedure call in the right place in the chain. Such a problem occurs quite often and I found the way of composing a chain of blocks outside the call, and then sticking everything inside.
Exactly the same calls are placed in the remaining ". LostFocus" blocks. Finally, everything should look like this:
On the phone, solving the equation x ^ 2-9x + 20 = 0 will look like this:
Immediately, the flaws in the settings of some of the controls have fallen out ... there will be something to fix with the update.
If the phone was not connected to the computer, you can compile the application in the AppInventor web interface, as well as create a Barcode:
The application is created, it's time for some conclusions.
4. Conclusions on the creation process and the resulting result
I can say that Google provides a very simple tool for the ability to create which are not difficult applications. This tool is certainly raw, there are not many functions, methods and all that are in the SDK. However, the Google team responds to suggestions and plans to implement many new features. Suggestions and noticed bugs can be viewed and added here: http://code.google.com/p/app-inventor-for-android/ .
The main disadvantages in my opinion and at the moment (Build: Mon Sep 27 17:51:06 2010 (1285635066) - 17446992):
- no support for languages other than English. This concerns not only the AppInventor interface ... neither the name of the application, nor any text in it can be different (the situation is expected to be corrected);
- the finished application takes a lot of memory. For example, this application takes 1.2 MB, and in the phone's memory is 3.8! This is due to the embedding of all (!) Components, even those not used in the program, in the executable file. Developers know they promise to fix the situation;
- all sorts of stuff like copy / paste, the inability to replace the icon, etc.
But, despite these shortcomings, I believe that there is a place for this tool, because without immersion in the SDK, they can do nothing at all.
In any case, the protection from the govnoprog available in the Android Market will be a fee for getting a developer's place. Those same $ 25.
By the way, wasn’t it time for us to stuff our creation there? ..
Source: https://habr.com/ru/post/107308/
All Articles