Preparing screenshots for documentation in GIMP (part 2)
 In the first part of the article, we reviewed the “Fast Shadow” and “Crop Corners” scripts and promised to show how beautifully to draw a screenshot of a window fragment. It's time to fulfill the promise. Today we will analyze the script “Framing with Wave Effect”, which allows you to cut off part of the image along wavy lines that look like sinusoids.
Additionally, we will look at how you can assemble several scripts into one to speed up the execution of typical actions on an image.
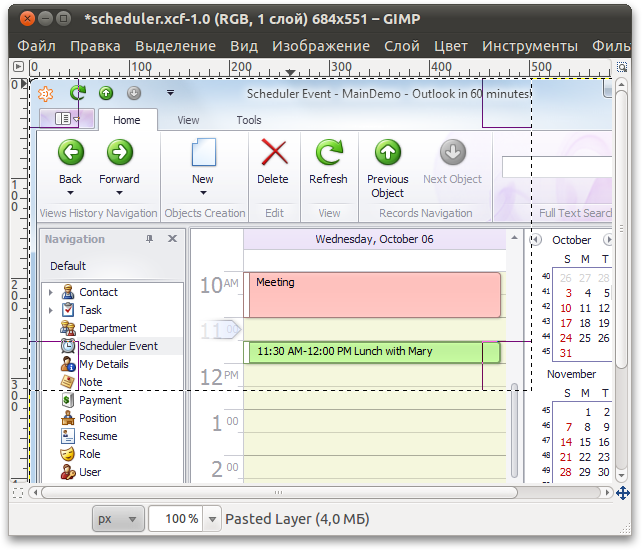
To cut off part of the image, you must first select it. Selection of an arbitrary shape in GIMP can be drawn "by hand" using the "Free Select" tool, but it is unlikely that you will get something smooth and beautiful. But from the script, we can refer to the gimp-free-select procedure and pass to it the array of coordinates of the points along which the selection will be made. Well, so that the points lined up in some nice looking forms, you can calculate their coordinates according to certain mathematical rules. So, let the user choose a fragment of the image with the Rectangle Select tool (Rectangle Select):
')
We need to create a new modified selection based on the position of the original. Then remove the parts of the image that did not get inside. Below is the script code “Crop with wave effect”, with comments.
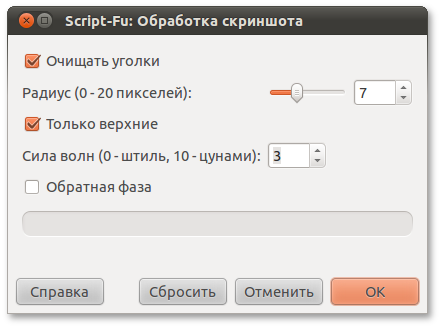
(define (script-fu-wave-crop image drawable ampl-factor reverse-phase) (gimp-context-push) (gimp-image-set-active-layer image drawable) (gimp-image-undo-group-start image) ; (if (= (car (gimp-selection-bounds image)) FALSE) (gimp-message " , .") (let* ( ; (selection-box (cdr (gimp-selection-bounds image))) ; (x1 (car selection-box)) (y1 (cadr selection-box)) ; (x2 (caddr selection-box)) (y2 (cadddr selection-box)) ; (image-width (car (gimp-image-width image))) (image-height (car (gimp-image-height image))) ) ; , (if (and (= x1 0) (= y1 0) (= x2 image-width) (= y2 image-height)) (gimp-message " , .") (let* ( ; gimp-free-select. ; 2 (x y ) (points (cons-array (* (+ (* 2 (- x2 x1)) (* 2 (- y2 y1))) 2) 'double)) (i 0) ; , (ampl-x (* (- y2 y1) ampl-factor 0.005)) (ampl-y (* (- x2 x1) ampl-factor 0.005)) ; " " (2pi 6.2832) (x x1) (y y1) ) ; (if (= reverse-phase TRUE) (begin ; (set! ampl-x (- ampl-x)) (set! ampl-y (- ampl-y)) ) ) ; (while (< x x2) (aset points ix) ; ; , (if (> y1 0) ; , (aset points (+ i 1) (+ y1 (* ampl-y (sin (* 2pi (/ (- x x1) (- x2 x1))))))) ; - . (aset points (+ i 1) 0) ) (set! i (+ i 2)) (set! x (+ x 1)) ) ; (while (< y y2) ; ; , (if (< x2 image-width) ; , (aset points i (+ x2 (* ampl-x (sin (- (* 2pi (/ (- y y1) (- y2 y1)))))))) ; - . (aset points i image-width) ) (aset points (+ i 1) y) (set! i (+ i 2)) (set! y (+ y 1)) ) ; (while (> x x1) (aset points ix) ; ; , (if (< y2 image-height) ; , (aset points (+ i 1) (+ y2 (* ampl-y (sin (* 2pi (/ (- x x1) (- x2 x1))))))) ; - . (aset points (+ i 1) image-height) ) (set! i (+ i 2)) (set! x (- x 1)) ) ; (while (> y y1) ; ; , (if (> x1 0) ; , (aset points i (+ x1 (* ampl-x (sin (- (* 2pi (/ (- y y1) (- y2 y1)))))))) ; - . (aset points i 0) ) (aset points (+ i 1) y) (set! i (+ i 2)) (set! y (- y 1)) ) ; (gimp-free-select image i points CHANNEL-OP-REPLACE TRUE FALSE 0) ; (gimp-selection-invert image) ; (gimp-layer-add-alpha drawable) ; (gimp-edit-clear drawable) ; (gimp-selection-none image) ; (plug-in-autocrop 1 image drawable) ) ) ) ) (gimp-image-undo-group-end image) (gimp-displays-flush) (gimp-context-pop) ) (script-fu-register "script-fu-wave-crop" " " " ." " <pupkin@example.com>" " " "2010/10/28" "RGB* GRAY*" SF-IMAGE "Image" 0 SF-DRAWABLE "Drawable" 0 SF-ADJUSTMENT " (0 - , 10 - )" '(3 0 10 1 0 0) SF-TOGGLE " " FALSE ) (script-fu-menu-register "script-fu-wave-crop" "<Image>/Filters/ ") The connection of scripts under Windows and Linux is discussed in the first part of the article. You can adjust the parameters of the “Framing with Wave Effect” script using the “Wave Power” coefficient, which influences the sinusoid amplitude, and the “Reverse Phase” checkbox, which changes the direction of the waves to the opposite.

The result of the successive execution of the Crop Corners, Crop with Wave Effects and Quick Shadow scripts is shown below:

With the active work on illustrations, most likely, you will need to call these scripts together. To speed up the work, we will write a “Screenshot processing” wrapper for the “Cut corners”, “Crop with wave effect” and “Quick shadow” scripts. To do this, we define a script-fu-screenshot-processing procedure, from which our scripts will be called sequentially. It is only necessary to take into account that when working, script-fu-cut-corners uses selection tools and will remove the current selection. Therefore, you should save the current selection to a separate channel before calling script-fu-cut-corners and restore it for script-fu-wave-crop .
(define (script-fu-screenshot-processing image drawable cut-corners radius only-top ampl-factor reverse-phase) (gimp-context-push) (gimp-image-set-active-layer image drawable) (gimp-image-undo-group-start image) (let* ( (selection-channel nil) ; , (cropping-required (car (gimp-selection-bounds image))) ) ; , (if (= cut-corners TRUE) (begin ; (set! selection-channel (car (gimp-selection-save image))) (script-fu-cut-corners image drawable radius only-top) ) ) ; , (if (= cropping-required TRUE) (begin ; (if (= cut-corners TRUE) (gimp-selection-load selection-channel)) (script-fu-wave-crop image drawable ampl-factor reverse-phase) ) ) ; script-fu-quick-shadow (script-fu-quick-shadow image drawable) ) (gimp-image-undo-group-end image) (gimp-displays-flush) (gimp-context-pop) ) (script-fu-register "script-fu-screenshot-processing" " " " , ." " <pupkin@example.com>" " " "2010/10/28" "RGB* GRAY*" SF-IMAGE "Image" 0 SF-DRAWABLE "Drawable" 0 SF-TOGGLE " " TRUE SF-ADJUSTMENT " (0 - 20 )" '(8 0 20 1 10 0 0) SF-TOGGLE " " FALSE SF-ADJUSTMENT " (0 - , 10 - )" '(3 0 10 1 0 0) SF-TOGGLE " " FALSE ) (script-fu-menu-register "script-fu-screenshot-processing" "<Image>/Filters/ ") As a result, script parameters are collected in one window.
The fact that GIMP remembers the settings used in the previous execution of the script greatly speeds up the work. By pressing Ctrl + F, you can execute the last called script by skipping the settings dialog.
Please note that when framing takes into account the position of the edges of the selection relative to the edges of the image. If the original selection goes along the edge of the image (or goes beyond it), the corresponding segment of the new selection goes in a straight line, along the edge of the image. You can cut out parts of the image, both from the edges and from the middle:

Source: https://habr.com/ru/post/107026/
All Articles