Preparing screenshots for documentation in GIMP (part 1)
As you know, an integral part of a professional software product is high-quality documentation. And the documentation, in turn, is unthinkable without illustrations. In most cases, the illustrations are screenshots, which should not only be beautiful and informative, but also uniformly decorated. The latter is important if different specialists (technical writers) work on different sections of the documentation. In this article, we will look at how GIMP's raster graphics editor and its built-in scripting language Script-Fu can be useful for preparing illustrations. The screenshots of our eXpressApp Framework product are used as examples.
The Script-Fu scripting language is based on Scheme (Lisp dialect), and is available out-of-the-box in GIMP on any platform, so we chose it. As the first simplest example, consider a script that applies a shadow effect with predefined parameters. Why not use the standard Drop Shadow? Yes, because he asks a lot of unnecessary questions about the parameters of the shadow. And we want the shadow to be always the same (black, with a certain offset, blur radius and transparency), and so that we do not have to re-set these parameters. So, open your favorite text editor and write the script:
A typical script consists of defining a main procedure that does all the work ( script-fu-quick-shadow ), and calls the built-in routines script-fu-register and script-fu-menu-register , which register the script, determine which parameters it will request at the user and create the corresponding item in the menu. The “Fast Shadow” script only requires an open RGB image, and should not request anything. In his main procedure, he refers to the built-in script-fu-drop-shadow procedure. If you want to figure out what parameters have been passed to this procedure, find its description in the “Script-Fu procedure view” (Filters -> Script-Fu -> Console -> View ...). Calls to procedures before and after calling script-fu-drop-shadow are typical for most scripts and are required to transfer the current context to the plugin, correctly interact with the Undo / Redo buffer, and update the UI after the script is run. By the way, most of the built-in GIMP filters are implemented on Script-Fu, and under Windows their sources are available in the % ProgramFiles% \ GIMP-2.0 \ share \ gimp \ 2.0 \ scripts folder, and under Linux - in / usr / local / share / gimp / 2.0 / scripts . You can use them as a starting point when developing your own scripts.
Let's save our first script with the scm extension, and place it in the user scripts folder. In Windows, user scripts are in the % USERPROFILE% \. Gimp-2.6 \ scripts folder, in Linux - in the ~ / .gimp-2.6 / scripts folder. Now you need to restart GIMP, or execute the command Filters -> Script-Fu -> Update Scripts. If there are no errors in the code, our script will be visible in the “viewing of Script-Fu procedures”:
')

Please note that here you can see information about the author, which we passed to script-fu-register . You can use this opportunity so that users know who thanks for talking to someone, or pass blank lines and save incognito.
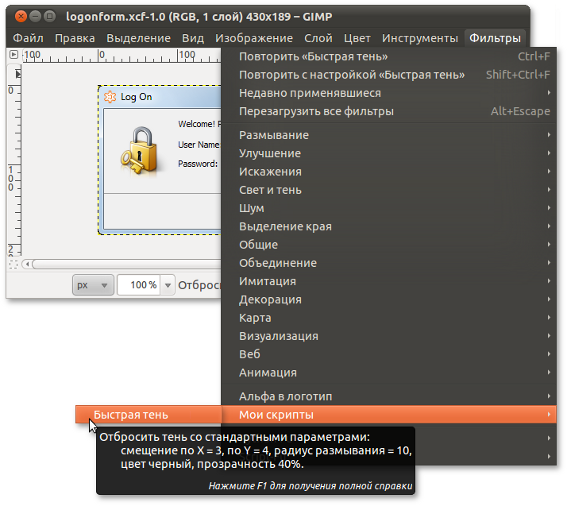
You can run the script through the menu “Filters -> My Scripts”:
For convenience, you can assign a suitable keyboard command. It is worth noting that GIMP supports dynamic shokkat - just press the desired “chord” when the pointer is over the desired menu item, and the setting will be saved. By default, this useful feature is disabled, it can be enabled in the settings in the "Interface" section.
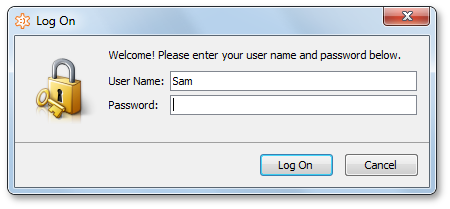
The “Quick Shadow” script assumes that it is called for a screenshot of the window cropped around the frame. Such an image can be obtained by pressing Alt + PrtScr, or using specialized software for capturing screenshots, such as SnagIt . Below is a screenshot of the window processed by the “fast shadow”:

Everything is good, but the rounded corners of the window, under which there is an opaque background, spoil the picture. Unfortunately, we did not come across utilities for capturing screenshots that are able to leave transparency under the corners (maybe the reader will advise something). Therefore, as a workaround, use the following script:
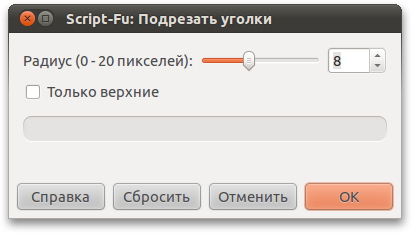
This script requests parameters from the user. First, you need to specify the corner radius. For the default theme of Windows 7, the value of 8 points is suitable, in Vista, the radius is smaller. Secondly, for some themes, an option may be useful - to trim only the upper corners.
Below is the result of the sequential launch of the Crop Corners and Quick Shadow scripts:
Already looks better, can be inserted into the documentation or on the site.
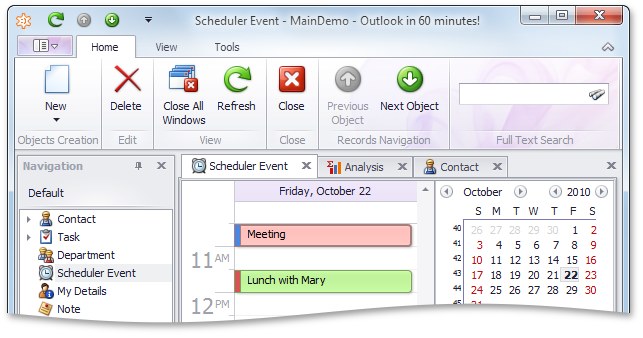
In our next article on GIMP, we will look at how to beautifully draw a screenshot of a window fragment. For example, like this:
Continuation - here .
The Script-Fu scripting language is based on Scheme (Lisp dialect), and is available out-of-the-box in GIMP on any platform, so we chose it. As the first simplest example, consider a script that applies a shadow effect with predefined parameters. Why not use the standard Drop Shadow? Yes, because he asks a lot of unnecessary questions about the parameters of the shadow. And we want the shadow to be always the same (black, with a certain offset, blur radius and transparency), and so that we do not have to re-set these parameters. So, open your favorite text editor and write the script:
(define (script-fu-quick-shadow image drawable) (gimp-context-push) (gimp-image-set-active-layer image drawable) (gimp-image-undo-group-start image) ; script-fu-drop-shadow (script-fu-drop-shadow image drawable 3 4 10 '(0 0 0) 40 TRUE) (gimp-image-undo-group-end image) (gimp-displays-flush) (gimp-context-pop) ) (script-fu-register "script-fu-quick-shadow" " " " : X = 3, Y = 4, = 10, , 40%." " <pupkin@example.com>" " " "2010/10/6" "RGB*" SF-IMAGE "Image" 0 SF-DRAWABLE "Drawable" 0 ) (script-fu-menu-register "script-fu-quick-shadow" "<Image>/Filters/ " ) A typical script consists of defining a main procedure that does all the work ( script-fu-quick-shadow ), and calls the built-in routines script-fu-register and script-fu-menu-register , which register the script, determine which parameters it will request at the user and create the corresponding item in the menu. The “Fast Shadow” script only requires an open RGB image, and should not request anything. In his main procedure, he refers to the built-in script-fu-drop-shadow procedure. If you want to figure out what parameters have been passed to this procedure, find its description in the “Script-Fu procedure view” (Filters -> Script-Fu -> Console -> View ...). Calls to procedures before and after calling script-fu-drop-shadow are typical for most scripts and are required to transfer the current context to the plugin, correctly interact with the Undo / Redo buffer, and update the UI after the script is run. By the way, most of the built-in GIMP filters are implemented on Script-Fu, and under Windows their sources are available in the % ProgramFiles% \ GIMP-2.0 \ share \ gimp \ 2.0 \ scripts folder, and under Linux - in / usr / local / share / gimp / 2.0 / scripts . You can use them as a starting point when developing your own scripts.
Let's save our first script with the scm extension, and place it in the user scripts folder. In Windows, user scripts are in the % USERPROFILE% \. Gimp-2.6 \ scripts folder, in Linux - in the ~ / .gimp-2.6 / scripts folder. Now you need to restart GIMP, or execute the command Filters -> Script-Fu -> Update Scripts. If there are no errors in the code, our script will be visible in the “viewing of Script-Fu procedures”:
')
Please note that here you can see information about the author, which we passed to script-fu-register . You can use this opportunity so that users know who thanks for talking to someone, or pass blank lines and save incognito.
You can run the script through the menu “Filters -> My Scripts”:
For convenience, you can assign a suitable keyboard command. It is worth noting that GIMP supports dynamic shokkat - just press the desired “chord” when the pointer is over the desired menu item, and the setting will be saved. By default, this useful feature is disabled, it can be enabled in the settings in the "Interface" section.
The “Quick Shadow” script assumes that it is called for a screenshot of the window cropped around the frame. Such an image can be obtained by pressing Alt + PrtScr, or using specialized software for capturing screenshots, such as SnagIt . Below is a screenshot of the window processed by the “fast shadow”:
Everything is good, but the rounded corners of the window, under which there is an opaque background, spoil the picture. Unfortunately, we did not come across utilities for capturing screenshots that are able to leave transparency under the corners (maybe the reader will advise something). Therefore, as a workaround, use the following script:
(define (script-fu-cut-corners image drawable radius only-top) (gimp-context-push) (gimp-image-set-active-layer image drawable) (gimp-image-undo-group-start image) ; - () (gimp-layer-add-alpha drawable) ; , c (gimp-round-rect-select image 0 0 (car (gimp-image-width image)) (car (gimp-image-height image)) radius radius CHANNEL-OP-REPLACE TRUE FALSE 0 0) ; (gimp-selection-invert image) ; ... (if (= only-top TRUE) ; ... ; (gimp-rect-select image 0 (- (car (gimp-image-height image)) radius) (car (gimp-image-width image)) radius CHANNEL-OP-SUBTRACT FALSE 0)) ; (gimp-edit-clear drawable) ; (gimp-selection-none image) (gimp-image-undo-group-end image) (gimp-displays-flush) (gimp-context-pop) ) (script-fu-register "script-fu-cut-corners" " " " ." " <pupkin@example.com>" " " "2010/10/6" "RGB*" SF-IMAGE "Image" 0 SF-DRAWABLE "Drawable" 0 SF-ADJUSTMENT " (0 - 20 )" '(8 0 20 1 10 0 0) SF-TOGGLE " " FALSE ) (script-fu-menu-register "script-fu-cut-corners" "<Image>/Filters/ ") This script requests parameters from the user. First, you need to specify the corner radius. For the default theme of Windows 7, the value of 8 points is suitable, in Vista, the radius is smaller. Secondly, for some themes, an option may be useful - to trim only the upper corners.
Below is the result of the sequential launch of the Crop Corners and Quick Shadow scripts:
Already looks better, can be inserted into the documentation or on the site.
In our next article on GIMP, we will look at how to beautifully draw a screenshot of a window fragment. For example, like this:
Continuation - here .
Source: https://habr.com/ru/post/106611/
All Articles