Build a computer with water cooling
Last year, I wrote a “fundamental” article about the cooling system - labor came out in two large parts ( 1 , 2 ), but I tried to tell everything about everything, from radiators to liquid nitrogen. Most recently, I matured to another "feat", namely, to install a water cooling system.
If you are interested in a detailed illustrated guide to the assembly / installation of such a system (for example, productive config), then welcome under cat. Traffic!
Radiators and coolers - even writing is not so interesting about it, because all this has long been in any computer and this will not surprise anyone. Liquid nitrogen and any phase transition systems there are another extreme, the chances of meeting with which in the economy of an ordinary person are almost nil. But the "dropsy" ... in terms of cooling the computer is like a happy medium - unusual, but affordable; almost no noise, but at the same time anything can cool. In fairness, SVO (water cooling system) is more appropriate to call LSS (liquid cooling system), because, in fact, you can pour anything inside. But, running ahead, I used plain water, so I’ll use more the term CBO.
')
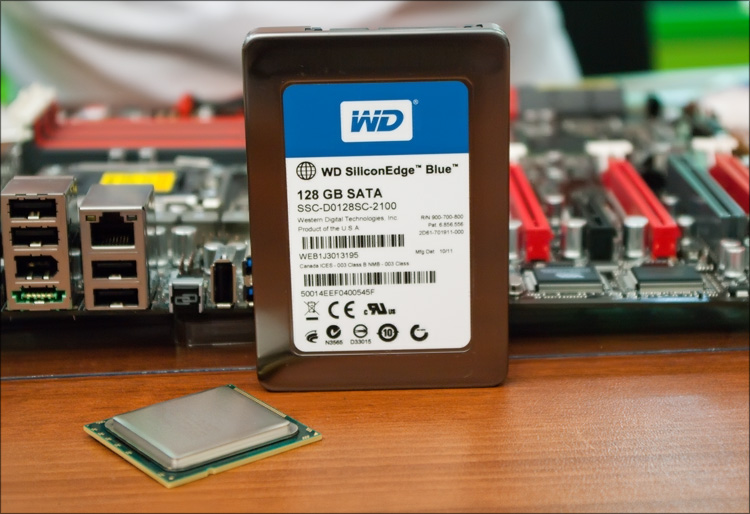
Most recently, I wrote in some detail about the assembly of a new system unit. The resulting stand looked like this:
- Thermaltake Level 10 housing
- Thermaltake Toughpower Grand 750W Power Supply
- ASUS Rampage III Extreme motherboard
- Intel Core i7-930 processor
- Leadtek GeForce GTX 480 video card
- Memory Crucial Ballistix Tracer
- WD SiliconEdge Blue SSD Hard Drive
Thoughtful study of the list suggests that the heat emission of some devices is not just high, but VERY high. And if you connect everything as it is, then inside even the most spacious case will be at least hot; and as practice shows, it will also be very noisy.
Let me remind you that the case in which the computer is going is not very practical (although every time I see the opposite), but very presentable Thermaltake Level 10 - it has disadvantages, but for just one appearance it can be forgiven him a lot .

I did a review of this case, then a less productive stand was going to it - everything was fine with the temperature regime, although, according to the statements of many reputable iron sites, the case was not designed to collect really powerful configs. Moreover, in the opinion of these publications, the case is also unsuitable for the installation of a liquid cooling system, with which I agreed at one time without verification. Finally, it was possible to disprove both of these statements, making a few useful things - assembling a computer, installing a water-cooling system in it and telling you about it. Let me tell you on the example of a rare and expensive body, but nothing prevents you from applying your knowledge on any other case - it will only be easier!
And the last. I have long thought about how to submit all the information received. As a result, after looking at 1000+ photos taken during the work, I wrote a universal algorithm (sequence of actions) for assembling CBO - I got 8 points, about each of which I wrote in detail and with pictures. Someone may get less of these items, some more, but in general, this “HowTo” can be used for any system - add to favorites, you see, it will be useful;)
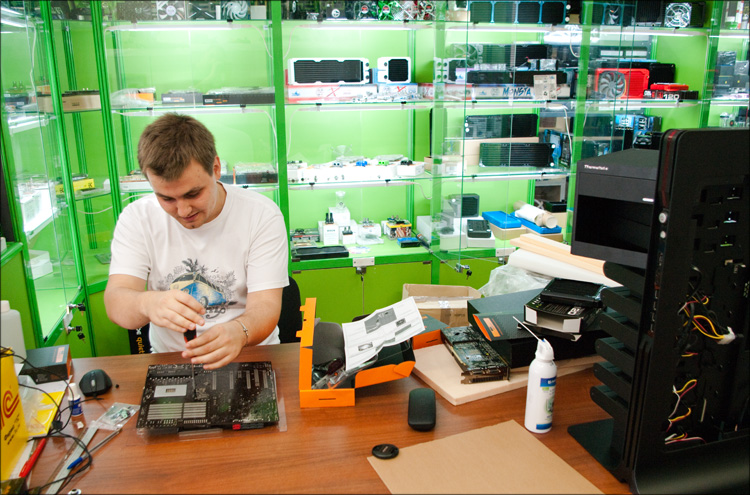
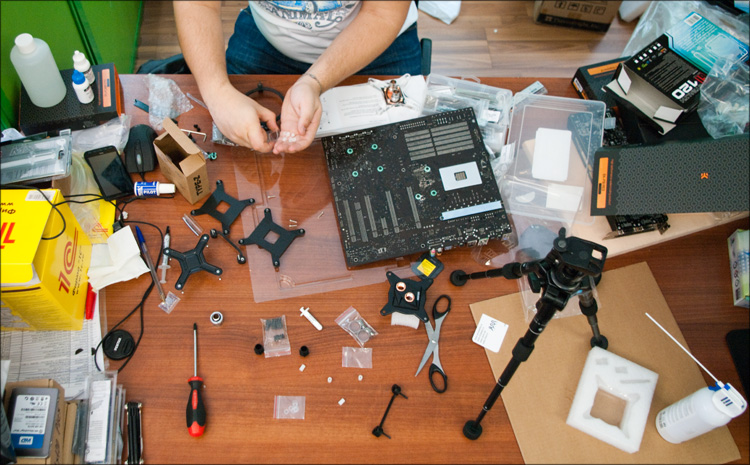
On one of the non-working days (on weekends) I arrived at a jam-packed car in the store and we almost immediately began to solve the problem. Besides me, there were two more people (Maxim and Alexey), the third one came in the evening to look at the result and offer us a way to solve one problem (because of which the assembly of the system was very long). Looking ahead - it is very good that everything happened in the store, where everything was necessary - without it, I would have spent 100% more money, time and nerves.
So, the goal was set - to assemble a single-circuit water cooling system, which would effectively cool the motherboard, processor and video card. Maximum quiet, ideally - with the possibility of further upgrading the system .
Having estimated the plan of action, the necessary hardware and its presence on the shelves of the store, we took up the screwdrivers. Whatever one may say, it’s necessary to start from the motherboard - it’s the most important thing on the computer.
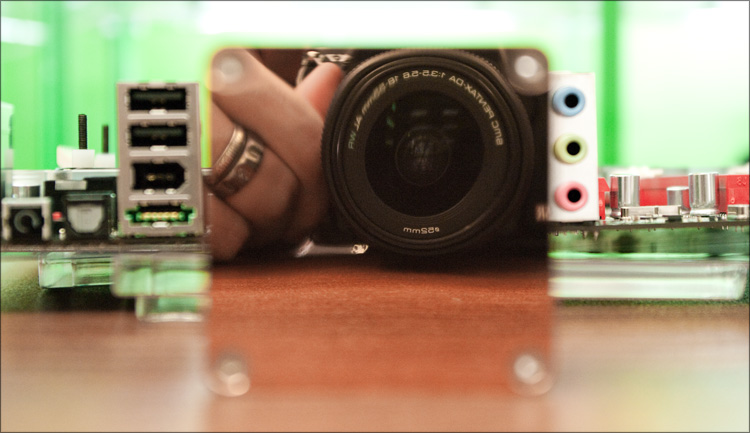
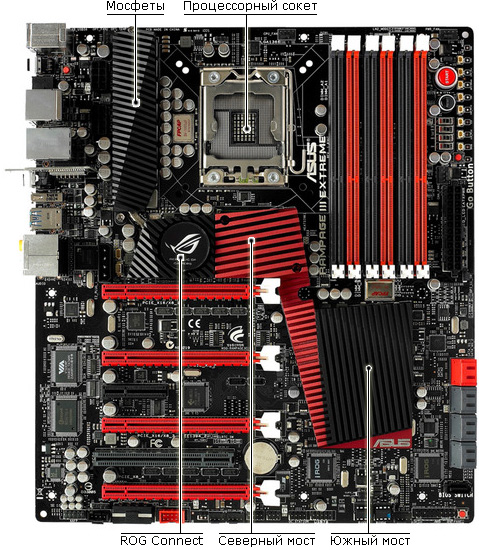
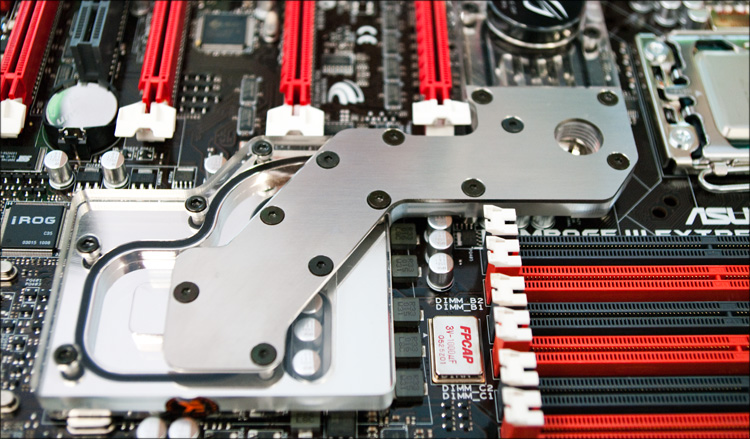
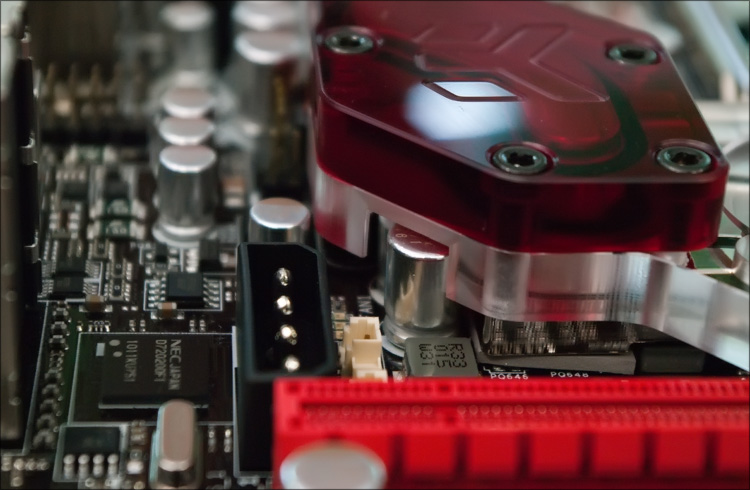
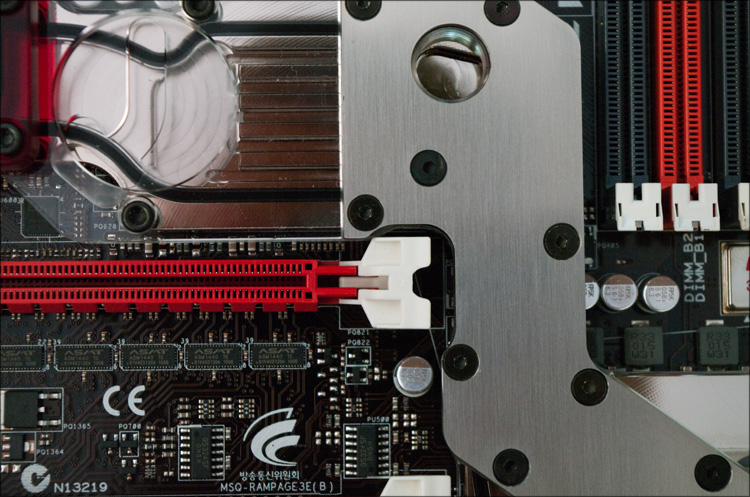
Motherboard ASUS Rampage III Extreme is very popular in the overclocking environment - if you look at world records, in very many cases it appears exactly. The great potential and technological prospects, the “freshness” of the model and the ASUS brand itself - all this was the result of the appearance on the market of various accessories sharpened specifically for this board. In particular, I'm talking about fullcover-waterblock (of which there are already three different models on the overhead for this board). Fullcover - means that this piece of iron covers all the necessary elements of the board (very hot, especially during overclocking), such as mosfets, north and south bridges.
For motherboards it is simpler (and for less common) there are quite a few ordinary water blocks that cool only one area or another, but in this case it is easy to run into a “file”, and the number of liquid tubes will in any case be larger.
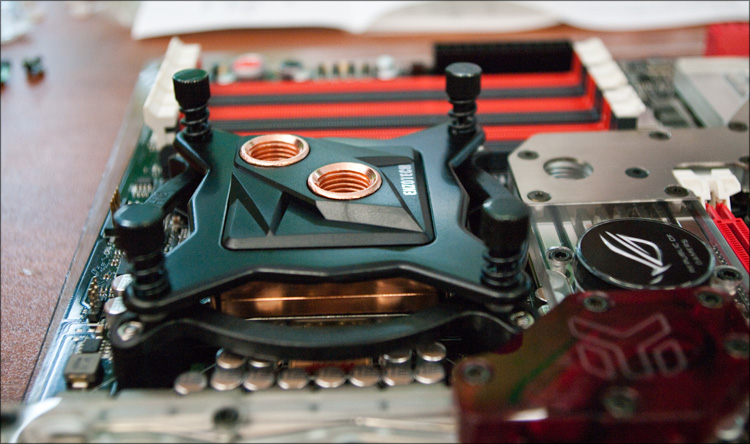
We chose the EK-FB RE3 fullcover water block (from EK Waterblocks), an expensive piece of metal with all kinds of cavities, which is suitable as a device for the device, skilfully bypassing all capacitors, protrusions and other relief features.

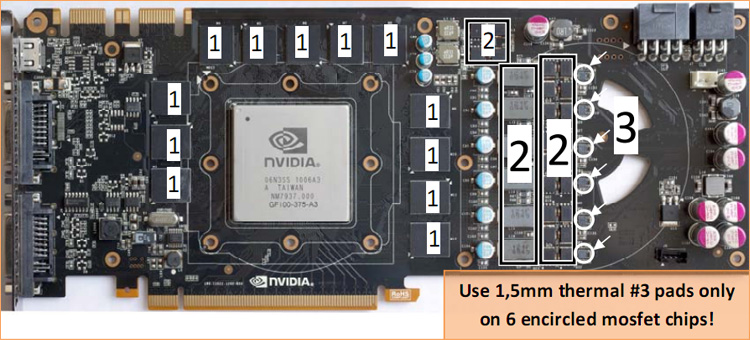
When designing motherboards, the radiators of the power subsystem of the central processor are designed for cooling by the central processor cooler. When installing SVO, mosfets lose blowing, and even with a slight acceleration, their temperature can reach a critical 100 degrees. So the fullcover for ASUS Rampage III Extreme is what the doctor ordered!
Pay attention to how complex the waterblock is. In addition to mirror polishing the base, an unusual shape of the piece of iron itself and precisely milled holes for capacitors, inside there is a space (with a no less complex geometry) along which water will flow. Horror.
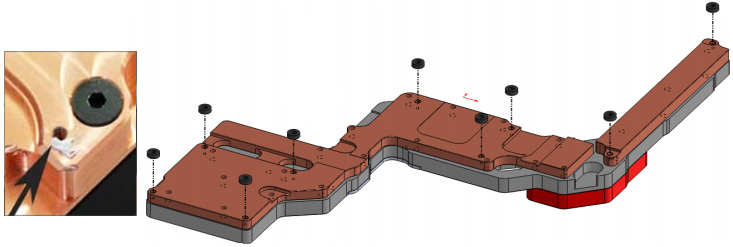
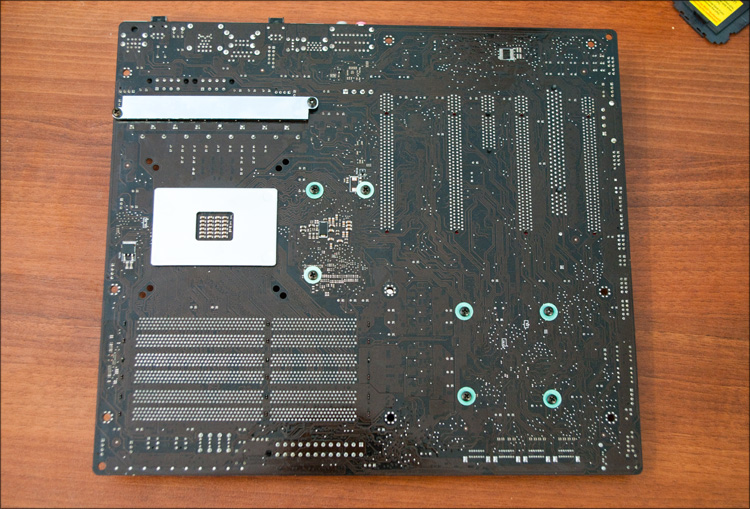
The installation process is so ugly. We unscrew the 9 screws on which the stock fullcover radiator rests - it is beautiful, so we will not throw it out.
Max at work)
Along the way, we pull out the glowing puck “ROG Connect” - it will still come in handy for us.

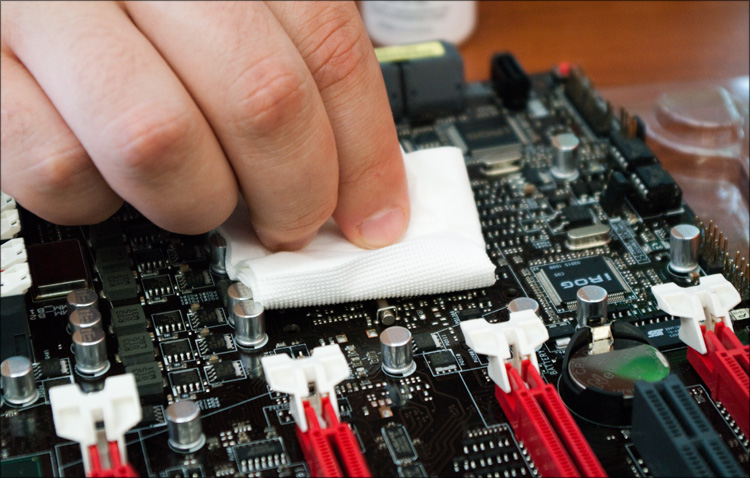
Then we take some fleece and remove the thermal interface that was on the chips under the radiator. You can use a special liquid for removing thermal paste - it helps. Next, we take the thermal pad (it comes with the water block) and, following the instructions, cut out the necessary pieces - paste them onto the mother's circuit.
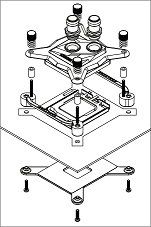
Next, simply fasten the water block, after installing the “standofy” (small plastic rings, which allow you to prevent distortions and peretyagov water block) in the holes for the screws.
The weight of the waterblock is 550 grams, so for the reliability on the back of the motherboard you need to install a backplane that distributes the load.
The final stroke is the installation of the ROG Connect indicator, for which there is now a corresponding dimple. With good luck, in the load mode, such a water block can take up to 40 degrees heat.

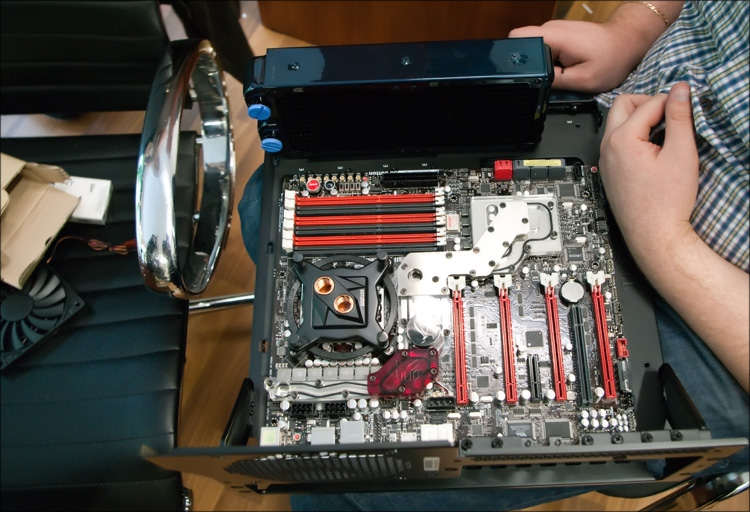
So that the motherboard could be put aside for a while, we decided to install a waterblock on the processor too - for obvious reasons, only fullcover is available for processors :)

We used a cross socket (775/1366) Enzotech Stealth - a stylish black water block, made in compliance with the highest requirements (the base is polished to a mirror finish, the maximum deviation from the straight line is less than 0.0003 inch).

In addition to it, the bundle included:
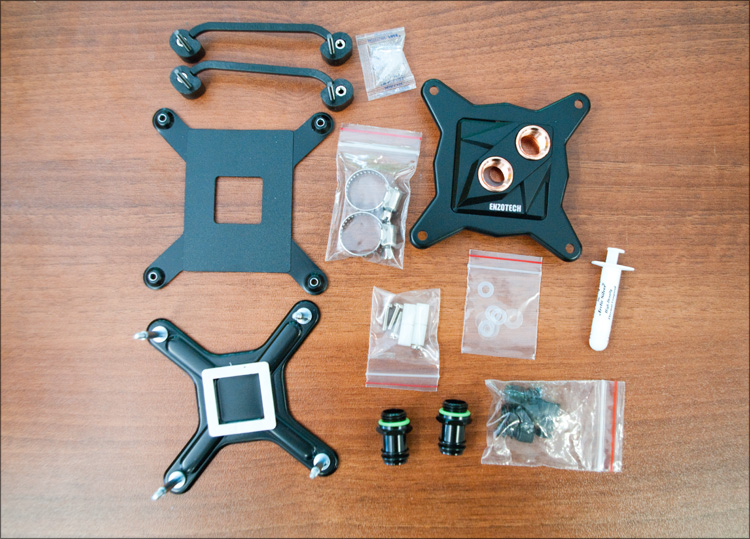
 - backplane for 775 and 1366 sockets
- One Enzotech 1366EZ mounting frame
- 4 nylon spacers
- 4 fixing screws
- 2 Christmas tree-type high-flow fittings with a diameter of 13mm (with o-rings)
- 2 hose clamps with an inner diameter of 13 mm
- Tube of thermal silver Arctic Silver Ceramique
The scheme of actions is about the same, only nothing needs to be dismantled - first install the protective backplane on the back side of the motherboard (the weight of the water block is 250 grams), and put a special frame on the front side (as is the case with air coolers).

We open the socket, put the processor in it, similarly we clean (already from the fat) the heat-spreading lid of the processor, apply a thin layer of thermal paste and place the water block itself on top. Just in case, you can immediately remove it to make sure (due to poor visibility) that there is a necessary contact between the processor cover and the base of the water block. Once again carefully we clean both surfaces and, with full confidence in the screwdriver, tighten the screws on the water block.
In order not to lose the parts, we twist both fittings from the kit - they are by default quite stylish. Everything.

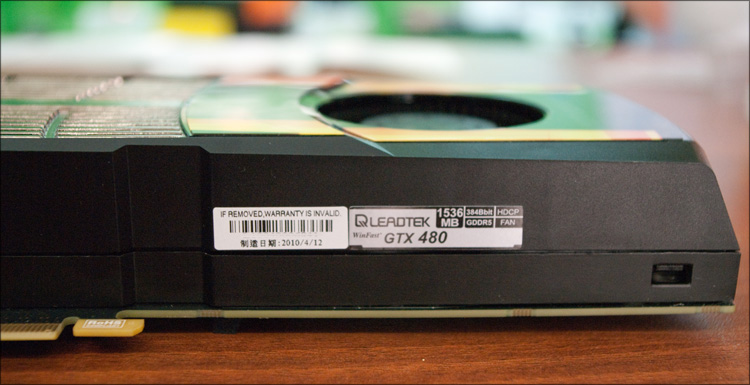
If we deprive the component parts of the guarantee, then all at once;) Now we have come to the hottest component of the system, to the Leadtek GeForce GTX 480 video card - if you believe the tests, then this lady warms up to 100+ degrees in the load, which is accompanied by a no less disturbing noise stock turbines.
To complete the picture, it was decided to also use the fullcover-water block. For video cards with NVIDIA Fermi architecture, there are already quite a few of them, and we, apparently, were lucky - Leadtek GeForce GTX 480 had a “reference design”, that is, the one that was originally designed by NVIDIA itself. Most often, the most obvious sign of a non-reference design is a nonstandard cooling system - what manufacturers give out as a plus (in fact, it is). It is much worse when the layout on the board is modified - it will be much more difficult to guess.
In the hope that everything will be fine, we have begun to dismantle the factory cooling system (the loss of warranty starts from this stage). In the case of this video card, the process is somewhat tiring - 17 screws from the PCB side and 2 from the side of the connectors. Next, carefully remove the entire radiator by disconnecting the cooler wire from the board beforehand.
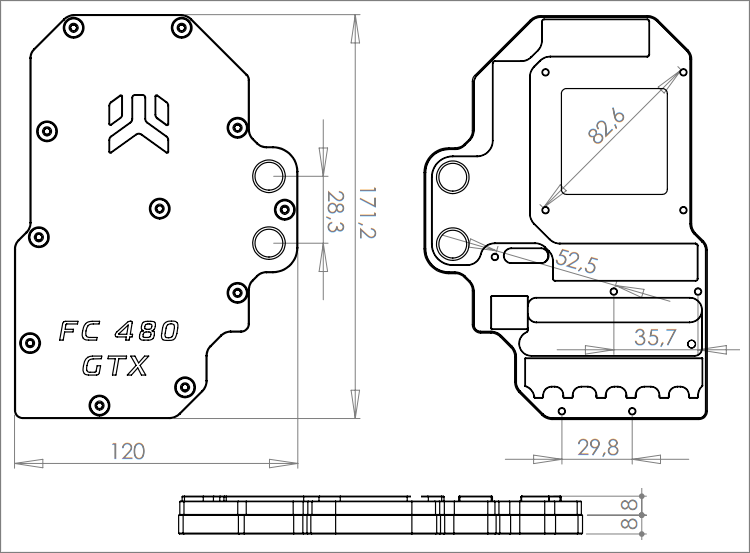
The fitting of the fullcover-waterblock EK-FC480 GTX Nickel + Plexi was successful - it fit perfectly)

Open the instructions, proceed to cutting thermal pads (it is best to do this with scissors, which is not a pity or clerical knife).

Gluing the thermal pads - it is very important to glue them correctly, so read the instructions carefully!
We put the stand-ins in the mounting holes of the waterblock, clean the GPU cover with a special liquid, apply a thin layer of thermal paste and dress the waterblock.
For reliability, this high-tech sandwich lacks 9 screws - the most important thing is not to tighten them very much!
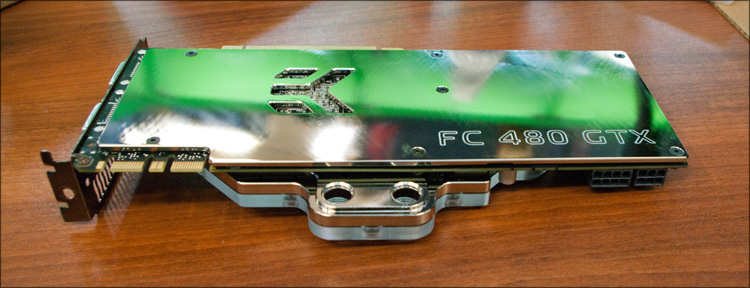
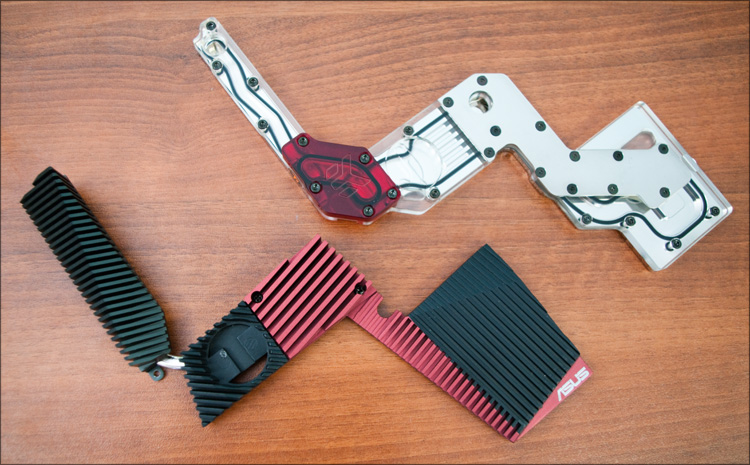
Next, the video card was tried on to the motherboard - beautifully, of course, but the textolite is completely unpresentable. Moreover, it can be accidentally touched and damaged, water can drip on top of it ... in general, it was decided to install a decorative-protective fullcover backplane, which was EK-FC480 GTX Backplate Nickel . With its installation there were no problems at all - they established and understood that they had not lost. Actually, everything.

Even when I was working for the “skinny” GeForce 2 MX 400, and the people were taking the 8800s with might and main - I think it was from that moment that many (and I, too) had to remember that the video card is something sooo big. What to talk about modern “fools”, which have ceased to fit in many cases (some video cards are nearly 30 cm long!). Then it always seemed to me that under a protective casing such various electronics are teeming, but as it turned out, most of the space is occupied by the cooling system radiator - the board itself is very thin.
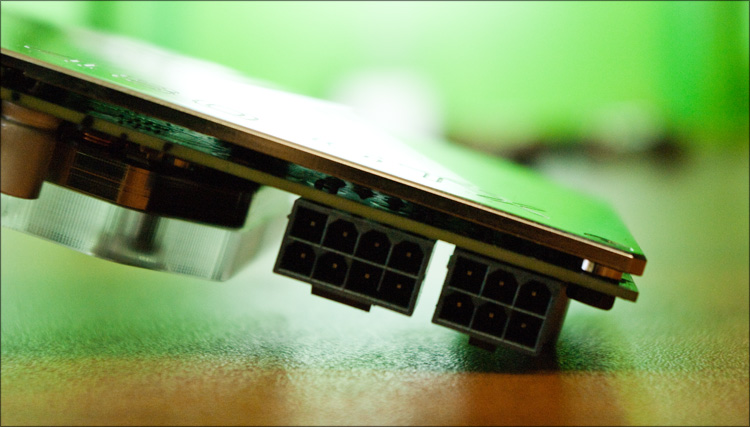
I mean, it’s very unusual to see such a thin top-end video card - the height of the water block is only 8.8 millimeters, so the total amount of video cards is a little over a centimeter, which is less than the height of the plug for the PCI slot! Accordingly, there will be no problems with the creation of an SLI system (for 2-3-4 video cards).
It involuntarily seems that such a system simply cannot work effectively ... but when you take it in hand ... By the way, the weight of a water block alone is 950 grams without fittings and caps! The weight of the video card assembly was 1.22 kg.
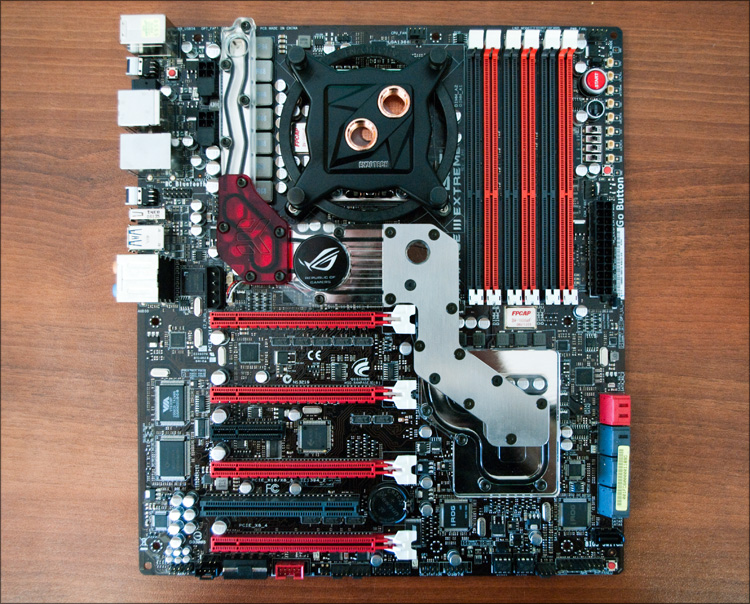
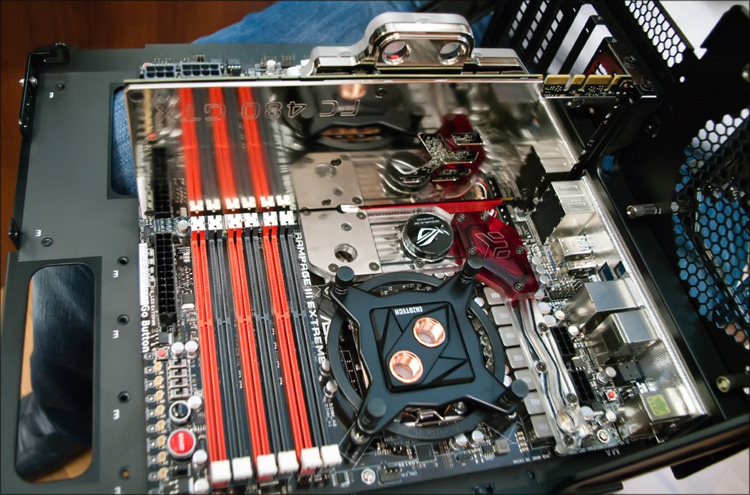
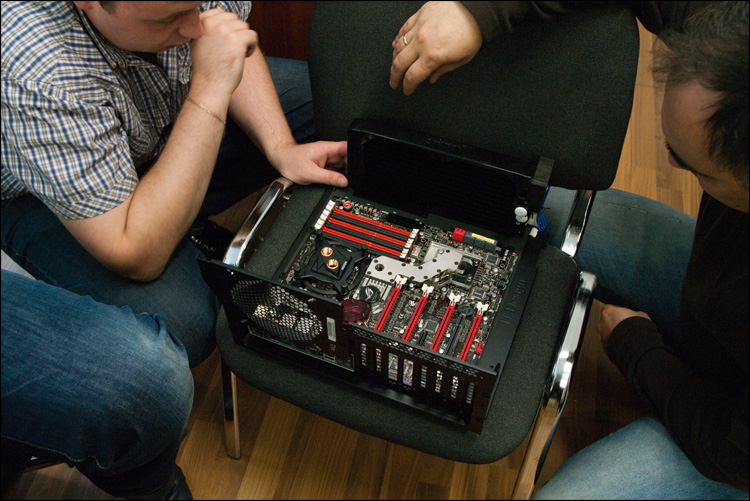
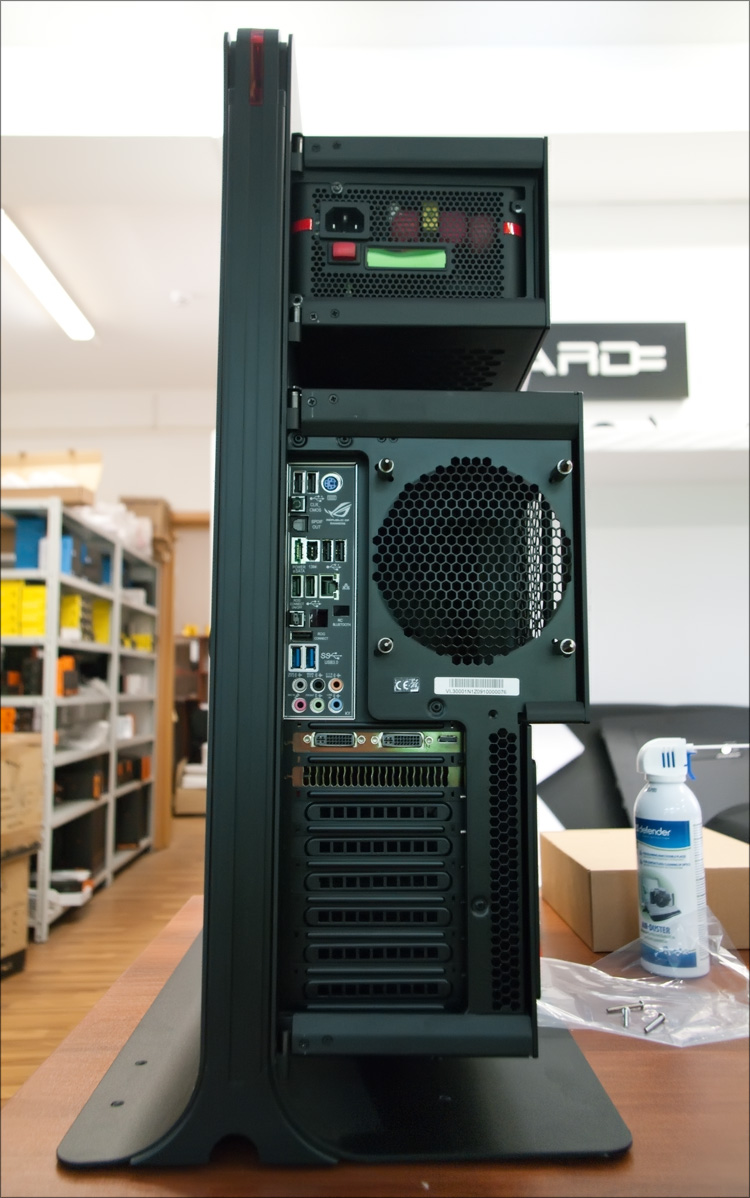
At this stage, the motherboard was installed in the case, a video card was inserted into it - previously in the top PCI slot.
One of the most interesting stages of work, which took us the most time (if we went right along the easy way, we would have managed it in half an hour, but first we tried all the difficult options, because of which all the work was dragged out for 2 days (of course, far incomplete).
The water cooling system is very similar to the one used in cars, just a little bigger - there is also a radiator (most often not one), cooler, coolant, etc. But the car has one advantage - a solid counter-flow of cold air, which plays a key role in cooling the system while driving.
In the case of a computer, heat is removed by the air in the room. Accordingly, the larger the size of the radiator and the number of coolers, the better. And since you want a minimum of noise, effective cooling will be achieved mainly due to the surface of the radiator.
And the essence of the problem was as follows. In Skype, we previously agreed on the opinion “we will hang it from behind the radiator into 2-3 sections - it is more than enough!”, But as soon as we looked at the case, it turned out that everything was not so simple. Firstly, there really wasn’t enough space for a three-section radiator (if the radiator was mounted on the opening where the installation of the blow cooler is supposed to be installed), and secondly, even if it were enough, it wouldn’t have been possible to open the case itself - it would interfere "Door" of the system compartment :)
In general, we counted at least four options for installing a radiator into a Thermaltake Level 10 enclosure - they are all possible, each would require a different amount of time, and each would have its own pros and cons. I will begin with those that we considered, but which did not suit us:
1. Install the radiator on the back (from the user) side, that is, on the removable door.
Pros:
+ Possibility of horizontal and vertical installation of any radiator, at least for 3-4 coolers
+ Case size would not have increased
Minuses:
- I would have to drill from 4 to 6-8 holes in the door
- It would be very inconvenient to remove the door
- With a horizontal arrangement, a radiator with a nonstandard arrangement of the opening for filling the fluid would be required.
- With a vertical arrangement, the hoses would be very long and with a large bend.
- The case will be on my left (on the windowsill), and I don’t need warm air from the coolers in my face :)
2. Install the radiator from the top, on the "cover" of the power supply compartment. Pros and cons are identical.
3. Installing a two-piece radiator inside the system compartment
Pros:
+ Easy solution
+ Outwardly there would be no change.
+ The system compartment door would open without problems.
Minuses:
- Only a 2-section radiator would fit (this is not enough for the config iron)
- In this case, it would have been impossible to take cold air from where, and we did not want to drive warm air to and fro.
- It would be difficult to "arrange" the pump and tank
- Even if ultra-thin coolers were used, all SATA connectors would overlap (if they were output to the user, and not sideways, then this problem would not exist)
In general, we have tried all these options to some extent - we spent a lot of time searching for the right components, fitting them, etc.
The very last option turned out to be a rather unusual solution - maybe not the most beautiful at first glance, but really practical. This is the installation of the radiator on the back of the case through a special adjustable adapter with a mechanism of the “scissors” type .
Pros:
+ I did not have to drill
+ Ability to hang ANY radiator
+ Excellent airflow
+ Do not block access to the connectors of the motherboard
+ Minimum length of hoses, minimum of bends
+ The design is removable and transportable
Minuses:
- Not the most presentable appearance :)
- Open the door of the system compartment is not so easy
- Enough expensive adapter
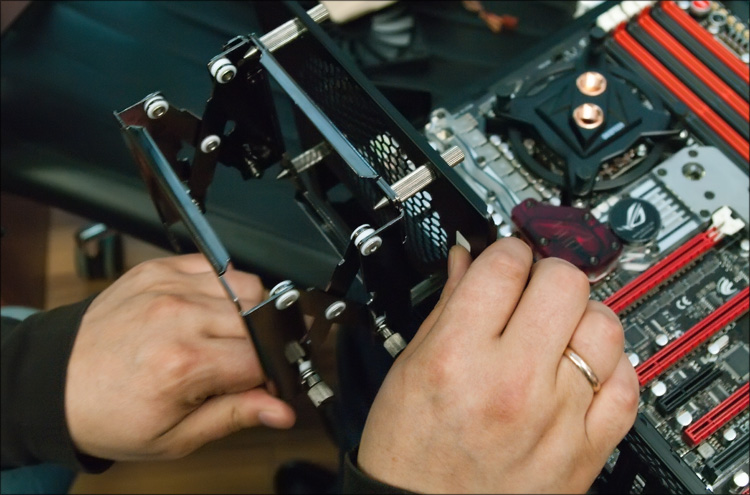
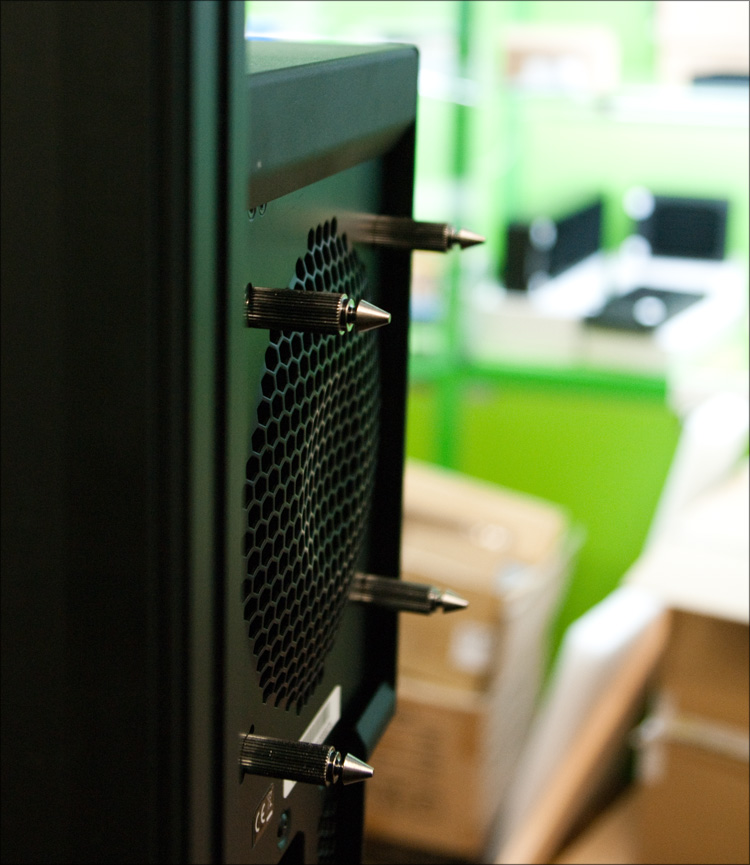
Why did we come to this option last? Because during the search for the previous three options, we accidentally found an adapter, which everyone had forgotten about, and it wasn’t in the online store) Looking at the only (last) copy of the Koolance Radiator Mounting Bracket , I thought, “And why not come up with! ". The point is the following - 4 "tapered nails" are inserted into the holes for attachment to the body of the rear blow cooler, on which a special frame is hung.
The design of this frame is such that its length can be changed by twisting the latches, and it is removed by mixing two parts of its body (so that the holes are unlocked and it can be removed from the “studs”) - so I bent! ) It is much easier to understand everything by photo.
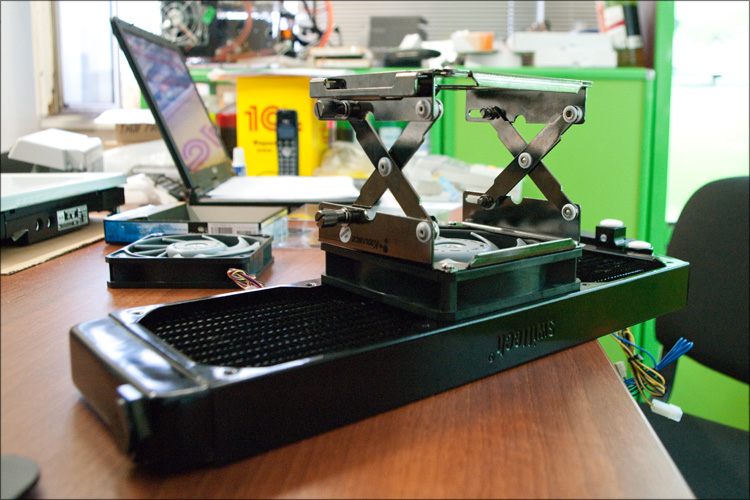
The frame is metal and very durable - I was convinced of this when we hung a 3-section (for 3 coolers) radiator for testing. Nothing dangles and does not swing, everything hangs tightly, but in the "decompressed" case, the door completely opened itself - this option completely suits me!

There were a huge number of radiators to choose from - black, white, red ... In this question, I was most surprised by the 4-section TFC Monsta , which can dissipate up to 2600W of heat (this is probably an SLI of four 480s)! But we people are much simpler, so we decided to stay on the radiator that we tried on - Swiftech MCR320-DRIVE . Its advantage is that it combines three components at once - a radiator (MCR320 QP Radiator for three 120mm coolers), a reservoir for a liquid and a high-pressure pump ( MCP350 Pump , a complete analog of the "ordinary" Laing DDC pump). In fact, with such a piece of iron for SVO it will be necessary to purchase only water blocks, hoses and other trifles that we already had. The pump operates from 12V (from 8 to 13.2), emitting a noise of 24 ~ 26 dBA. The maximum pressure generated is 1.5 bar, which is approximately equal to 1.5 "atmospheric".
There were three candidate coolers for the radiator - Noctua , Be Quiet and Scythe . As a result, stopped at the Indonesian (with Japanese roots) Scythe Gentle Typhoon(120mm, 1450 rpm, 21 dBA) - these turntables are not in great demand for many users for the first day. They are sooo quiet, and the quality of bearing balancing is simply surprising - the cooler will spin for an unnaturally long time even at the slightest touch. The service life is 100,000 hours at 30 ° C (or 60,000 hours at 60 ° C), which is enough for obsolescence of this system unit.

The review of these "typhoons" was at the Center, I advise you to read . Protective grids were placed on top of the coolers so that the child would not put something vital in the fans.
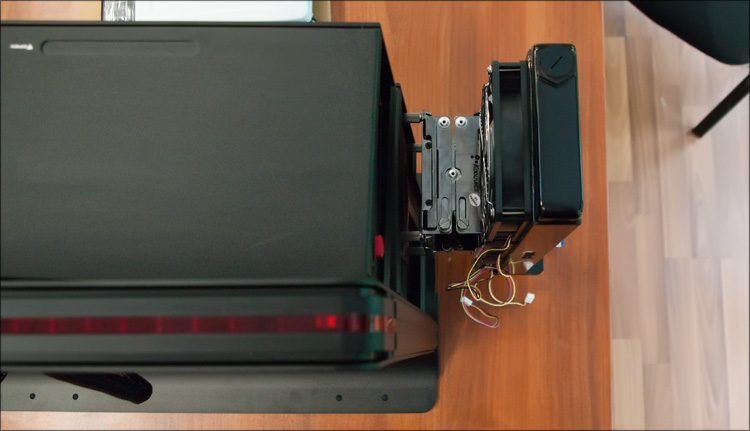
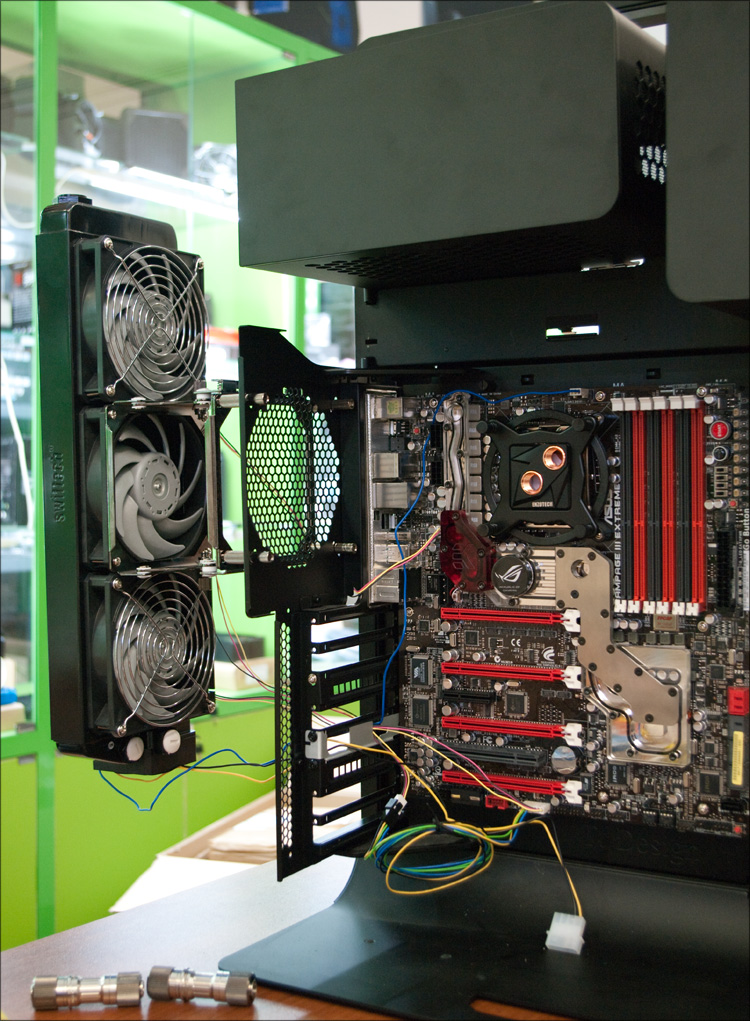
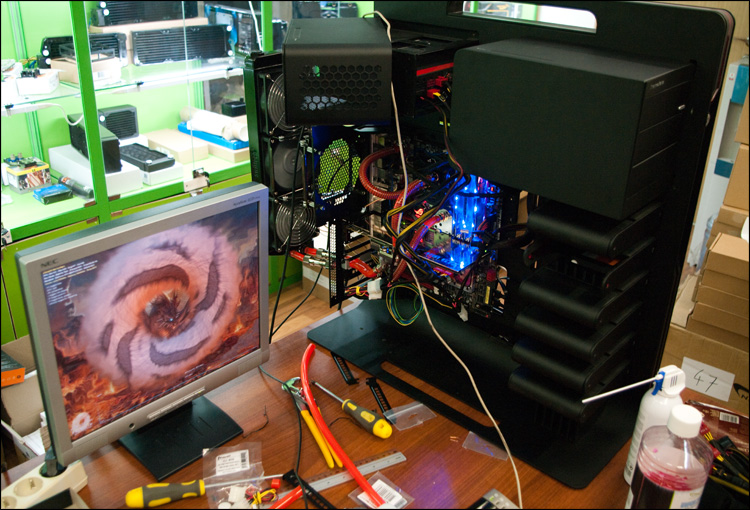
We try on the resulting structure to the system unit - it looks very unusual) But look how convenient it is to climb inside the case (or remove the cooling system), just press one “button” and the whole structure is, in fact, already disconnected. We squeeze the mounting frame and have full access to the insides - it's more than spacious, because we did not pile up anything there. Maybe I described not the most convenient option, but ... if you consider that after assembling a computer, there is almost no need to climb inside, and good cooling is much more important, then I think our solution is right.
The assembly in the assembly weighs 2.25 kilograms, and with liquid and fittings, probably all 3 - looking ahead, even such a weight to the frame from Koolance turned out to be able, for which respect and respect for her :)
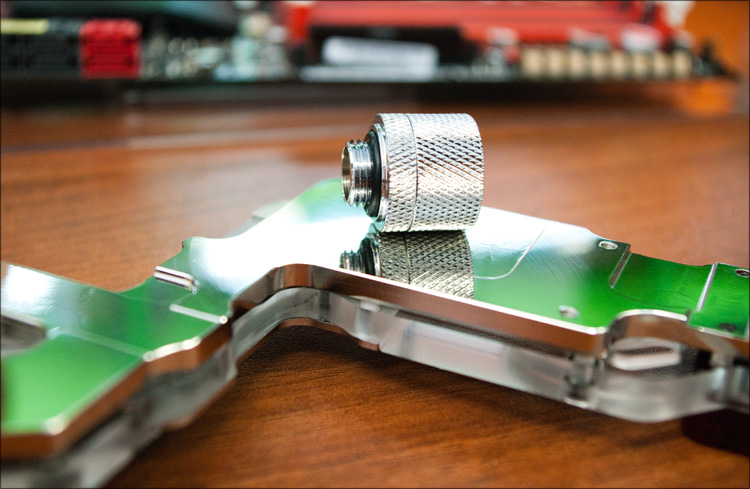
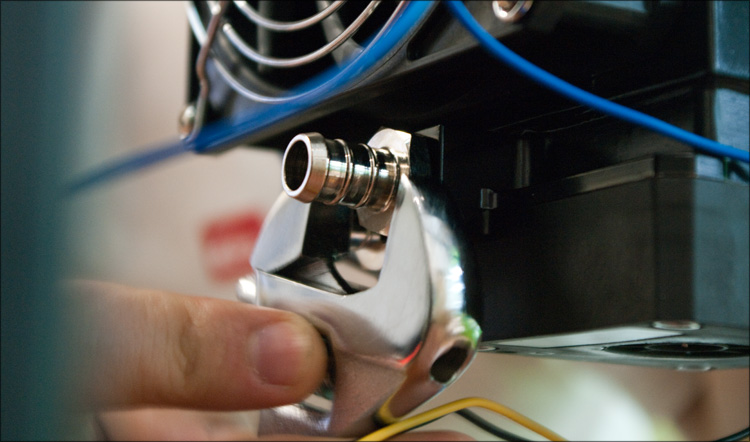
It remains for the small - to install all the components, "tie with water" and test the resulting computer. It all started with the installation of fittings - such beautiful pieces of iron (in the form of “Christmas trees”) that are installed through special gaskets (and sometimes, when the thread of the fitting is very long, through special spacers) are installed in the corresponding hole of the water block or tank — we used a small adjustable wrench for tightening , but here it is also important not to overdo it.
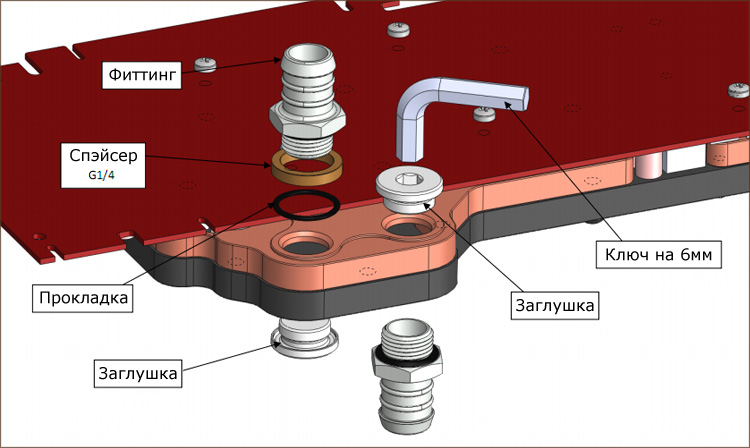
In addition to the fittings, special plugs were installed in the two holes of the video block water block:
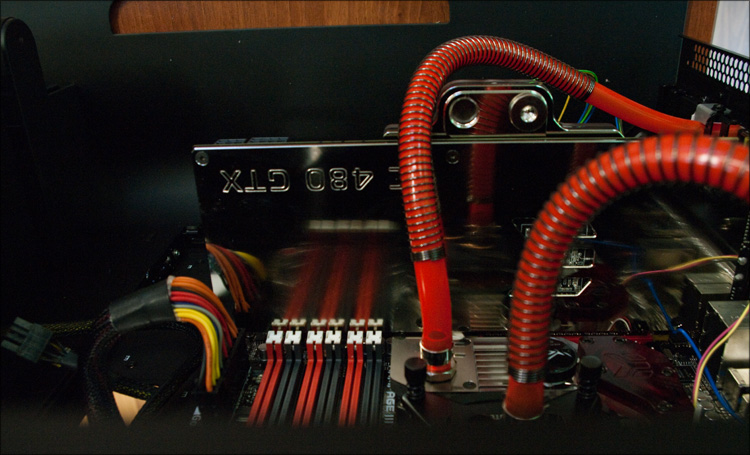
After that, we thought about the route that the water will take. The rule is simple - from less heated to more. Accordingly, the "output" of the radiator is connected first with the waterblock of the motherboard, from it the output to the processor, then to the video card and only then back to the entrance to the radiator to cool. Since water is one for all, the temperature of all components will be approximately the same as a result - it is for these reasons that multi-loop systems are made, and for this reason it does not make sense to connect hard drives, RAM, etc. to the same circuit.
The role of the hose went to the red Feser Tube (PVC, operating temperature from -30 to + 70 ° C, tensile pressure of 10 MPa), for which special predatory tools were used.

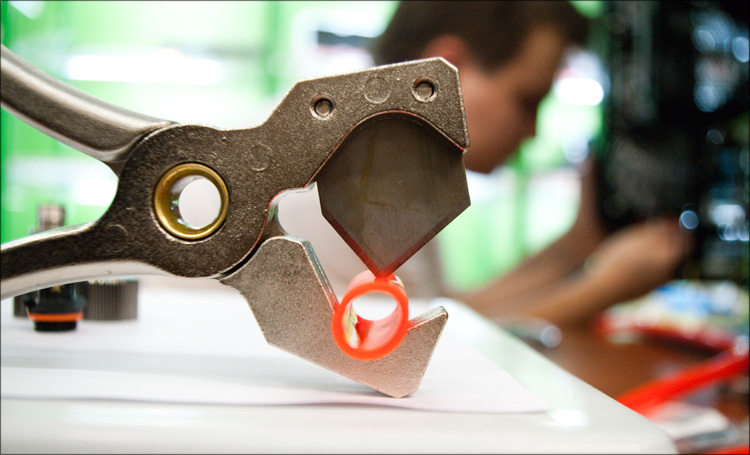
Cutting the hose smoothly may not be so difficult, but very important! Almost all hoses were put on special springs against bends and kinks of the hose (the minimum radius of the loop of the hose becomes ~ 3.5 cm).

On each hose (on both sides) in the area of the fitting, you need to install a “hose clamp” - we used beautiful Koolance Hose Clamp . They are installed using ordinary pliers (with a rough male force), so you need to act carefully in order not to accidentally touch something.
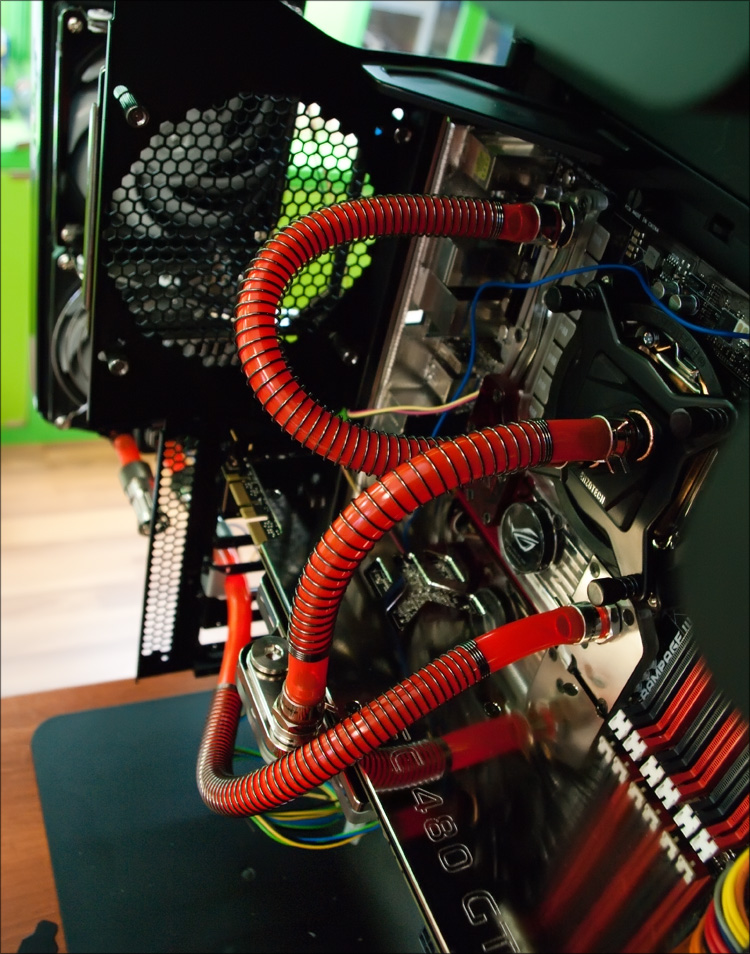
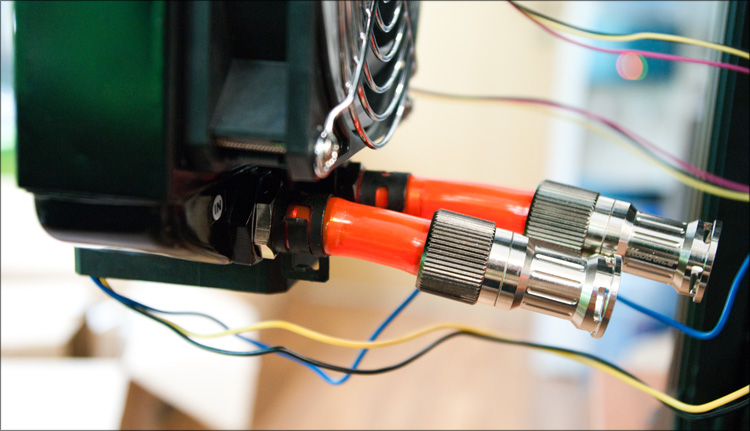
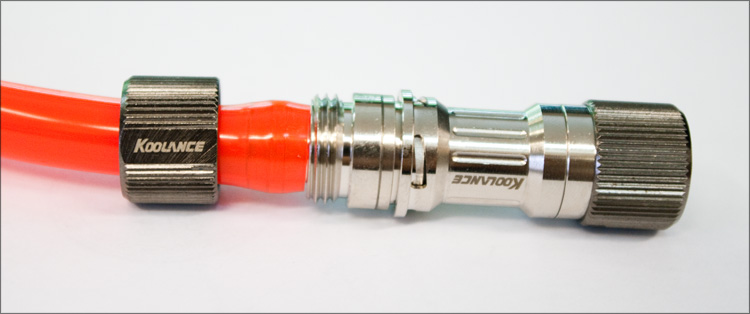
 It is time to work on the connection of the “inner world” with the “outer”. In order to be able to remove the radiator-tank reservoir (for example, for opening the case or for transportation), we put on the tube so-called “quick couplings” (quick-release valves), the principle of action of which is outrageously simple.
When we rotate the connection (as with BNC connectors), the hole in the tube closes-opens, so you can disassemble the dropsy in less than a minute, without any puddles and other consequences. A couple more expensive but beautiful looking pieces of iron:


5110 - EK FB RE3 Nickel
waterblock for 3660 motherboard - EK-FC480 GTX Nickel + Plexi waterblock for
1065 video card - Backpacklate EK-FC480 GTX Backplate Nickel for
2999 video card - Enzotech Stealth waterblock for
9430 processor - Pump / heatsink / hectare box for 3430 - Water pump / heatsink / tank / hectare box, Swifter if if if if 3 3 3 3 99 99 99 99 99 99 2999 DRIVE
2610 - Two Release Coupling
4000 Quick Release Valves - Koolance Radiator Mounting Bracket
1325 Adapter - Three Scythe Gentle Typhoon Coolers (120mm) for Radiator
290 - Four EK-10mm High Flow Fitting
430 Fittings - Arctic-Cooling-MX-3
400 Thermal Paste - Nine hose clamps Koolance Hose Clamp
365 - Nanoxia HyperZero
355 Fluid - Feser Tube Hose
Such a high price in this case is due to the fact that fullcover water blocks were used for VERY hot glands, all the heat from which must be dissipated with an appropriate radiator. For simpler systems, such solutions are simply not needed, you can also do without decorative linings and any quick-release valves - in such cases, you can easily meet half the cost. The price of an average "dropsy" is 12-15 thousand rubles, which is 4-5 times higher than the cost of a really good processor cooler.
After all the components of the system were connected, the time came for the leak test (leak test) —the coolant was poured into the radiator (double-distilled Nanoxia HyperZero water is red, with anti-corrosion and antibiological additives) —the order of 500 ml.
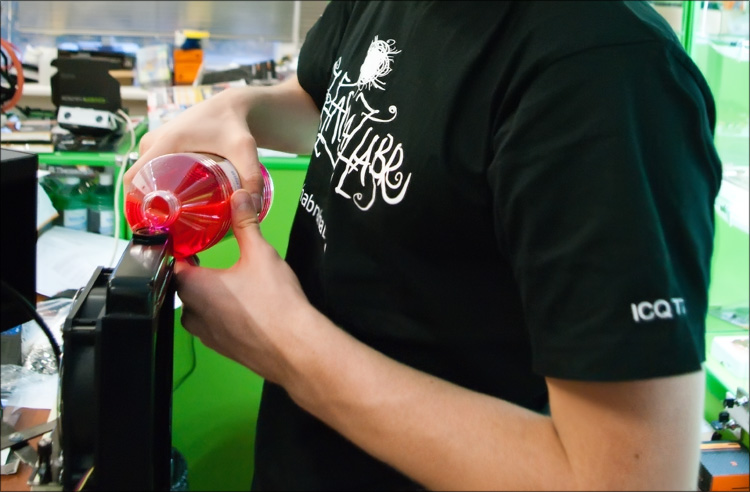
The guy in habramayke runs the radiator)
Because it is impossible to exclude the possibility that something was connected to the computer components wrong, it was decided to separately test the operation of the water-cooling system itself. To do this, all the wires (from the coolers and from the pump) were connected, and a clip was inserted into the 24-pin power supply connector for “idling”. Just in case, below we put napkins to make the slightest leak easier to detect.
Pressing the button and ... everything was intended) Honestly, before that I had to see dropsy (besides the Internet) only at various exhibitions and competitions, where it was very noisy; therefore, I subconsciously prepared for the “murmur of the stream”, but the noise level was pleasantly surprised - for the most part only the pump work was heard. Initially, there were "hissing" sounds - due to air bubbles inside the circuit (they were visible in some places of the hoses). To solve this problem, the radiator tank plug was opened - the air gradually came out of the circulation and the system began to work even quieter. After topping up the fluid, the plug was closed and the computer worked for another 10 minutes. Noise from the power supply cooler and from three on the radiator could not be heard at all, although their air currents made themselves felt.
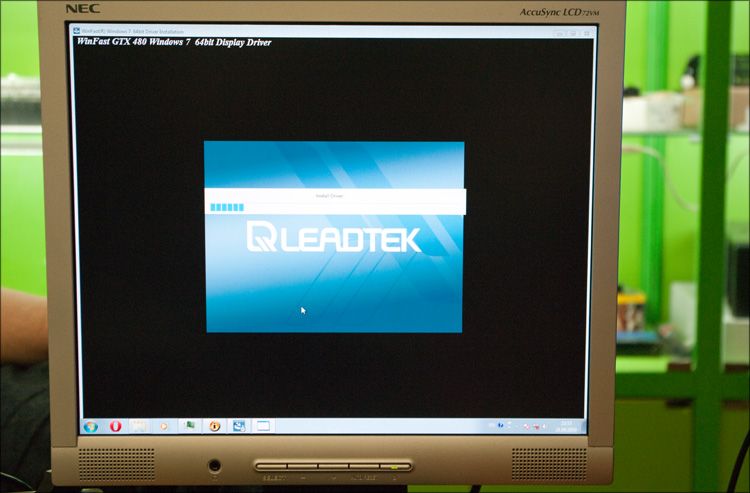
Making sure that the system is fully operational, we decided to finally assemble a test bench. It took no more than a minute to connect the wires - the monitor and the wire to connect it took longer to search. everyone worked on laptops;) The phrase "Reboot and select a boot device or boot drive" has become a balm for the soul - we inserted one of the "working" SSD disks (with Windows 7 on board) - well, that the new computer adopted such an option. For complete happiness, only updated drivers for the chipset and installed drivers for the video card.
We launch the diagnostic monster Everest , where on one of the tabs we find the readings of the temperature sensors: 30 ° C were valid for all system components — the CPU, the GPU and the motherboard — well, very nice numbers. The equality of numbers has led to the assumption that cooling in idle mode is limited to room temperature, because it cannot be below normal temperature. In any case, it is much more interesting to see what the situation will be under load.
15 minutes of "office work" and the temperature of the video card has risen to 35 ° C.
We start by checking the CPU, for which we use the OCCT 3.1.0 program - after quite a long time in the 100% load mode, the maximum processor temperature was 38 ° C, and the core temperature is 49-55 ° C, respectively. The temperature of the motherboard was 31 ° C, the north bridge - 38 ° C, the south one - 39 ° C. By the way, it is very remarkable that all four cores of the processor had almost equal temperature - apparently, it is the merit of the water block, which removes heat evenly from the entire surface of the processor cover. 50+ degrees for a 4-core Intel Core i7-930 with a TDP of 130W - at least one stock cooler is hardly capable of such a result. And if it is capable, then the noise from its work is unlikely that anyone will like it (the Internet says about the temperature of this processor at 65-70 degrees with Cooler Master V10 cooler - the one with the Peltier element).
Out of habit, the video card was warmed up with the FurMark 1.8.2 program (in common “donut”) - you could hardly have thought up something more resource-intensive and informative.
In addition to the "Everest" program was also installed EVGA Precision 2.0 . At the maximum available resolution (with maximum smoothing), a stress test was launched with temperature logging - after just 3 minutes the temperature of the video card was set at 52 degrees! 52 degrees in the load for the top (at the moment) NVIDIA GTX 480 video card on the Fermi architecture is not just great, it's great! )

For comparison, the temperature of a video card in a load with a regular cooler can reach up to 100 degrees, and with a good non-reference one - up to 70-80.
In general, the temperature regime is in perfect order - in the load coolers blow practically cold air out of the radiator, and the radiator itself is barely warm. I will not talk about overclocking potential in this article, I can only say that it exists. But much more pleasant is completely different - the system works almost silently!

You can talk about the result for a long time, but I liked it, as well as all those who have already managed to see it. Whatever one may say, but in the case of Thermaltake Level 10 I managed to collect more than a productive config that will be relevant for a long time. Moreover, almost without problems, a “complete” water cooling system “stood up”, which, in addition to good cooling of the filling, gives +5 to the appearance. Speaking about the temperature mode, we can safely talk about a solid potential for overclocking - now even in the load, the cooling system works far from the limit of possibilities.

I forgot to write about another important plus - interesting. Perhaps this is the most interesting thing that I had to do with the glands - not a single computer assembly brought so much pleasure! One thing is when you collect the usual "soulless" compics, it is quite another thing when you understand all the responsibility and approach the matter with all your soul. Such work takes not 5 minutes - all this time you feel like a child playing as an adult constructor. And also the engineer-technologist-designer-plumber-designer, just a geek ... well, the interest is greatly increased!
Successes and frosty freshness!
If you are interested in a detailed illustrated guide to the assembly / installation of such a system (for example, productive config), then welcome under cat. Traffic!
Radiators and coolers - even writing is not so interesting about it, because all this has long been in any computer and this will not surprise anyone. Liquid nitrogen and any phase transition systems there are another extreme, the chances of meeting with which in the economy of an ordinary person are almost nil. But the "dropsy" ... in terms of cooling the computer is like a happy medium - unusual, but affordable; almost no noise, but at the same time anything can cool. In fairness, SVO (water cooling system) is more appropriate to call LSS (liquid cooling system), because, in fact, you can pour anything inside. But, running ahead, I used plain water, so I’ll use more the term CBO.
')
Most recently, I wrote in some detail about the assembly of a new system unit. The resulting stand looked like this:
- Thermaltake Level 10 housing
- Thermaltake Toughpower Grand 750W Power Supply
- ASUS Rampage III Extreme motherboard
- Intel Core i7-930 processor
- Leadtek GeForce GTX 480 video card
- Memory Crucial Ballistix Tracer
- WD SiliconEdge Blue SSD Hard Drive
Thoughtful study of the list suggests that the heat emission of some devices is not just high, but VERY high. And if you connect everything as it is, then inside even the most spacious case will be at least hot; and as practice shows, it will also be very noisy.
Let me remind you that the case in which the computer is going is not very practical (although every time I see the opposite), but very presentable Thermaltake Level 10 - it has disadvantages, but for just one appearance it can be forgiven him a lot .
I did a review of this case, then a less productive stand was going to it - everything was fine with the temperature regime, although, according to the statements of many reputable iron sites, the case was not designed to collect really powerful configs. Moreover, in the opinion of these publications, the case is also unsuitable for the installation of a liquid cooling system, with which I agreed at one time without verification. Finally, it was possible to disprove both of these statements, making a few useful things - assembling a computer, installing a water-cooling system in it and telling you about it. Let me tell you on the example of a rare and expensive body, but nothing prevents you from applying your knowledge on any other case - it will only be easier!
And the last. I have long thought about how to submit all the information received. As a result, after looking at 1000+ photos taken during the work, I wrote a universal algorithm (sequence of actions) for assembling CBO - I got 8 points, about each of which I wrote in detail and with pictures. Someone may get less of these items, some more, but in general, this “HowTo” can be used for any system - add to favorites, you see, it will be useful;)
Go-go-go!
On one of the non-working days (on weekends) I arrived at a jam-packed car in the store and we almost immediately began to solve the problem. Besides me, there were two more people (Maxim and Alexey), the third one came in the evening to look at the result and offer us a way to solve one problem (because of which the assembly of the system was very long). Looking ahead - it is very good that everything happened in the store, where everything was necessary - without it, I would have spent 100% more money, time and nerves.
So, the goal was set - to assemble a single-circuit water cooling system, which would effectively cool the motherboard, processor and video card. Maximum quiet, ideally - with the possibility of further upgrading the system .
Having estimated the plan of action, the necessary hardware and its presence on the shelves of the store, we took up the screwdrivers. Whatever one may say, it’s necessary to start from the motherboard - it’s the most important thing on the computer.
Installing a fullcover-waterblock on the motherboard
Motherboard ASUS Rampage III Extreme is very popular in the overclocking environment - if you look at world records, in very many cases it appears exactly. The great potential and technological prospects, the “freshness” of the model and the ASUS brand itself - all this was the result of the appearance on the market of various accessories sharpened specifically for this board. In particular, I'm talking about fullcover-waterblock (of which there are already three different models on the overhead for this board). Fullcover - means that this piece of iron covers all the necessary elements of the board (very hot, especially during overclocking), such as mosfets, north and south bridges.
For motherboards it is simpler (and for less common) there are quite a few ordinary water blocks that cool only one area or another, but in this case it is easy to run into a “file”, and the number of liquid tubes will in any case be larger.
We chose the EK-FB RE3 fullcover water block (from EK Waterblocks), an expensive piece of metal with all kinds of cavities, which is suitable as a device for the device, skilfully bypassing all capacitors, protrusions and other relief features.
When designing motherboards, the radiators of the power subsystem of the central processor are designed for cooling by the central processor cooler. When installing SVO, mosfets lose blowing, and even with a slight acceleration, their temperature can reach a critical 100 degrees. So the fullcover for ASUS Rampage III Extreme is what the doctor ordered!
Pay attention to how complex the waterblock is. In addition to mirror polishing the base, an unusual shape of the piece of iron itself and precisely milled holes for capacitors, inside there is a space (with a no less complex geometry) along which water will flow. Horror.
The installation process is so ugly. We unscrew the 9 screws on which the stock fullcover radiator rests - it is beautiful, so we will not throw it out.
Max at work)
Along the way, we pull out the glowing puck “ROG Connect” - it will still come in handy for us.
Then we take some fleece and remove the thermal interface that was on the chips under the radiator. You can use a special liquid for removing thermal paste - it helps. Next, we take the thermal pad (it comes with the water block) and, following the instructions, cut out the necessary pieces - paste them onto the mother's circuit.
Next, simply fasten the water block, after installing the “standofy” (small plastic rings, which allow you to prevent distortions and peretyagov water block) in the holes for the screws.
The weight of the waterblock is 550 grams, so for the reliability on the back of the motherboard you need to install a backplane that distributes the load.
The final stroke is the installation of the ROG Connect indicator, for which there is now a corresponding dimple. With good luck, in the load mode, such a water block can take up to 40 degrees heat.
Installing the waterblock on the processor
So that the motherboard could be put aside for a while, we decided to install a waterblock on the processor too - for obvious reasons, only fullcover is available for processors :)
We used a cross socket (775/1366) Enzotech Stealth - a stylish black water block, made in compliance with the highest requirements (the base is polished to a mirror finish, the maximum deviation from the straight line is less than 0.0003 inch).
In addition to it, the bundle included:
- backplane for 775 and 1366 sockets- One Enzotech 1366EZ mounting frame
- 4 nylon spacers
- 4 fixing screws
- 2 Christmas tree-type high-flow fittings with a diameter of 13mm (with o-rings)
- 2 hose clamps with an inner diameter of 13 mm
- Tube of thermal silver Arctic Silver Ceramique
The scheme of actions is about the same, only nothing needs to be dismantled - first install the protective backplane on the back side of the motherboard (the weight of the water block is 250 grams), and put a special frame on the front side (as is the case with air coolers).
We open the socket, put the processor in it, similarly we clean (already from the fat) the heat-spreading lid of the processor, apply a thin layer of thermal paste and place the water block itself on top. Just in case, you can immediately remove it to make sure (due to poor visibility) that there is a necessary contact between the processor cover and the base of the water block. Once again carefully we clean both surfaces and, with full confidence in the screwdriver, tighten the screws on the water block.
In order not to lose the parts, we twist both fittings from the kit - they are by default quite stylish. Everything.
Installing a fullcover-waterblock on a video card
If we deprive the component parts of the guarantee, then all at once;) Now we have come to the hottest component of the system, to the Leadtek GeForce GTX 480 video card - if you believe the tests, then this lady warms up to 100+ degrees in the load, which is accompanied by a no less disturbing noise stock turbines.
To complete the picture, it was decided to also use the fullcover-water block. For video cards with NVIDIA Fermi architecture, there are already quite a few of them, and we, apparently, were lucky - Leadtek GeForce GTX 480 had a “reference design”, that is, the one that was originally designed by NVIDIA itself. Most often, the most obvious sign of a non-reference design is a nonstandard cooling system - what manufacturers give out as a plus (in fact, it is). It is much worse when the layout on the board is modified - it will be much more difficult to guess.
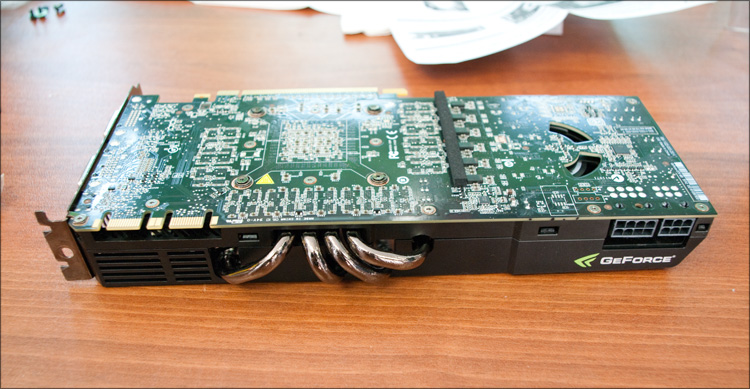
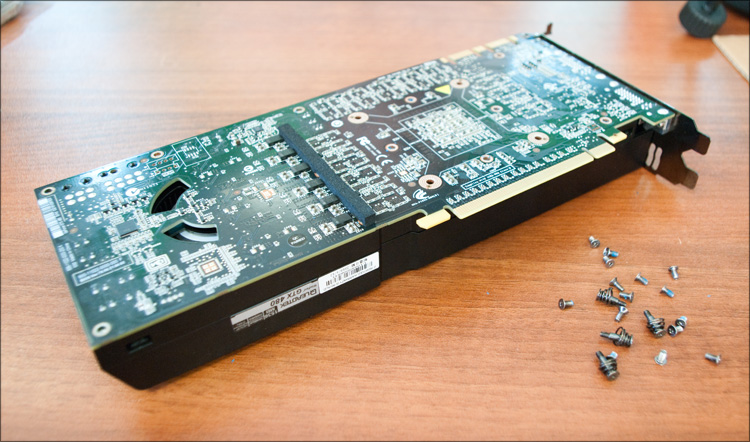
In the hope that everything will be fine, we have begun to dismantle the factory cooling system (the loss of warranty starts from this stage). In the case of this video card, the process is somewhat tiring - 17 screws from the PCB side and 2 from the side of the connectors. Next, carefully remove the entire radiator by disconnecting the cooler wire from the board beforehand.
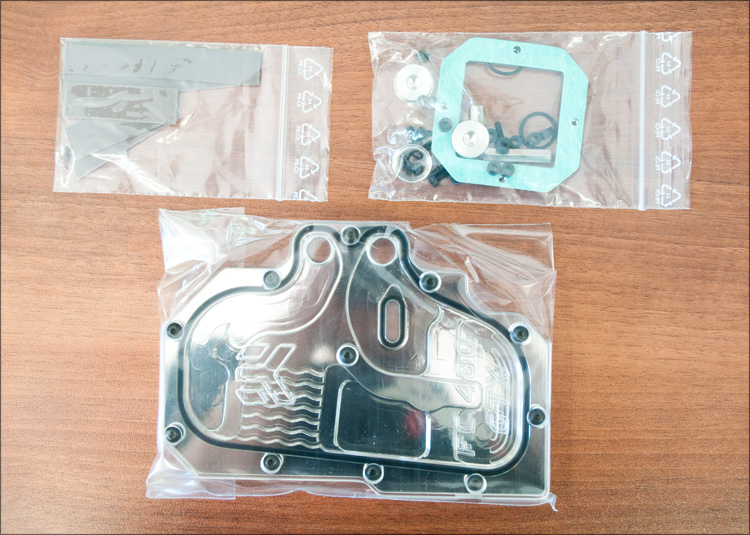
The fitting of the fullcover-waterblock EK-FC480 GTX Nickel + Plexi was successful - it fit perfectly)
Open the instructions, proceed to cutting thermal pads (it is best to do this with scissors, which is not a pity or clerical knife).
Gluing the thermal pads - it is very important to glue them correctly, so read the instructions carefully!
We put the stand-ins in the mounting holes of the waterblock, clean the GPU cover with a special liquid, apply a thin layer of thermal paste and dress the waterblock.
For reliability, this high-tech sandwich lacks 9 screws - the most important thing is not to tighten them very much!
Next, the video card was tried on to the motherboard - beautifully, of course, but the textolite is completely unpresentable. Moreover, it can be accidentally touched and damaged, water can drip on top of it ... in general, it was decided to install a decorative-protective fullcover backplane, which was EK-FC480 GTX Backplate Nickel . With its installation there were no problems at all - they established and understood that they had not lost. Actually, everything.
Even when I was working for the “skinny” GeForce 2 MX 400, and the people were taking the 8800s with might and main - I think it was from that moment that many (and I, too) had to remember that the video card is something sooo big. What to talk about modern “fools”, which have ceased to fit in many cases (some video cards are nearly 30 cm long!). Then it always seemed to me that under a protective casing such various electronics are teeming, but as it turned out, most of the space is occupied by the cooling system radiator - the board itself is very thin.
I mean, it’s very unusual to see such a thin top-end video card - the height of the water block is only 8.8 millimeters, so the total amount of video cards is a little over a centimeter, which is less than the height of the plug for the PCI slot! Accordingly, there will be no problems with the creation of an SLI system (for 2-3-4 video cards).
It involuntarily seems that such a system simply cannot work effectively ... but when you take it in hand ... By the way, the weight of a water block alone is 950 grams without fittings and caps! The weight of the video card assembly was 1.22 kg.
At this stage, the motherboard was installed in the case, a video card was inserted into it - previously in the top PCI slot.
Installation of radiator / pump / reservoir
One of the most interesting stages of work, which took us the most time (if we went right along the easy way, we would have managed it in half an hour, but first we tried all the difficult options, because of which all the work was dragged out for 2 days (of course, far incomplete).
The water cooling system is very similar to the one used in cars, just a little bigger - there is also a radiator (most often not one), cooler, coolant, etc. But the car has one advantage - a solid counter-flow of cold air, which plays a key role in cooling the system while driving.
In the case of a computer, heat is removed by the air in the room. Accordingly, the larger the size of the radiator and the number of coolers, the better. And since you want a minimum of noise, effective cooling will be achieved mainly due to the surface of the radiator.
And the essence of the problem was as follows. In Skype, we previously agreed on the opinion “we will hang it from behind the radiator into 2-3 sections - it is more than enough!”, But as soon as we looked at the case, it turned out that everything was not so simple. Firstly, there really wasn’t enough space for a three-section radiator (if the radiator was mounted on the opening where the installation of the blow cooler is supposed to be installed), and secondly, even if it were enough, it wouldn’t have been possible to open the case itself - it would interfere "Door" of the system compartment :)
In general, we counted at least four options for installing a radiator into a Thermaltake Level 10 enclosure - they are all possible, each would require a different amount of time, and each would have its own pros and cons. I will begin with those that we considered, but which did not suit us:
1. Install the radiator on the back (from the user) side, that is, on the removable door.
Pros:
+ Possibility of horizontal and vertical installation of any radiator, at least for 3-4 coolers
+ Case size would not have increased
Minuses:
- I would have to drill from 4 to 6-8 holes in the door
- It would be very inconvenient to remove the door
- With a horizontal arrangement, a radiator with a nonstandard arrangement of the opening for filling the fluid would be required.
- With a vertical arrangement, the hoses would be very long and with a large bend.
- The case will be on my left (on the windowsill), and I don’t need warm air from the coolers in my face :)
2. Install the radiator from the top, on the "cover" of the power supply compartment. Pros and cons are identical.
3. Installing a two-piece radiator inside the system compartment
Pros:
+ Easy solution
+ Outwardly there would be no change.
+ The system compartment door would open without problems.
Minuses:
- Only a 2-section radiator would fit (this is not enough for the config iron)
- In this case, it would have been impossible to take cold air from where, and we did not want to drive warm air to and fro.
- It would be difficult to "arrange" the pump and tank
- Even if ultra-thin coolers were used, all SATA connectors would overlap (if they were output to the user, and not sideways, then this problem would not exist)
In general, we have tried all these options to some extent - we spent a lot of time searching for the right components, fitting them, etc.
The very last option turned out to be a rather unusual solution - maybe not the most beautiful at first glance, but really practical. This is the installation of the radiator on the back of the case through a special adjustable adapter with a mechanism of the “scissors” type .
Pros:
+ I did not have to drill
+ Ability to hang ANY radiator
+ Excellent airflow
+ Do not block access to the connectors of the motherboard
+ Minimum length of hoses, minimum of bends
+ The design is removable and transportable
Minuses:
- Not the most presentable appearance :)
- Open the door of the system compartment is not so easy
- Enough expensive adapter
Why did we come to this option last? Because during the search for the previous three options, we accidentally found an adapter, which everyone had forgotten about, and it wasn’t in the online store) Looking at the only (last) copy of the Koolance Radiator Mounting Bracket , I thought, “And why not come up with! ". The point is the following - 4 "tapered nails" are inserted into the holes for attachment to the body of the rear blow cooler, on which a special frame is hung.
The design of this frame is such that its length can be changed by twisting the latches, and it is removed by mixing two parts of its body (so that the holes are unlocked and it can be removed from the “studs”) - so I bent! ) It is much easier to understand everything by photo.
The frame is metal and very durable - I was convinced of this when we hung a 3-section (for 3 coolers) radiator for testing. Nothing dangles and does not swing, everything hangs tightly, but in the "decompressed" case, the door completely opened itself - this option completely suits me!
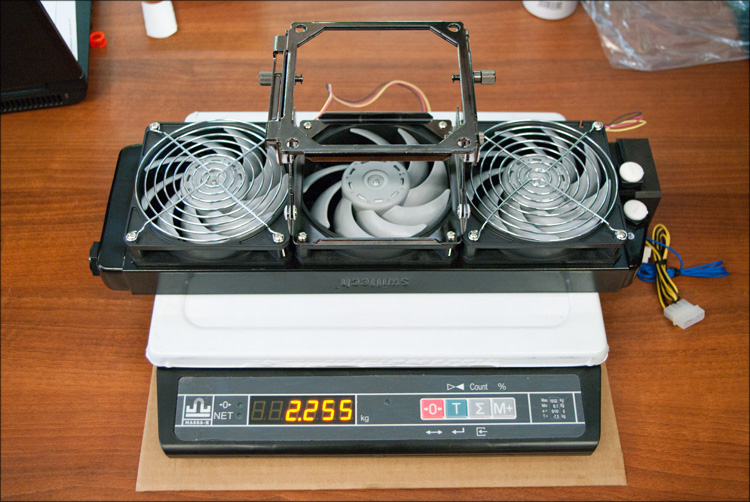
There were a huge number of radiators to choose from - black, white, red ... In this question, I was most surprised by the 4-section TFC Monsta , which can dissipate up to 2600W of heat (this is probably an SLI of four 480s)! But we people are much simpler, so we decided to stay on the radiator that we tried on - Swiftech MCR320-DRIVE . Its advantage is that it combines three components at once - a radiator (MCR320 QP Radiator for three 120mm coolers), a reservoir for a liquid and a high-pressure pump ( MCP350 Pump , a complete analog of the "ordinary" Laing DDC pump). In fact, with such a piece of iron for SVO it will be necessary to purchase only water blocks, hoses and other trifles that we already had. The pump operates from 12V (from 8 to 13.2), emitting a noise of 24 ~ 26 dBA. The maximum pressure generated is 1.5 bar, which is approximately equal to 1.5 "atmospheric".
There were three candidate coolers for the radiator - Noctua , Be Quiet and Scythe . As a result, stopped at the Indonesian (with Japanese roots) Scythe Gentle Typhoon(120mm, 1450 rpm, 21 dBA) - these turntables are not in great demand for many users for the first day. They are sooo quiet, and the quality of bearing balancing is simply surprising - the cooler will spin for an unnaturally long time even at the slightest touch. The service life is 100,000 hours at 30 ° C (or 60,000 hours at 60 ° C), which is enough for obsolescence of this system unit.
The review of these "typhoons" was at the Center, I advise you to read . Protective grids were placed on top of the coolers so that the child would not put something vital in the fans.
We try on the resulting structure to the system unit - it looks very unusual) But look how convenient it is to climb inside the case (or remove the cooling system), just press one “button” and the whole structure is, in fact, already disconnected. We squeeze the mounting frame and have full access to the insides - it's more than spacious, because we did not pile up anything there. Maybe I described not the most convenient option, but ... if you consider that after assembling a computer, there is almost no need to climb inside, and good cooling is much more important, then I think our solution is right.
The assembly in the assembly weighs 2.25 kilograms, and with liquid and fittings, probably all 3 - looking ahead, even such a weight to the frame from Koolance turned out to be able, for which respect and respect for her :)
 Finish line
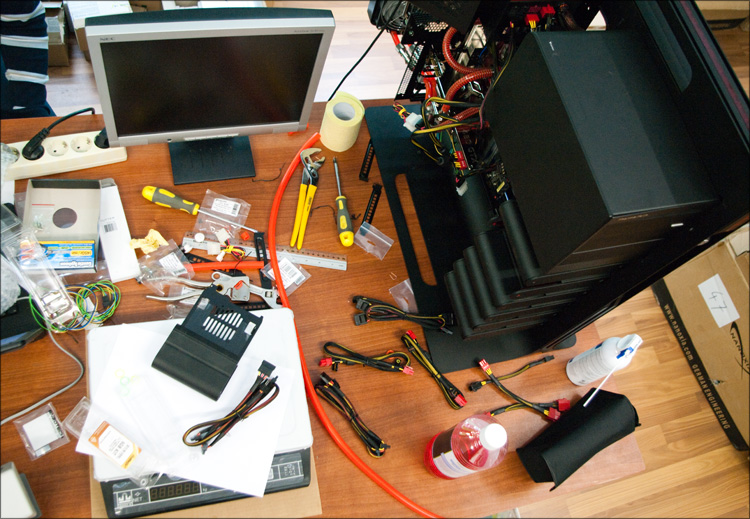
It remains for the small - to install all the components, "tie with water" and test the resulting computer. It all started with the installation of fittings - such beautiful pieces of iron (in the form of “Christmas trees”) that are installed through special gaskets (and sometimes, when the thread of the fitting is very long, through special spacers) are installed in the corresponding hole of the water block or tank — we used a small adjustable wrench for tightening , but here it is also important not to overdo it.
In addition to the fittings, special plugs were installed in the two holes of the video block water block:
After that, we thought about the route that the water will take. The rule is simple - from less heated to more. Accordingly, the "output" of the radiator is connected first with the waterblock of the motherboard, from it the output to the processor, then to the video card and only then back to the entrance to the radiator to cool. Since water is one for all, the temperature of all components will be approximately the same as a result - it is for these reasons that multi-loop systems are made, and for this reason it does not make sense to connect hard drives, RAM, etc. to the same circuit.
The role of the hose went to the red Feser Tube (PVC, operating temperature from -30 to + 70 ° C, tensile pressure of 10 MPa), for which special predatory tools were used.
Cutting the hose smoothly may not be so difficult, but very important! Almost all hoses were put on special springs against bends and kinks of the hose (the minimum radius of the loop of the hose becomes ~ 3.5 cm).
On each hose (on both sides) in the area of the fitting, you need to install a “hose clamp” - we used beautiful Koolance Hose Clamp . They are installed using ordinary pliers (with a rough male force), so you need to act carefully in order not to accidentally touch something.
It is time to work on the connection of the “inner world” with the “outer”. In order to be able to remove the radiator-tank reservoir (for example, for opening the case or for transportation), we put on the tube so-called “quick couplings” (quick-release valves), the principle of action of which is outrageously simple.When we rotate the connection (as with BNC connectors), the hole in the tube closes-opens, so you can disassemble the dropsy in less than a minute, without any puddles and other consequences. A couple more expensive but beautiful looking pieces of iron:
Costs
5110 - EK FB RE3 Nickel
waterblock for 3660 motherboard - EK-FC480 GTX Nickel + Plexi waterblock for
1065 video card - Backpacklate EK-FC480 GTX Backplate Nickel for
2999 video card - Enzotech Stealth waterblock for
9430 processor - Pump / heatsink / hectare box for 3430 - Water pump / heatsink / tank / hectare box, Swifter if if if if 3 3 3 3 99 99 99 99 99 99 2999 DRIVE
2610 - Two Release Coupling
4000 Quick Release Valves - Koolance Radiator Mounting Bracket
1325 Adapter - Three Scythe Gentle Typhoon Coolers (120mm) for Radiator
290 - Four EK-10mm High Flow Fitting
430 Fittings - Arctic-Cooling-MX-3
400 Thermal Paste - Nine hose clamps Koolance Hose Clamp
365 - Nanoxia HyperZero
355 Fluid - Feser Tube Hose
Such a high price in this case is due to the fact that fullcover water blocks were used for VERY hot glands, all the heat from which must be dissipated with an appropriate radiator. For simpler systems, such solutions are simply not needed, you can also do without decorative linings and any quick-release valves - in such cases, you can easily meet half the cost. The price of an average "dropsy" is 12-15 thousand rubles, which is 4-5 times higher than the cost of a really good processor cooler.
Turn on and work
After all the components of the system were connected, the time came for the leak test (leak test) —the coolant was poured into the radiator (double-distilled Nanoxia HyperZero water is red, with anti-corrosion and antibiological additives) —the order of 500 ml.
The guy in habramayke runs the radiator)
Because it is impossible to exclude the possibility that something was connected to the computer components wrong, it was decided to separately test the operation of the water-cooling system itself. To do this, all the wires (from the coolers and from the pump) were connected, and a clip was inserted into the 24-pin power supply connector for “idling”. Just in case, below we put napkins to make the slightest leak easier to detect.
Pressing the button and ... everything was intended) Honestly, before that I had to see dropsy (besides the Internet) only at various exhibitions and competitions, where it was very noisy; therefore, I subconsciously prepared for the “murmur of the stream”, but the noise level was pleasantly surprised - for the most part only the pump work was heard. Initially, there were "hissing" sounds - due to air bubbles inside the circuit (they were visible in some places of the hoses). To solve this problem, the radiator tank plug was opened - the air gradually came out of the circulation and the system began to work even quieter. After topping up the fluid, the plug was closed and the computer worked for another 10 minutes. Noise from the power supply cooler and from three on the radiator could not be heard at all, although their air currents made themselves felt.
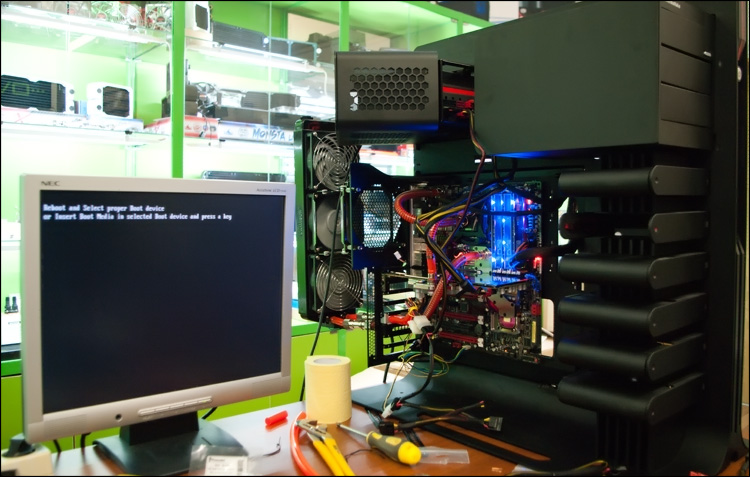
Making sure that the system is fully operational, we decided to finally assemble a test bench. It took no more than a minute to connect the wires - the monitor and the wire to connect it took longer to search. everyone worked on laptops;) The phrase "Reboot and select a boot device or boot drive" has become a balm for the soul - we inserted one of the "working" SSD disks (with Windows 7 on board) - well, that the new computer adopted such an option. For complete happiness, only updated drivers for the chipset and installed drivers for the video card.
We launch the diagnostic monster Everest , where on one of the tabs we find the readings of the temperature sensors: 30 ° C were valid for all system components — the CPU, the GPU and the motherboard — well, very nice numbers. The equality of numbers has led to the assumption that cooling in idle mode is limited to room temperature, because it cannot be below normal temperature. In any case, it is much more interesting to see what the situation will be under load.
15 minutes of "office work" and the temperature of the video card has risen to 35 ° C.
We start by checking the CPU, for which we use the OCCT 3.1.0 program - after quite a long time in the 100% load mode, the maximum processor temperature was 38 ° C, and the core temperature is 49-55 ° C, respectively. The temperature of the motherboard was 31 ° C, the north bridge - 38 ° C, the south one - 39 ° C. By the way, it is very remarkable that all four cores of the processor had almost equal temperature - apparently, it is the merit of the water block, which removes heat evenly from the entire surface of the processor cover. 50+ degrees for a 4-core Intel Core i7-930 with a TDP of 130W - at least one stock cooler is hardly capable of such a result. And if it is capable, then the noise from its work is unlikely that anyone will like it (the Internet says about the temperature of this processor at 65-70 degrees with Cooler Master V10 cooler - the one with the Peltier element).
Out of habit, the video card was warmed up with the FurMark 1.8.2 program (in common “donut”) - you could hardly have thought up something more resource-intensive and informative.
In addition to the "Everest" program was also installed EVGA Precision 2.0 . At the maximum available resolution (with maximum smoothing), a stress test was launched with temperature logging - after just 3 minutes the temperature of the video card was set at 52 degrees! 52 degrees in the load for the top (at the moment) NVIDIA GTX 480 video card on the Fermi architecture is not just great, it's great! )
For comparison, the temperature of a video card in a load with a regular cooler can reach up to 100 degrees, and with a good non-reference one - up to 70-80.
In general, the temperature regime is in perfect order - in the load coolers blow practically cold air out of the radiator, and the radiator itself is barely warm. I will not talk about overclocking potential in this article, I can only say that it exists. But much more pleasant is completely different - the system works almost silently!
The end
You can talk about the result for a long time, but I liked it, as well as all those who have already managed to see it. Whatever one may say, but in the case of Thermaltake Level 10 I managed to collect more than a productive config that will be relevant for a long time. Moreover, almost without problems, a “complete” water cooling system “stood up”, which, in addition to good cooling of the filling, gives +5 to the appearance. Speaking about the temperature mode, we can safely talk about a solid potential for overclocking - now even in the load, the cooling system works far from the limit of possibilities.
I forgot to write about another important plus - interesting. Perhaps this is the most interesting thing that I had to do with the glands - not a single computer assembly brought so much pleasure! One thing is when you collect the usual "soulless" compics, it is quite another thing when you understand all the responsibility and approach the matter with all your soul. Such work takes not 5 minutes - all this time you feel like a child playing as an adult constructor. And also the engineer-technologist-designer-plumber-designer, just a geek ... well, the interest is greatly increased!
Successes and frosty freshness!
Source: https://habr.com/ru/post/106394/
All Articles