Homemade Remote Control for Canon 50d
It took me a trigger for my Canon 50d (also suitable for all models of the floor and about the class of DSLRs). I didn’t want to throw out a lot of money for what they sell in our stores, to wait until the order arrives with eBay too. I began to search the apartment for something that can be used for this case.
I caught the flashlight keychain that I had brought home.

After disassembling this device, it was thought how to do what I want.
there was a simple circuit for closing contacts with a button that moved in front and back. It actually was what I needed, but after turning it this way and that, I noticed that the button also moves horizontally, or rather at an angle. Then a new idea of how to make from one button, the button of focusing and descending (as well as on the camera) has matured.
')
Everything that was not needed was cut off from the bottom, and two contacts were glued: one at the bottom, the second one slightly higher (on the curb), the one that is lower is responsible for focusing, the one that is higher than the descent.

I attached a spring and a small plate to the button for turning on the flashlight; the spring should not reach the bottom plate when the button is not pressed

these two contacts are soldered to each other and act as a common key for both actions.
Homemade Remote Control for Canon 50d
In general, the idea is that when lightly pressed, the spring swings the lower contact, auto-focusing works + additional rigidity appears. Upon further pressing, the second contact closes, causing the shutter to open.
It seems like everything is ready, it remains only to solder and assemble everything

In order not to tear off the wire with ease, I rolled up a small roll of electrical tape, along the diameter of the outlet opening, and cut it to the desired length. When assembling the case, it will be very good to press the wire and it will not allow you to pull out all with hurdles
Now the most difficult thing to make a connector for connecting to the camera
in the original it looks like this
Once there was a similar task and I decided to use the old method, just pick the right diameter of the wires and glue them in the right form, since the contacts in the current connector are arranged in a triangle shape and it was not difficult to put them together in the right order

For confidence, she was wearing another thermal tube, pre-filling again with super glue
farther on one side, insulation was cut to half on each wire (for connecting wires).

I specifically chose the colors of the wires (red green and blue) so that they coincided with the colors of the connecting wire (taken a regular piece of cable from the headphones).

All this is wrapped in a thermotube, as a result, I have something like this

For convenience, you need some kind of body that is easily covered with your fingers and does not slip in your hands. By the way, there were remnants of cold welding (base epoxy resin), of rather poor quality, which is good for me in this particular case. With this stinking mass, I wrapped my so-called connector and in the end it turned out to be something like that

When “It” almost turned into a solid mass, I, as far as I was allowed by my not quite even hands, cut it to a less acceptable form, and then processed it with sandpaper.
In the end, that's what I got

then everything was wrapped in a brazen tape and here's the finished product

what I got obviously does not pretend to something unique and beautiful, it’s just a lot needed by many for which a lot of money is being torn from clients, the most important thing is that it does one hundred percent with the tasks set for it.
Today he passed the first tests, and I was very pleased with what I did
I will be very glad to any comments.
I caught the flashlight keychain that I had brought home.
After disassembling this device, it was thought how to do what I want.
there was a simple circuit for closing contacts with a button that moved in front and back. It actually was what I needed, but after turning it this way and that, I noticed that the button also moves horizontally, or rather at an angle. Then a new idea of how to make from one button, the button of focusing and descending (as well as on the camera) has matured.
')
Everything that was not needed was cut off from the bottom, and two contacts were glued: one at the bottom, the second one slightly higher (on the curb), the one that is lower is responsible for focusing, the one that is higher than the descent.
I attached a spring and a small plate to the button for turning on the flashlight; the spring should not reach the bottom plate when the button is not pressed
these two contacts are soldered to each other and act as a common key for both actions.
Homemade Remote Control for Canon 50d
In general, the idea is that when lightly pressed, the spring swings the lower contact, auto-focusing works + additional rigidity appears. Upon further pressing, the second contact closes, causing the shutter to open.
It seems like everything is ready, it remains only to solder and assemble everything
In order not to tear off the wire with ease, I rolled up a small roll of electrical tape, along the diameter of the outlet opening, and cut it to the desired length. When assembling the case, it will be very good to press the wire and it will not allow you to pull out all with hurdles
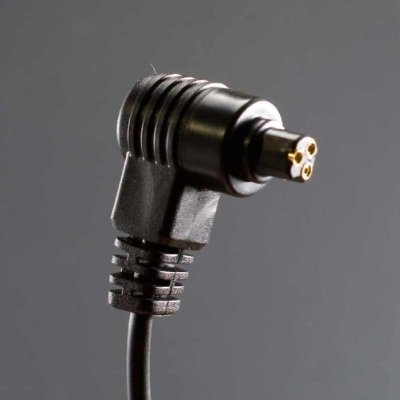
Now the most difficult thing to make a connector for connecting to the camera
in the original it looks like this
Once there was a similar task and I decided to use the old method, just pick the right diameter of the wires and glue them in the right form, since the contacts in the current connector are arranged in a triangle shape and it was not difficult to put them together in the right order
For confidence, she was wearing another thermal tube, pre-filling again with super glue
farther on one side, insulation was cut to half on each wire (for connecting wires).
I specifically chose the colors of the wires (red green and blue) so that they coincided with the colors of the connecting wire (taken a regular piece of cable from the headphones).
All this is wrapped in a thermotube, as a result, I have something like this
For convenience, you need some kind of body that is easily covered with your fingers and does not slip in your hands. By the way, there were remnants of cold welding (base epoxy resin), of rather poor quality, which is good for me in this particular case. With this stinking mass, I wrapped my so-called connector and in the end it turned out to be something like that
When “It” almost turned into a solid mass, I, as far as I was allowed by my not quite even hands, cut it to a less acceptable form, and then processed it with sandpaper.
In the end, that's what I got
then everything was wrapped in a brazen tape and here's the finished product
what I got obviously does not pretend to something unique and beautiful, it’s just a lot needed by many for which a lot of money is being torn from clients, the most important thing is that it does one hundred percent with the tasks set for it.
Today he passed the first tests, and I was very pleased with what I did
I will be very glad to any comments.
Source: https://habr.com/ru/post/106296/
All Articles