Constructor for .NET Scheduler Printing Form
Created many components for .NET that implement the functionality of the calendar and the scheduler (organizer). Their task is to provide the user with opportunities similar to those that he gets when using the target Outlook Calendar, Apple iCal, Windows Calendar, Google Calendar and other similar Internet calendars. An important place among these features is printing. The printing functionality of the components should be no worse than that of specialized applications, but at the same time provide greater flexibility in the settings.
The most common approaches to printing:

Our product, XtraScheduler , a scheduler for .NET Windows Forms, is similar in functionality to the Outlook Calendar, and also includes the ability to create printed reports. At a certain stage of product development, a print version using templates was implemented. At first glance, it should have met the needs of users, but in reality this was not enough.
')
From users began to receive a large number of requests related to the fine-tuning of types of printing - from small cosmetic changes to the new location of elements and printed data. Further increasing the number of options for each option became unacceptable, and it became necessary to revise the approach to the construction of reports for printing.
One of the possible solutions to the problem is to expand the set of printed styles “for every taste and color.” A striking example is the Calendar Printing Assistant add-in for Outlook, offering a collection of all kinds of printed templates.
For us, this option seemed to be a dead end, as it would force us to constantly create and add all new styles. Therefore, we decided to provide users with the opportunity to design and create their own printed calendars using a special designer.
Having DevExpress in the arsenal of a product called XtraReports , the most sensible thing was to make an add-on based on this printing system, applying it as a platform for building calendar reports.
We have chosen flexibility as a fundamental criterion when creating XtraScheduler Reporting . When designing, scenarios for printing data from different data sources, the possibility of setting arbitrary print intervals, as well as the user choice of display facilities and the location of visual elements were considered.
The main idea of the XtraScheduler Reporting approach is that the printed document is formed not on the basis of a fixed style, but is designed in the designer from independent parts, each of which is responsible for printing a specific report element - for example, a date header, days of the week, resources, different cells. containing events, additional items in the form of calendars, lines, tables, etc.
The report designer establishes relationships between these elements, determining the correct order of receipt of data for printing. In addition, there are a number of non-visual components to set specific print options. These components are intermediaries between the data source and report elements.
Let's clarify that the data here means time intervals, a list of resources and a set of events associated with time and resources.
A screenshot of the report designer during the design of the report is shown below:

Thus, simply placing the necessary elements on the page layout and defining links and properties, we get the desired report template.
A designed report can be saved to a template file or used to create a class instance at run-time to display, print, or export to one of the supported text formats, including pdf, html, mht, or one of the graphic formats.
Let's take a closer look at an example of creating a calendar report.
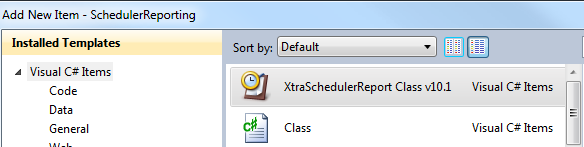
Suppose you need to create a weekly report of planned events for a group of people. Create a new Windows Forms project in Visual Studio and add the XtraSchedulerReport report class using the Add New Item menu item (for this class there is a registered template in Visual Studio).
The designer window opens. Let's throw a control from the toolbar, which is responsible for displaying the events of the week FullWeek , and a control showing the headers of the HorizontalResourceHeaders resources.
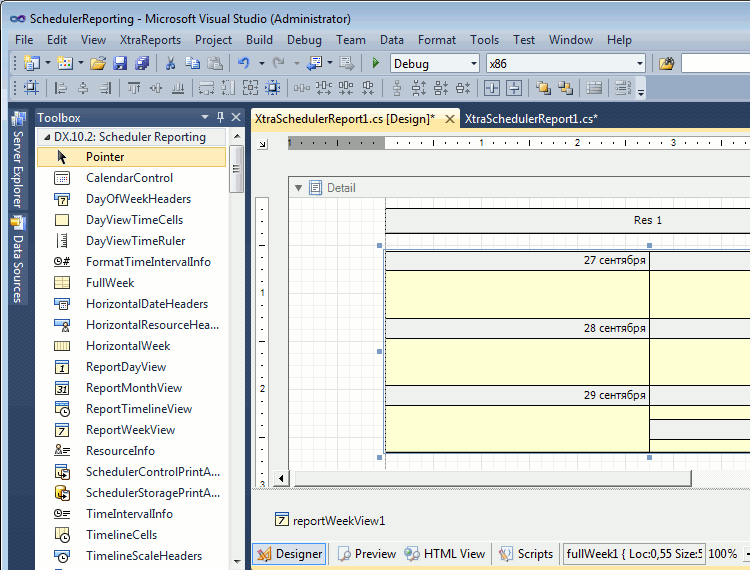
We will set the properties that determine the number of displayed resources on the page, and we will bind the cells that display the days of the week to the resource headers — this is easy to do either through the Property Grid or using the Smart Tag. As a result, we get the report shown below:

Add additional TimeIntervalInfo and CalendarControl controls to display the current interval and the calendar for a month. When they are created, they automatically assign themselves the necessary links with other report elements, thereby freeing you from setting links manually.
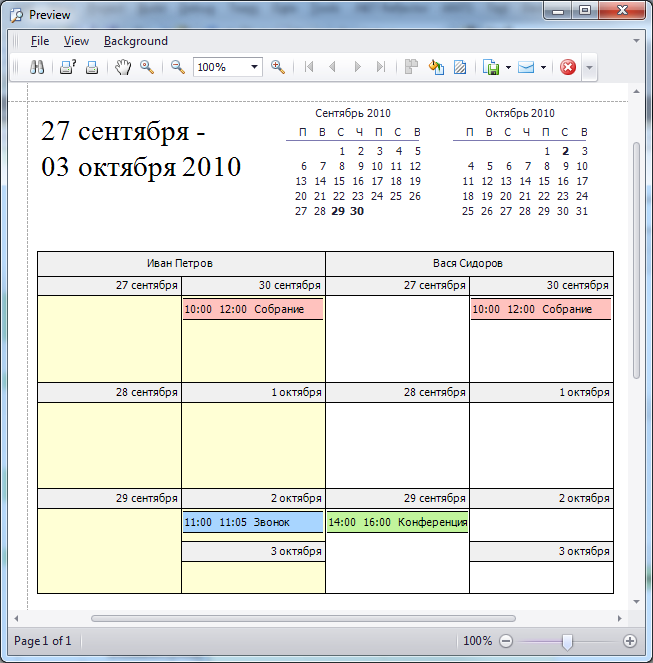
Now, without even specifying the source of the data, we have the opportunity to look at the approximate view of the constructed report. Click the Preview button at the bottom of the designer’s window and see the following result:
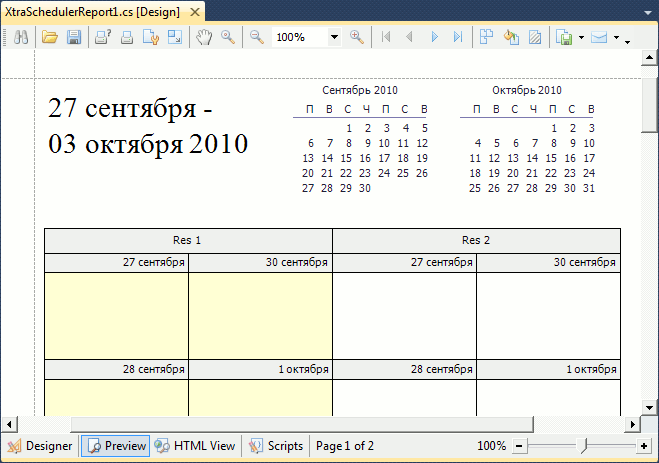
The report does not contain event scheduler, real dates and resources.
How to bind a report to a data source? To do this, there are a number of non-visual components that inherit from the SchedulerPrintAdapter and serve as a bridge between data sources and report elements. They allow you to process the data coming from the source (apply a filter, set the order) and define various printing parameters, such as a printed time interval, the first day of the week, a time zone, and others.
The report, receiving data through the adapter interfaces, does not depend on the implementation of the scheduler. The adapter can be used as heirs for different platforms and data acquisition scenarios. Thus, we get the ability to print on the web platform using specialized adapters for ASPxSchedulerControl .
In an application that contains a scheduler, the data source for the adapter can be SchedulerControl . To communicate with it, we add the corresponding SchedulerControlPrintAdapter adapter to our report, while it, being a component, will fall into the component tray as shown in the figure.

Now the report template is ready. It can be saved to a special * .repx file if you plan to load report templates from files, rather than create instances of specific report classes from the application.
Let's write a simple code to display the report we designed. Set the Scheduler (SchedulerControl) as the data source for the print adapter and call the method to display the browse dialog.
As a result, the actual data from the scheduler through the print adapter will be delivered to the elements of the report. In other words, dates, resources and events from the application will be shown according to the template we created.
As can be seen, the approach described above provides greater flexibility in comparison with the method using styles. Report elements can be located, customized and printed in accordance with the wishes of the designer, not limited to preset styles.
The most common approaches to printing:
- WYSIWYG print or close to it. This method is typical for Internet calendars due to the ability to use the print functionality of the browser. The disadvantages of this approach are the lack of settings, printing only the visible range and the inability to print additional information other than the one shown.
- Print using predefined style sets / templates. This method is typical for desktop applications. Typical scenarios allow you to print several types of calendar - daily, weekly, monthly, detailed, as well as their combinations. For example, Outlook Calendar has a set of printed styles and options that allow you to control the appearance of items, the number of columns, the intervals of dates and times, etc.
Our product, XtraScheduler , a scheduler for .NET Windows Forms, is similar in functionality to the Outlook Calendar, and also includes the ability to create printed reports. At a certain stage of product development, a print version using templates was implemented. At first glance, it should have met the needs of users, but in reality this was not enough.
')
From users began to receive a large number of requests related to the fine-tuning of types of printing - from small cosmetic changes to the new location of elements and printed data. Further increasing the number of options for each option became unacceptable, and it became necessary to revise the approach to the construction of reports for printing.
One of the possible solutions to the problem is to expand the set of printed styles “for every taste and color.” A striking example is the Calendar Printing Assistant add-in for Outlook, offering a collection of all kinds of printed templates.
For us, this option seemed to be a dead end, as it would force us to constantly create and add all new styles. Therefore, we decided to provide users with the opportunity to design and create their own printed calendars using a special designer.
Having DevExpress in the arsenal of a product called XtraReports , the most sensible thing was to make an add-on based on this printing system, applying it as a platform for building calendar reports.
We have chosen flexibility as a fundamental criterion when creating XtraScheduler Reporting . When designing, scenarios for printing data from different data sources, the possibility of setting arbitrary print intervals, as well as the user choice of display facilities and the location of visual elements were considered.
The main idea of the XtraScheduler Reporting approach is that the printed document is formed not on the basis of a fixed style, but is designed in the designer from independent parts, each of which is responsible for printing a specific report element - for example, a date header, days of the week, resources, different cells. containing events, additional items in the form of calendars, lines, tables, etc.
The report designer establishes relationships between these elements, determining the correct order of receipt of data for printing. In addition, there are a number of non-visual components to set specific print options. These components are intermediaries between the data source and report elements.
Let's clarify that the data here means time intervals, a list of resources and a set of events associated with time and resources.
A screenshot of the report designer during the design of the report is shown below:
Thus, simply placing the necessary elements on the page layout and defining links and properties, we get the desired report template.
A designed report can be saved to a template file or used to create a class instance at run-time to display, print, or export to one of the supported text formats, including pdf, html, mht, or one of the graphic formats.
Let's take a closer look at an example of creating a calendar report.
Suppose you need to create a weekly report of planned events for a group of people. Create a new Windows Forms project in Visual Studio and add the XtraSchedulerReport report class using the Add New Item menu item (for this class there is a registered template in Visual Studio).
The designer window opens. Let's throw a control from the toolbar, which is responsible for displaying the events of the week FullWeek , and a control showing the headers of the HorizontalResourceHeaders resources.
We will set the properties that determine the number of displayed resources on the page, and we will bind the cells that display the days of the week to the resource headers — this is easy to do either through the Property Grid or using the Smart Tag. As a result, we get the report shown below:
Add additional TimeIntervalInfo and CalendarControl controls to display the current interval and the calendar for a month. When they are created, they automatically assign themselves the necessary links with other report elements, thereby freeing you from setting links manually.
Now, without even specifying the source of the data, we have the opportunity to look at the approximate view of the constructed report. Click the Preview button at the bottom of the designer’s window and see the following result:
The report does not contain event scheduler, real dates and resources.
How to bind a report to a data source? To do this, there are a number of non-visual components that inherit from the SchedulerPrintAdapter and serve as a bridge between data sources and report elements. They allow you to process the data coming from the source (apply a filter, set the order) and define various printing parameters, such as a printed time interval, the first day of the week, a time zone, and others.
The report, receiving data through the adapter interfaces, does not depend on the implementation of the scheduler. The adapter can be used as heirs for different platforms and data acquisition scenarios. Thus, we get the ability to print on the web platform using specialized adapters for ASPxSchedulerControl .
In an application that contains a scheduler, the data source for the adapter can be SchedulerControl . To communicate with it, we add the corresponding SchedulerControlPrintAdapter adapter to our report, while it, being a component, will fall into the component tray as shown in the figure.
Now the report template is ready. It can be saved to a special * .repx file if you plan to load report templates from files, rather than create instances of specific report classes from the application.
Let's write a simple code to display the report we designed. Set the Scheduler (SchedulerControl) as the data source for the print adapter and call the method to display the browse dialog.
private void ShowWeeklyReport() { XtraSchedulerReport1 report = new XtraSchedulerReport1(); report.SchedulerAdapter.SetSourceObject(this.schedulerControl1); report.ShowPreviewDialog(); } As a result, the actual data from the scheduler through the print adapter will be delivered to the elements of the report. In other words, dates, resources and events from the application will be shown according to the template we created.
As can be seen, the approach described above provides greater flexibility in comparison with the method using styles. Report elements can be located, customized and printed in accordance with the wishes of the designer, not limited to preset styles.
Source: https://habr.com/ru/post/105260/
All Articles