Canvas transformations in accessible language
 Good day, habravchane! In this article I will tell you in detail about the transformation and rotation in javascripte. The transformation matrix, at first glance, is incomprehensible and many people use it without even realizing what it actually does, using ready-made values from the Internet. At the MDC , this is told very poorly, and the information in the English Wikipedia is hard to call publicly available. We will try to understand this together.
Translate
Translate is the easiest method of transforming. It only shifts all the addressed pixels by the specified values:
ctx.translate(x,y) . The nuances of working with him, we consider in more detail below.Experimenting with translate
Scale
Scale, like translate, takes as arguments x and y - the values by which the corresponding axis should be multiplied. For example, with ctx.scale (2,3) everything will be rendered twice as wide and three times higher. Specifying X = -1, we will mirror the image to the left, specifying y = -1, we will mirror the image up.
Experimenting with scale
')
Rotate
Rotate takes as a parameter the angle in radians, to which the image should be rotated around the pivot point specified by the translate method (default: 0: 0). You can convert degrees to radians using a simple formula that is the basis of the Number.degree method in LibCanvas:
Number.prototype.degree = function () { return this * Math.PI / 180; }; (60).degree() // 60 Experimenting with rotate
If we want to rotate some object, for example, a picture, it is necessary to interact correctly using the rotate and translate methods, otherwise we will never get the picture to the right place. The easiest way to select the center of the image with the axis of rotation and draw it to the coordinates (-width / 2, -height / 2). For example, we want to expand a 50x50 image located at 100: 100 coordinates. We specify the translate in the coordinate 125: 125 and draw the picture in the coordinate -25: -25. The alternative is to use LibCanvas and the rotatedImage method (or drawImage in the near future) and not strain.
Rotate the picture
setTransform
ctx.setTransform(m11, m12, m21, m22, dx, dy); Consider in turn what each of the arguments is responsible for.
dx, dy - repeat the translate method, shifting the image to the appropriate values.m11, m22 - repeat the scale method, changing the size of the rye pixels.m12, m21 - more interesting. Each pixel (x, y) is shifted by y * m21 pixels to the right and x * m12 pixels down. This means that with m21 = 1, each next line will be shifted by 1 pixel to the right, relative to the previous one.Experimenting with setTransform
The transform method acts exactly the same, but unlike setTransform, it does not reset the previous transformation each time, but overlaps it. What can be obtained from this?
Isometric map
Let's make an isometric tiled 2D map from the top view using a simple transformation. The simplest isometric projection figure is a rhombus in which the horizontal diagonal is twice the vertical (it is twice as wide as it is higher). It can be done in three steps.

Shift it to the right with m21 = 1, lift it up with m12 = -0.5 and drop it with m22 = 0.5 (you can do it step by step in the sandbox ).
But it will be an isometric projection with an angle of 26.565 ° to the horizontal. If we want a true isometric projection with an angle of 30 °, it is necessary to slightly flatten it in width by changing the width of the cell along the X axis, which is easy to calculate by the following method:

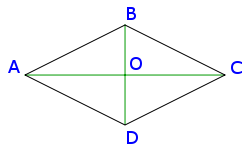
We see that the cell is an ABCD rhombus centered at the point O. The angle of the BAO is the angle that must be made from 26.6 30. Now AO = BD, that is, the height of the isosceles triangle BAD is equal to its base. We need to make this triangle equilateral (so that the angle BAD becomes equal to 60 degrees), that is, reduce the height by some coefficient. Suppose AO = BD = 1 parrot. Then AO should be equal to sqrt (AB 2 -BO 2 ) = sqrt (1-0.25) = 0.866 parrot. We use this coefficient in our matrix:
ctx.setTransform(0.866, -0.5, 0.866, 0.5, 0, 0) We look what we got the card
I hope everything is clearly described. Ask questions, suggest, we will replenish the topic together.
Source: https://habr.com/ru/post/104718/
All Articles