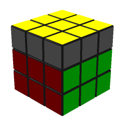
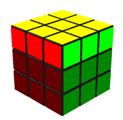
Fast Rubik's Cube Assembly
 Perhaps many of the readers wondered how people manage to assemble a Rubik 3 × 3 cube in 7 seconds . Even if we assume that the record holder was very lucky, the world ranking table for the average of the five results leaves no doubt: if more than 80 people, on average, fit into 12 seconds, they obviously know something. In this short review I will try to reveal the secrets of speed assembly. Immediately make a reservation that after reading this article you will not become champions: here are the main points and links to more detailed information. In addition, even after learning the method completely, you will need long workouts to achieve good results. But you get a good idea of how this is done, and if you want, you will know where to go next. I think that with sufficient diligence after several months of training, many will be able to achieve an average result in the region of 30 seconds.
I will refer mainly to the SpeedSolving Wiki and Badmephisto . So let's go.
CFOP method
The most popular method of high-speed assembly of the cube is the CFOP method , which is also the Jessica Friedrich method, which improved and popularized it, although other people contributed as well. If everything is done correctly, on average the cube can be assembled in 56 moves (alas, not twenty ). There are other methods by which you can get good results: Petrus , ZZ , Roux , etc. They are less popular and for the sake of brevity, we limit ourselves to the CFOP method.
CFOP is the name of the four stages of assembly: C ross, F 2L, O LL, P LL:
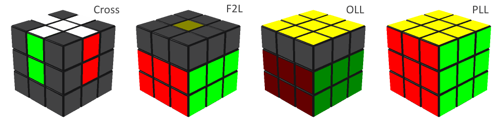
- Cross - build a cross, four edge cubes on the bottom;
- F2L (First two layers) - assembly of two layers - lower and middle;
- OLL (Orient the last layer) - the correct orientation of the cubes of the upper layer;
- PLL (Permute the last layer) - arrangement of the cubes of the upper layer.
')
Cross
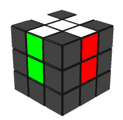 The goal of the stage is to correctly place four edge cubes on one of the faces. Anyone who knows how to assemble a cube at least somehow will cope with this, but to assemble a cross in a few seconds is not so trivial. According to the rules of the competition before the assembly, you are given 15 seconds to study the combination (inspecting), for which at least you need to find these four edge cubes, and it would be nice to make up a complete sequence of moves in your head. It has been proven that assembling a cross on a pre-selected face always requires no more than eight turns (a 180 ° turn is counted as one), and eight are extremely rare, and seven are rare (average slightly less than six). In practice, to quickly learn how to find the optimal sequence, it takes a lot of training.
Choose a face for the assembly of the cross can be different. The most popular way is to always collect it on the same face (often on white). Then you are at all stages of assembly know exactly the relative arrangement of colors, which facilitates the process. Some people are the first to collect the border that is easiest to collect. On average, it saves one turn, but you constantly have to rebuild to a different arrangement of colors. A compromise is also used - to collect one of the two opposite faces (say, either white or yellow), then the set of colors of the side faces does not change.
The main trick of assembling the cross is that it should be collected relatively. For example, if you collect a cross on a white face and a white and blue rib cube is already on it in white to the white center, then it is not so important for you whether the blue side of this cube is combined with the blue face. It is enough to place a white-green cube on the opposite side, and a white-red and white-orange left and right. During the assembly process, you can twist the white face as you like, and at the end in one motion, immediately align all the side centers with the cubes of the cross. It is only important to remember the exact order of colors on the cube: if you look at the white side, then go blue, red, green, orange clockwise (yellow at the back).
Professionals collect a cross on the bottom. It seems difficult for beginners, as you can hardly see what you are collecting, but it gives a great advantage when moving to the next stage: you don’t have to waste time turning the cube, and you may notice the arrangement of the cubes needed to build F2L during the assembly of the cross and outline a plan for further assembly.
Some advanced tricks of the assembly of the cross are described in this video .
F2L - first two layers
 Perhaps the longest stage, the purpose of which is to collect two layers completely: a layer with a cross and an intermediate layer. In fact, you need to place eight cubes in place: four corner bottom layers and four rib side layers in the middle layer. In contrast to the assembly methods for beginners, a pair (column) from the corner and edge cubes is assembled immediately (that is, four such pairs must be assembled). Depending on the initial arrangement of the cubes of the pair, you need to apply one or another algorithm (sequence of turns). In total, there are more than 40 such algorithms; you can simply memorize them , but almost all of them are derived intuitively. There are two simplest cases where a couple is going in three movements:
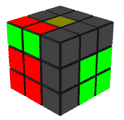

Two more cases are mirrored to these. All the rest must be reduced to one of these four. This requires a maximum of 8 moves, that is, only 11 moves per column will be required. You may not find the most optimal way, but if you first learn how to intuitively assemble any combination at least somehow, you can look at individual cases in the cheat sheets.
The main difficulty of the stage is to quickly find paired cubes. They can be in 16 different places: 8 places in the last layer and 8 in columns. The bars look more difficult, and the fewer bars you have assembled, the more likely it is that the cubes you need are in the unassembled ones. If you didn’t pay attention to the cubes for F2L when assembling the cross, you can lose a lot of time just to search when going to this stage. It is also not always reasonable to start with the first pair found: it is possible that it is going to be a long algorithm, and if you start with another, then in the process the first one will be reconstructed into a more successful combination.
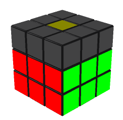
OLL - orientation of the last layer
 At this stage, the cubes of the last layer are oriented so that the last (in our case - yellow) face is collected. At the same time, it doesn’t matter that the cubes do not in fact stand in their places: we will deal with this at the last stage.
There are 57 different initial situations, each of which has its own assembly algorithm, from 6 and somewhere up to 14 moves. It is necessary not only to learn all these algorithms, but also to quickly identify which of them must be applied at the moment. Here is an example of one of the OLL:

On the left in the picture, the initial situation is shown up to a turn (it is assumed that we are collecting the yellow face). To apply this OLL, you must match the location of the yellow squares not only on the upper face, but also on the side (we ignore the squares of other colors). It is not always necessary to compare the cube with the scheme completely, it is only necessary to compare enough squares to distinguish it from other combinations. To the right are two algorithms (it is more convenient for someone to do one, for someone else) in standard notation , below is the OLL number and the probability of its loss. Almost all fall out with a probability of 1/54, some with 1/108 and two with a probability of 1/216 (including the lucky combination when OLL assembled herself).
Beginning to memorize 57 combinations may seem like torture, so a simplified, but slower version is invented - 2-look OLL. In this case, the OLL is divided into two stages, the cross is first assembled, and then the corners. Here you need to memorize only 10 algorithms (3 for the cross, 7 for the corners). Gaining experience in 2-look OLL, you can leisurely take up the study of the full set. In this case, 2-look will be useful in any case: firstly, they are all in the full set (for example, if the cross is assembled by itself, then the full OLL coincides with the 2-look OLL for the corners), and secondly, if you get caught unfamiliar OLL, you can return to 2-look.
Cribs on OLL (including 2-look) is here or here , a training video for 2-look OLL here .
PLL - rearrange the last layer
 The final stage of assembly is to arrange the cubes of the last layer in the right places. The approach is approximately the same as the previous stage, but there are fewer combinations and algorithms, only 21 (13, if you count the mirror and inverse for one). On the other hand, they are somewhat more difficult to recognize, since here we must take into account different colors, and the colors on the scheme may not coincide with your colors (up to a cyclic permutation):
The arrows indicate the cubes that the PLL transposes. The probabilities of most combinations are 1/18, occasionally 1/36 and 1/72 (including a lucky chance when nothing needs to be done).
Again, a simplified version is proposed - 2-look PLL, when angles (two combinations) are placed first, and then centers (four combinations), they are fairly easy to learn.
Cheats for PLL (including 2-look) are here or here , training video for 2-look PLL here .
Cube and grease
Even having studied the method perfectly, you will not achieve good results with a bad cube. Faces of the cube should be easily rotated by a single finger, while it should not be too loose. Layers should hang on the springs so that not fully rotated one layer does not interfere with continuing rotation in the other direction (within reasonable limits, of course). At the correct cube, the central squares can be pulled out and tightened up the bolts that are under them. In ordinary stores it is difficult to find a good cube, it is recommended to order via the Internet, for example, here .
For best results, the cube must be lubricated. Sometimes the grease comes with a cube, or bought separately. Suitable silicone grease, which can be bought in auto shops.
Cube rotation
The rotation of the whole cube in the hands (and not of individual faces) takes significant time, so when assembling it, they try to avoid it as much as possible. For example, at the F2L stage, it is sometimes easier to assemble a column in the corner farther away from you, without seeing it, than to turn the cube by this column towards you. At the OLL stage, in order to rotate the cube as in the algorithm scheme, it is enough to twist the upper layer, and not twist the whole cube - this is faster (the position of the upper layer relative to the lower ones is not important at this stage).
Look ahead - looking ahead
After the completion of the next stage, you should proceed without delay to the next. While you are performing the next algorithm on the machine, your head is free. Use this time to find the cubes that are important for the next stage, and figure out which of the algorithms you have to use next.
Fingertricks
Also, the key to significantly speeding up the assembly is fingertricks, the skillful use of all fingers to rotate. Some frequently used combinations are performed with lightning speed, 5 turns per second and above, if you use your fingers correctly. Note: it is not always faster to do a shorter algorithm; may be. that you have to do awkward turns. BadMephisto has several videos dedicated to fingertricks, for example, it tells about F2L.
Practice
Without long training will not work. Get ready for the cube to be collected thousands of times.
Source: https://habr.com/ru/post/103990/
All Articles