Expanding horizons. SharpDevelop AddIns
I’ve been familiar with SharpDevelop for about a year. To put it mildly, not a top laptop, he feels great and at the same time manages to solve most of the tasks assigned to him. But like any other development tool, not omnipotent. From time to time you have to turn to Visual Studio and other tools. Sometimes self-signed Project Templates and File Templates help out. Sometimes - connection of console utilities through the Tools menu. But I would like something more.
SharpDevelop is, as you know, Open Source. So nothing prevents to take its code and rewrite as it pleases. But we will leave it as a last resort. SharpDevelop has a great opportunity to write plugins for it or AddIns, as the authors call them. Therefore, today we will focus on plugins and analyze how they work and how to write them. For example, let's write a simple plugin to support the Microsoft Moles Isolation Framework .
Before that, I came across a few plug-in implementations. A couple of times created his version. But this is not good enough for what I saw in SharpDevelop. Almost everything is implemented in it in the form of plug-ins. Editors windows, sidebars, dialogs, support for various languages, toolbar items, individual menu bar items and a context menu. If you remove all the plugins, then all that remains is the core to support the plugins.
')
But it was not always so. The first trial versions of SharpDevelop appeared in 2000 - immediately after the release of the first .NET Framework. The chief architect, Mike Kruger, had never worked on the Windows platform before. Only from Linux. When he saw C #, this language seemed to him better than Java. Therefore, he decided to write an IDE for him, because at that time there was nothing like that for .NET.
The first version was a regular window with .NET RichTextBox. She was able to download files with code and compile them using csc.exe. Next, we created our own text editor and tools for managing project files. After a while, SharpDevelop was stable enough to continue developing on it.
In early 2001, the first AddIn implementation appeared. It was quite simple - you could only add items to a special item in the main menu. And in early 2002, the AddIn system acquired its final form, in which she lived to this day.
The developers have set themselves a serious task - it was necessary to implement such a system of plug-ins, so that you could extend some plug-ins with the help of others. This is how the idea of AddIn Tree appeared. AddIn Tree allows you to describe extensions using XML and connect them almost anywhere, specifying the path (Path).
All new functionality should declare the way in which it is placed. By Path is meant a path in a tree, from the root to a specific node. For example - "/ SharpDevelop / Workbench / MainMenu". The path is just a string that allows you to find the necessary extensions.
All extensions must contain the * .addin (XML) file that describes them. There may also be one or more .NET assemblies that contain extension logic. At run time, the contents of the addin files are merged into one tree. But related assemblies may not load immediately.
For example, along the path "/ SharpDevelop / Workbench / MainMenu" all the main menu items are located. The tree is used when drawing this menu, and the code is loaded only when one of its items is selected. There is a similar situation with panels - while the panel is closed or collapsed, its code is not loaded into memory. This can significantly reduce the startup time of SharpDevelop.
Consider how Path is used when describing an extension.
Our nodes that we added will become View and Edit items in this menu. For obvious reasons, nodes located on the same path must have a unique id.
After that, each node itself becomes an element of the path. For example - "/ SharpDevelop / Workbench / MainMenu / Edit". Therefore, along this path you can add new nodes:
The Edit menu item can be implemented in one plugin, and the Copy and Paste items in the other. Thus, using paths in the tree, you can not only add your own extensions, but also “expand” existing ones.
Let's summarize a little. An XML file with a root AddIn element allows us to describe our extension. In particular, what place in the program it “expands”. The code itself is stored in a separate .NET assembly. Therefore, now we need to describe in the XML file how to run this code.
For this, the creators of SharpDevelop have come up with a special level of abstraction - Doozer (formerly called Codon). Doozer helps to create all sorts of objects using parameters - XML attributes. For example, MenuItemDoozer can create a menu item, and PadDoozer can create panels (such as Class View or Toolbox). Now you can update our description of the extension by adding a Doozer to it.
Label is the name of the menu item that will be displayed on the screen. Class is the name of the class that implements the IMenuCommand interface (inherited from ICommand). When you click on a menu item, an object of this class is created and its Run method is called.
The developer already has many ready-made Doozers. A complete list can be found in the documentation (all links at the end of the article). All of them implement the IDoozer interface, and their names end with Doozer. In the XML file, the Doozer suffix is omitted.
Not all Doozers work with teams. For example, ClassDoozer simply creates a class object using the default constructor and inserts it into the tree. And CustomPropertyDoozer creates one of the properties in which user settings are stored.
Now that you have a basic understanding of how AddIns is structured, you can try writing your own plugin. Let me remind you that for example we will create a plugin to use Microsoft Moles. The first thing to start with is to look at the SharpDevelop window and think about where to put your plugin in it, how it will be launched and used.
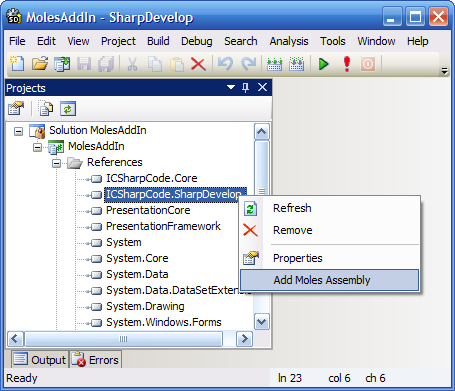
We will not be original and will do by analogy with Visual Studio. If you remember, to create Moles there you need to select the desired assembly in the References folder, in the Projects panel. In the context menu of these assemblies there is an item “Add Moles Assembly”.
With the launch of the plugin, we decided. Now you need to know which path (Path) should be used. You do not have to dig into the books, forums, manuals. SharpDevelop has an excellent tool - AddIn Scout (main menu - Tools - AddIn Scout), which shows AddIn Tree as a folder tree.
Having strayed a little on this tree, we find what we need:
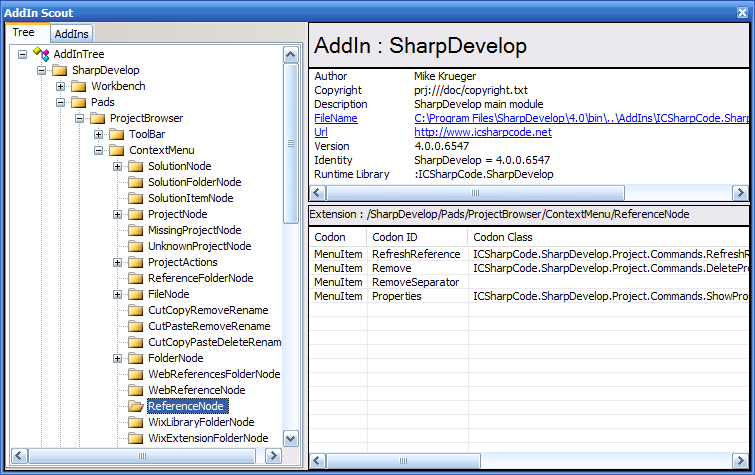
"/ SharpDevelop / Pads / ProjectBrowser / ContextMenu / ReferenceNode" - this is exactly the path we need. According to it, the existing context menu items have already been added: Refresh, Remove and Properties.
The FileName link points to the path of the .addin file in which the selected extension is defined. In this case, it is ICSharpCode.SharpDevelop.addin - the main file in which the main extensions are defined. It's pretty big, 2,171 lines. If you click on the link, this file will open in the embedded XML editor.
Edit this file is not recommended. Better we find how it describes the elements of the context menu.
Finally, you can go to the most interesting - writing a plugin. First you need to download the latest version of SharpDevelop in binary form and install it. We also need its source. All this can be found here (stable version) or here (build server). I took with build server.
Sources first need to compile. For this it is better to use the file debugbuild.bat, which comes in the kit. “Why do we need two versions of SharpDevelop?” - you ask. The fact is that when launching a debug version, in addition to the main window, the console is also launched, where you can watch the log. In particular, one can observe there when and which assemblies are loaded.
Now you can open the main SharpDevelop and create a new project “SharpDevelop addin”, which is located in the “C # / SharpDevelop” section. Let's call it MolesAddIn. The template contains two files: AddInWritingHelp.txt and MolesAddIn.addin. The first contains some tips on writing plugins and a couple of links. It can be safely removed. The second will contain the description of our plugin.
In the Runtime tag should be placed all the assemblies that will be needed for the work of your extension. In this case, it is an assembly of our project. Identity is the name of the extension that will be displayed in the AddIn Manager (main menu - Tools - AddIn Manager). Each extension must have one identity, and the name must be unique. As a version, you can either explicitly specify a version, for example 1.0.0, or use the version of the assembly, as was done above.
Dependency is extensions that are needed for your AddIn to work. There may be several. SharpDevelop is the main extension that contains a lot of things, including the Project Browser, which we need. Therefore, this dependency is mandatory for all AddIns.
Path - the path by which we added the menu item. There can be several paths in one file, as in ICSharpCode.SharpDevelop.addin. Also, each menu item may contain nested menu items. The class attribute contains the name of the class that is responsible for handling clicks on the menu item. For MenuItem, this class must inherit the IMenuCommand interface or the abstract AbstractMenuCommand class.
Add to our project two links: ICSharpCode.Core.dll and ICSharpCode.SharpDevelop.dll. They can be found in / path / to / sharpdevelop-source / bin after you have compiled the sources. For links, you need to set the Copy To Local property to False, since our extension will launch SharpDevelop itself. Now you can add the AddMolesCommand class.
So far, the team is not doing anything useful. We only got access to the assembly, on which we clicked the right mouse button and found out its file name.
To run an extension, you need to slightly edit the properties of the MolesAddIn project. The first thing to do is to change the path that the finished extension will be copied, so that SharpDevelop will automatically launch it. For this there is a special folder AddIns. Create a subfolder in it with the name of our extension.
Thus, the Output Path must be set to "/ path / to / sharpdevelop-source / AddIns / MolesAddIn".

To run the debug-version of SharpDevelop when pressing F5, you need to change the launch method in the project properties.

Now everything is ready. Ctrl + F5 - and we have already launched the second SharpDevelop. Open the MolesAddIn project in it and right-click on any of its links.
The menu item “Add Moles Assembly” can be observed immediately after “Properties”. At this point, the MolesAddIn.dll assembly has not yet been loaded; you can verify this by viewing the log in the console. After clicking on the selected menu item, MessageBox will open, and the line “Loading AddIn MolesAddIn.dll” will appear in the log.
In AddIn Manager (Tools - AddIn Manager) you can find an entry about our extension: name, version and description. You can also see it in AddIn Scout.
This is how the development of extensions for SharpDevelop looks. After the AddIn is fairly stable, you can prepare it for installation into your working version of the IDE. This is done simply - all the assemblies that are needed for its work (in our case one - MolesAddIn.dll) together with the * .addin file are packed into the zip archive. Further, this archive is renamed to * .sdaddin. That's all, the installation package is ready. With the help of AddIn Manager you can install SharpDevelop.
Of course, this description of the AddIns system is far from complete. It only gives a general idea and helps to look at the writing of plug-ins from the developer.
A more complete description can be found in the book Dissecting a C # Application: Inside SharpDevelop . In digital form it can be downloaded for free. Since it came out there has not been a major change in the architecture, mainly renaming. For example, Path in the book is called Extension, and Doozer is Codon. More current information can be found in the SharpDevelop distribution kit, in the doc / technotes folder.
PS For some reason, the source tag refuses to work for me.
SharpDevelop is, as you know, Open Source. So nothing prevents to take its code and rewrite as it pleases. But we will leave it as a last resort. SharpDevelop has a great opportunity to write plugins for it or AddIns, as the authors call them. Therefore, today we will focus on plugins and analyze how they work and how to write them. For example, let's write a simple plugin to support the Microsoft Moles Isolation Framework .
Before that, I came across a few plug-in implementations. A couple of times created his version. But this is not good enough for what I saw in SharpDevelop. Almost everything is implemented in it in the form of plug-ins. Editors windows, sidebars, dialogs, support for various languages, toolbar items, individual menu bar items and a context menu. If you remove all the plugins, then all that remains is the core to support the plugins.
')
A bit of history
But it was not always so. The first trial versions of SharpDevelop appeared in 2000 - immediately after the release of the first .NET Framework. The chief architect, Mike Kruger, had never worked on the Windows platform before. Only from Linux. When he saw C #, this language seemed to him better than Java. Therefore, he decided to write an IDE for him, because at that time there was nothing like that for .NET.
The first version was a regular window with .NET RichTextBox. She was able to download files with code and compile them using csc.exe. Next, we created our own text editor and tools for managing project files. After a while, SharpDevelop was stable enough to continue developing on it.
In early 2001, the first AddIn implementation appeared. It was quite simple - you could only add items to a special item in the main menu. And in early 2002, the AddIn system acquired its final form, in which she lived to this day.
Addin tree
The developers have set themselves a serious task - it was necessary to implement such a system of plug-ins, so that you could extend some plug-ins with the help of others. This is how the idea of AddIn Tree appeared. AddIn Tree allows you to describe extensions using XML and connect them almost anywhere, specifying the path (Path).
All new functionality should declare the way in which it is placed. By Path is meant a path in a tree, from the root to a specific node. For example - "/ SharpDevelop / Workbench / MainMenu". The path is just a string that allows you to find the necessary extensions.
All extensions must contain the * .addin (XML) file that describes them. There may also be one or more .NET assemblies that contain extension logic. At run time, the contents of the addin files are merged into one tree. But related assemblies may not load immediately.
For example, along the path "/ SharpDevelop / Workbench / MainMenu" all the main menu items are located. The tree is used when drawing this menu, and the code is loaded only when one of its items is selected. There is a similar situation with panels - while the panel is closed or collapsed, its code is not loaded into memory. This can significantly reduce the startup time of SharpDevelop.
Consider how Path is used when describing an extension.
< AddIn >
<!-- some stuff -->

< Path name ="/SharpDevelop/Workbench/MainMenu" >
<!-- node with id="View" -->
<!-- node with id="Edit" -->
</ Path >
</ AddIn >
Our nodes that we added will become View and Edit items in this menu. For obvious reasons, nodes located on the same path must have a unique id.
After that, each node itself becomes an element of the path. For example - "/ SharpDevelop / Workbench / MainMenu / Edit". Therefore, along this path you can add new nodes:
< Path name ="/SharpDevelop/Workbench/MainMenu/Edit" >
<!-- node with id="Copy" -->
<!-- node with id="Paste" -->
</ Path >
The Edit menu item can be implemented in one plugin, and the Copy and Paste items in the other. Thus, using paths in the tree, you can not only add your own extensions, but also “expand” existing ones.
Doozer
Let's summarize a little. An XML file with a root AddIn element allows us to describe our extension. In particular, what place in the program it “expands”. The code itself is stored in a separate .NET assembly. Therefore, now we need to describe in the XML file how to run this code.
For this, the creators of SharpDevelop have come up with a special level of abstraction - Doozer (formerly called Codon). Doozer helps to create all sorts of objects using parameters - XML attributes. For example, MenuItemDoozer can create a menu item, and PadDoozer can create panels (such as Class View or Toolbox). Now you can update our description of the extension by adding a Doozer to it.
< AddIn >
<!-- some stuff -->

< Path name ="/SharpDevelop/Workbench/MainMenu" >
< MenuItem id ="Edit"
label ="Edit"
class ="Namespace.EditCommandImplementation" />
</ Path >
</ AddIn >
Label is the name of the menu item that will be displayed on the screen. Class is the name of the class that implements the IMenuCommand interface (inherited from ICommand). When you click on a menu item, an object of this class is created and its Run method is called.
The developer already has many ready-made Doozers. A complete list can be found in the documentation (all links at the end of the article). All of them implement the IDoozer interface, and their names end with Doozer. In the XML file, the Doozer suffix is omitted.
Not all Doozers work with teams. For example, ClassDoozer simply creates a class object using the default constructor and inserts it into the tree. And CustomPropertyDoozer creates one of the properties in which user settings are stored.
Go to practice
Now that you have a basic understanding of how AddIns is structured, you can try writing your own plugin. Let me remind you that for example we will create a plugin to use Microsoft Moles. The first thing to start with is to look at the SharpDevelop window and think about where to put your plugin in it, how it will be launched and used.
We will not be original and will do by analogy with Visual Studio. If you remember, to create Moles there you need to select the desired assembly in the References folder, in the Projects panel. In the context menu of these assemblies there is an item “Add Moles Assembly”.
With the launch of the plugin, we decided. Now you need to know which path (Path) should be used. You do not have to dig into the books, forums, manuals. SharpDevelop has an excellent tool - AddIn Scout (main menu - Tools - AddIn Scout), which shows AddIn Tree as a folder tree.
Having strayed a little on this tree, we find what we need:
"/ SharpDevelop / Pads / ProjectBrowser / ContextMenu / ReferenceNode" - this is exactly the path we need. According to it, the existing context menu items have already been added: Refresh, Remove and Properties.
The FileName link points to the path of the .addin file in which the selected extension is defined. In this case, it is ICSharpCode.SharpDevelop.addin - the main file in which the main extensions are defined. It's pretty big, 2,171 lines. If you click on the link, this file will open in the embedded XML editor.
Edit this file is not recommended. Better we find how it describes the elements of the context menu.
< Path name ="/SharpDevelop/Pads/ProjectBrowser/ContextMenu/ReferenceNode" >
< MenuItem id ="RefreshReference"
icon ="Icons.16x16.BrowserRefresh"
label ="${res:AddIns.HtmlHelp2.Refresh}"
class ="ICSharpCode.SharpDevelop.Project.Commands.RefreshReference" />
< MenuItem id ="Remove"
label ="${res:Global.RemoveButtonText}"
icon ="Icons.16x16.DeleteIcon"
class ="ICSharpCode.SharpDevelop.Project.Commands.DeleteProjectBrowserNode" />
< MenuItem id ="RemoveSeparator" type ="Separator" />
< MenuItem id ="Properties"
icon ="Icons.16x16.PropertiesIcon"
label ="${res:XML.MainMenu.FormatMenu.ShowProperties}"
class ="ICSharpCode.SharpDevelop.Project.Commands.ShowPropertiesForNode" />
</ Path >
Finally, you can go to the most interesting - writing a plugin. First you need to download the latest version of SharpDevelop in binary form and install it. We also need its source. All this can be found here (stable version) or here (build server). I took with build server.
Sources first need to compile. For this it is better to use the file debugbuild.bat, which comes in the kit. “Why do we need two versions of SharpDevelop?” - you ask. The fact is that when launching a debug version, in addition to the main window, the console is also launched, where you can watch the log. In particular, one can observe there when and which assemblies are loaded.
Now you can open the main SharpDevelop and create a new project “SharpDevelop addin”, which is located in the “C # / SharpDevelop” section. Let's call it MolesAddIn. The template contains two files: AddInWritingHelp.txt and MolesAddIn.addin. The first contains some tips on writing plugins and a couple of links. It can be safely removed. The second will contain the description of our plugin.
< AddIn name ="MolesAddIn"
author ="OpenMinded"
copyright ="GNU Lesser General Public License Version 2.1"
url =""
description ="Adds support for Microsoft Moles to the projects browser" >

< Runtime >
< Import assembly ="MolesAddIn.dll" />
</ Runtime >

< Manifest >
< Identity name ="OpenMinded.MolesAddIn" version ="@MolesAddIn.dll" />
< Dependency addin ="SharpDevelop" version ="4.0" />
</ Manifest >

< Path name ="/SharpDevelop/Pads/ProjectBrowser/ContextMenu/ReferenceNode" >
< MenuItem id ="AddMolesAssembly"
label ="Add Moles Assembly"
class ="OpenMinded.MolesAddIn.AddMolesCommand" />
</ Path >

</ AddIn >
In the Runtime tag should be placed all the assemblies that will be needed for the work of your extension. In this case, it is an assembly of our project. Identity is the name of the extension that will be displayed in the AddIn Manager (main menu - Tools - AddIn Manager). Each extension must have one identity, and the name must be unique. As a version, you can either explicitly specify a version, for example 1.0.0, or use the version of the assembly, as was done above.
Dependency is extensions that are needed for your AddIn to work. There may be several. SharpDevelop is the main extension that contains a lot of things, including the Project Browser, which we need. Therefore, this dependency is mandatory for all AddIns.
Path - the path by which we added the menu item. There can be several paths in one file, as in ICSharpCode.SharpDevelop.addin. Also, each menu item may contain nested menu items. The class attribute contains the name of the class that is responsible for handling clicks on the menu item. For MenuItem, this class must inherit the IMenuCommand interface or the abstract AbstractMenuCommand class.
Add to our project two links: ICSharpCode.Core.dll and ICSharpCode.SharpDevelop.dll. They can be found in / path / to / sharpdevelop-source / bin after you have compiled the sources. For links, you need to set the Copy To Local property to False, since our extension will launch SharpDevelop itself. Now you can add the AddMolesCommand class.
using System;
using System.Windows.Forms;
using ICSharpCode.Core;
using ICSharpCode.SharpDevelop.Project;

namespace OpenMinded.MolesAddIn
{
public class AddMolesCommand : AbstractMenuCommand
{
public override void Run()
{
// References
ReferenceNode node = Owner as ReferenceNode;
if (node != null )
{
// ,
ReferenceProjectItem item = node.ReferenceProjectItem;
if (item != null ) {
string fileName = item.FileName;

MessageBox.Show(fileName);
}
}
}
}
}
So far, the team is not doing anything useful. We only got access to the assembly, on which we clicked the right mouse button and found out its file name.
To run an extension, you need to slightly edit the properties of the MolesAddIn project. The first thing to do is to change the path that the finished extension will be copied, so that SharpDevelop will automatically launch it. For this there is a special folder AddIns. Create a subfolder in it with the name of our extension.
Thus, the Output Path must be set to "/ path / to / sharpdevelop-source / AddIns / MolesAddIn".
To run the debug-version of SharpDevelop when pressing F5, you need to change the launch method in the project properties.
Now everything is ready. Ctrl + F5 - and we have already launched the second SharpDevelop. Open the MolesAddIn project in it and right-click on any of its links.
The menu item “Add Moles Assembly” can be observed immediately after “Properties”. At this point, the MolesAddIn.dll assembly has not yet been loaded; you can verify this by viewing the log in the console. After clicking on the selected menu item, MessageBox will open, and the line “Loading AddIn MolesAddIn.dll” will appear in the log.
In AddIn Manager (Tools - AddIn Manager) you can find an entry about our extension: name, version and description. You can also see it in AddIn Scout.
And what next?
This is how the development of extensions for SharpDevelop looks. After the AddIn is fairly stable, you can prepare it for installation into your working version of the IDE. This is done simply - all the assemblies that are needed for its work (in our case one - MolesAddIn.dll) together with the * .addin file are packed into the zip archive. Further, this archive is renamed to * .sdaddin. That's all, the installation package is ready. With the help of AddIn Manager you can install SharpDevelop.
Of course, this description of the AddIns system is far from complete. It only gives a general idea and helps to look at the writing of plug-ins from the developer.
A more complete description can be found in the book Dissecting a C # Application: Inside SharpDevelop . In digital form it can be downloaded for free. Since it came out there has not been a major change in the architecture, mainly renaming. For example, Path in the book is called Extension, and Doozer is Codon. More current information can be found in the SharpDevelop distribution kit, in the doc / technotes folder.
PS For some reason, the source tag refuses to work for me.
Source: https://habr.com/ru/post/103640/
All Articles