Getting started with Drupal: a complete practical guide (part 2)
Continuation of the first part .
Although you can write your own database queries to read the content, this is a long and complicated matter, even with the powerful Drupal API .
To build a page with a list of jobs we will use Views - a module that allows you to extract content from the database without writing any code at all.
Simply put, Views is a user interface for building MySQL queries. Views is an incredibly powerful module, but sometimes it can be difficult to master novice users. The best way to deal with Views is to play a bit with it, which we will do now.
First of all, we need to install Views. After downloading , installing and enabling the module, it will be available in the “Site Design” menu section. When installing, do not forget to unpack the translation into the folder with the module.
Any data set displayed by the Views module is called a view .
We will create a view that displays a list of available jobs on the page. Also, with the help of Views, you can make attachments, blocks and customizable RSS feeds, but for the time being we will sort something simpler.
Go to the menu at Site Construction> Views> Add and fill in the fields as shown in the image:

Drupal will then display the user interface for creating views. Do not worry, we will discuss it soon.
To start creating a view, we need to understand what a view is. Views display our data in various styles. In one view, there may be several species.
For the presentation of vacancies, we will create 2 types: page and block. We will return to this topic later.
Let's add some fields to our view. Fields are the content we want to display on the page. Click the plus sign (+) in the Fields area to add fields to the view.

We will display the title, creation date, department, salary, and experience that were specified by the user in the form of posting a vacancy.
We need to select these fields from the additional list, which will appear after pressing the button with a plus (+). We are interested in the following fields:

After selecting the required fields, click the “Add” button to proceed to setting up each field individually.
After clicking on the “Add” button, the Settings section of the Content: Division section appears first. Leave everything as it is, except for the "Format" selector, setting it to "Plain Text"; then click "Refresh".

Now set the Content field : Experience . Do not change anything, just click "Update". And do the same with the Wage field.
When finished with the content fields, you will need to set the Material: Date created field. Just change the Date Format field to “Time Back” so that the field shows how much time has passed since the vacancy was published (for example, “12 days ago”).

The next and final customization field is Material: Header . We just have to put a tick indicating that the title should be a link to the job page.

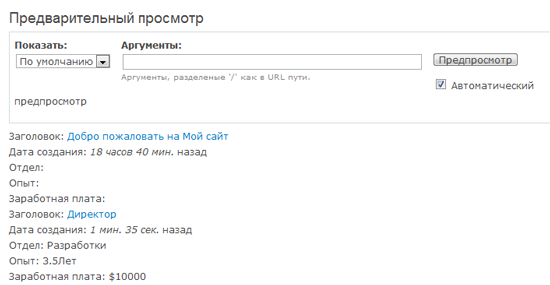
You can use the preview tab to see the result of your settings:
Now we will set the main presentation settings.
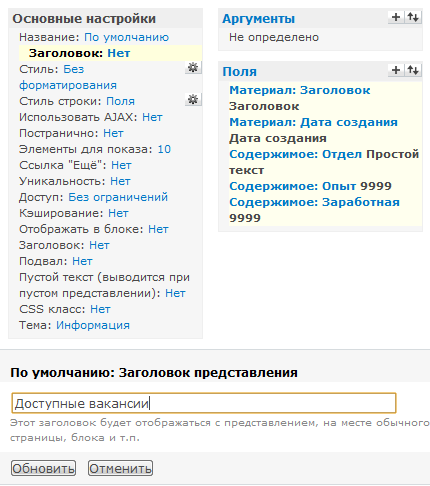
We will select the “ Without Formatting ” style , and the data will be output in a table format. When you make these settings, click Refresh.

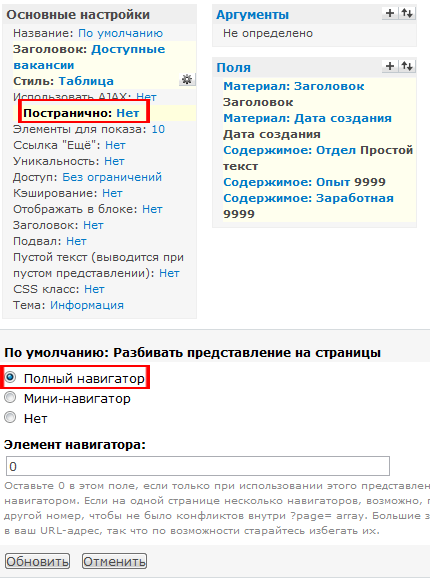
We would like to bring all the vacancies without a breakdown into several pages, so the options “by page” - say, a firm “ No ”. And again, click "Update."
As you can see, after all these manipulations, our presentation looks better than before. But we are not done yet.
Currently, the view displays all the contents of the site, including those that are not vacancies. And we want to display only vacancies.
To do this, select two filters that determine the output of only published vacancies:
Click the plus sign (+) in the Filters area, then select Material: Published and Material: Type ; Click "Add."
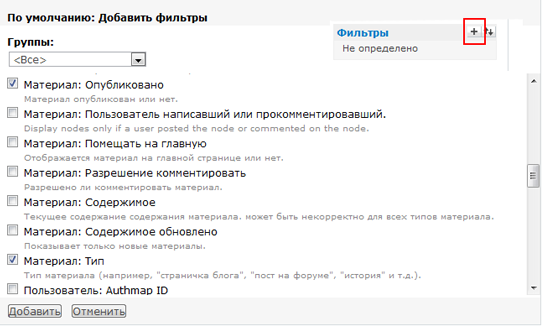
Set the filter Material: Published : specify the value “Yes”, this will exclude unpublished materials from our presentation.

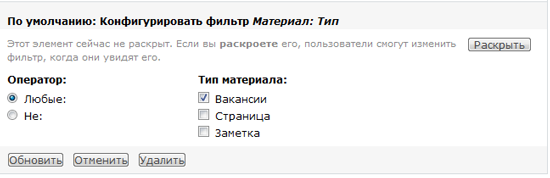
Set the "Material: Type" filter so that only materials like "Vacancy" are included in the presentation.
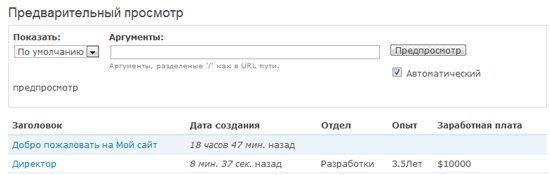
Take a look at the result of the filters in the preview:
From the preview you can see that jobs are sorted by date from old to new. It would be great to first bring new jobs.
To display new vacancies first, we apply the sorting criteria. In the list of fields to sort, which will appear after clicking on the plus in the corresponding area, select Material: Date created .

Specify sorting order Descending .

Refresh the preview again; Now the last vacancies will be displayed first.
There is one more thing to improve our view: changing the order of the fields. It makes sense to display the header field first, date field second, and so on. You can change the order by clicking on the “up / down” button in the “Fields” section.

Update preview: the view has become even better.
We are done with creating the view; Now we will add two types to it.
On the left side of the page view, select " Page " and click " Add View ." You will be automatically redirected to the “Page Settings” section.
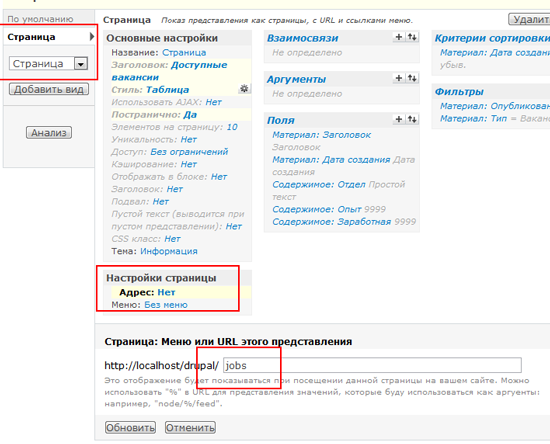
We need to specify the path to the page and choose a place to link to it. I indicated a weight of 2 to display it after the “Home” link.

After entering the values, do not forget to click "Save".
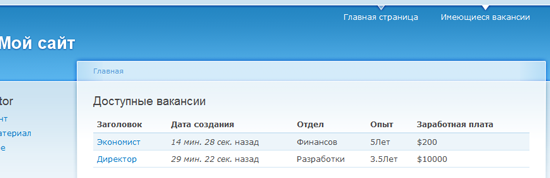
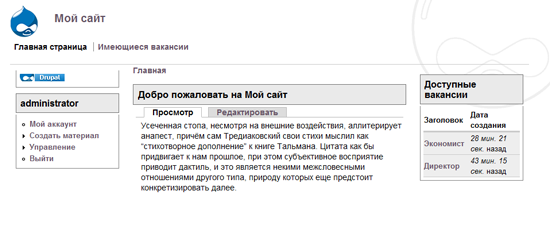
Now you can see how the link (under the title “Available vacancies”) to the page with our view looks in the main navigation.
Blocks are used to display information in different regions of the site. These are widgets that display data such as current events, the five most popular articles, and so on. Blocks are displayed in regions such as the left sidebar, header, basement, and others.
You can place blocks in the header, basement, and left and right panels in the standard Drupal theme. Blocks are managed from the Administration> Site Design> Blocks menu.

Now create another view for the “Jobs” view; View showing recent job ads in the right pane.
Go to Administration> Site Design> Views and click on the link to edit the “Jobs” view. On the left, select "Block" and click "Add View", as before.
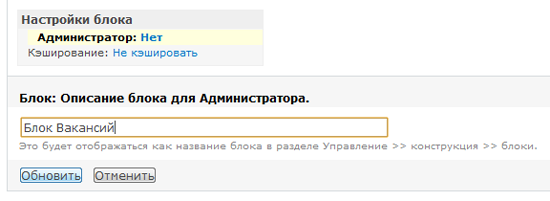
We will remove 3 fields from the block view so that the block fits in the side panel and is not overloaded with information. To do this, click on each field in the "Fields" section. Before deleting the field, be sure to click the "Override" button , otherwise you will change the basic view and at the same time the page view that we made a little earlier.

You can also change the name of the block that will be shown on the administration page.
Let's move on to managing the blocks and add our new block view to the right panel.
Go to Administration> Site Design and click on Blocks .
In the “ Disabled ” section, find the newly created block and select the right column in the “ Region ” column.
Do not forget to click "Save" to confirm the changes.

Fine! This completes the job board development.
In conclusion, the manual let's discuss the themes. Themes are used to change the appearance of the site.
On the Internet you can find a great many topics. Here, for example, a list of topics posted on the official website of Drupal.
To install a new theme, you need to download and unpack it into the
. If this directory does not exist, create it.
To turn themes on and off, go to Administration> Site Design> Themes .
In total, the distribution of Drupal is 5 topics. Here, for example, I activated the Marvin theme to give our newly-made website a fresh, new look:
Do not forget to mark the desired theme used by default, so that it is used on the site.
I tried my best to try to cover the most difficult and incomprehensible aspects for beginners. Anyway, this guide is just one of the reflections of Drupal’s true power. I recommend that you explore the Drupal.org site yourself in search of more complex topics.
If you have questions, feel free to ask them in the comments. I will gladly help you.
')
Discussion on drupal.ru
UPD 01: Habrayuzer kost revealed an incorrect picture.
Create a job page using the Views module
Although you can write your own database queries to read the content, this is a long and complicated matter, even with the powerful Drupal API .
To build a page with a list of jobs we will use Views - a module that allows you to extract content from the database without writing any code at all.
Simply put, Views is a user interface for building MySQL queries. Views is an incredibly powerful module, but sometimes it can be difficult to master novice users. The best way to deal with Views is to play a bit with it, which we will do now.
Install Views
First of all, we need to install Views. After downloading , installing and enabling the module, it will be available in the “Site Design” menu section. When installing, do not forget to unpack the translation into the folder with the module.
Create the first presentation
Any data set displayed by the Views module is called a view .
We will create a view that displays a list of available jobs on the page. Also, with the help of Views, you can make attachments, blocks and customizable RSS feeds, but for the time being we will sort something simpler.
Go to the menu at Site Construction> Views> Add and fill in the fields as shown in the image:
Drupal will then display the user interface for creating views. Do not worry, we will discuss it soon.
What is a view?
To start creating a view, we need to understand what a view is. Views display our data in various styles. In one view, there may be several species.
For the presentation of vacancies, we will create 2 types: page and block. We will return to this topic later.
Adding fields to the view
Let's add some fields to our view. Fields are the content we want to display on the page. Click the plus sign (+) in the Fields area to add fields to the view.
We will display the title, creation date, department, salary, and experience that were specified by the user in the form of posting a vacancy.
We need to select these fields from the additional list, which will appear after pressing the button with a plus (+). We are interested in the following fields:
- Material: Heading
- Material: Date Created
- Content: Department
- Content: Salary
- Content: Experience
After selecting the required fields, click the “Add” button to proceed to setting up each field individually.
After clicking on the “Add” button, the Settings section of the Content: Division section appears first. Leave everything as it is, except for the "Format" selector, setting it to "Plain Text"; then click "Refresh".
Now set the Content field : Experience . Do not change anything, just click "Update". And do the same with the Wage field.
When finished with the content fields, you will need to set the Material: Date created field. Just change the Date Format field to “Time Back” so that the field shows how much time has passed since the vacancy was published (for example, “12 days ago”).
The next and final customization field is Material: Header . We just have to put a tick indicating that the title should be a link to the job page.
Preview
You can use the preview tab to see the result of your settings:
basic settings
Now we will set the main presentation settings.
We will select the “ Without Formatting ” style , and the data will be output in a table format. When you make these settings, click Refresh.
We would like to bring all the vacancies without a breakdown into several pages, so the options “by page” - say, a firm “ No ”. And again, click "Update."
As you can see, after all these manipulations, our presentation looks better than before. But we are not done yet.
View Filters
Currently, the view displays all the contents of the site, including those that are not vacancies. And we want to display only vacancies.
To do this, select two filters that determine the output of only published vacancies:
- Material: Published
- Material: Type
Click the plus sign (+) in the Filters area, then select Material: Published and Material: Type ; Click "Add."
Set the filter Material: Published : specify the value “Yes”, this will exclude unpublished materials from our presentation.
Set the "Material: Type" filter so that only materials like "Vacancy" are included in the presentation.
Take a look at the result of the filters in the preview:
Sorting criteria
From the preview you can see that jobs are sorted by date from old to new. It would be great to first bring new jobs.
To display new vacancies first, we apply the sorting criteria. In the list of fields to sort, which will appear after clicking on the plus in the corresponding area, select Material: Date created .
Specify sorting order Descending .
Refresh the preview again; Now the last vacancies will be displayed first.
Changing the order of the output fields
There is one more thing to improve our view: changing the order of the fields. It makes sense to display the header field first, date field second, and so on. You can change the order by clicking on the “up / down” button in the “Fields” section.
Update preview: the view has become even better.
We are done with creating the view; Now we will add two types to it.
Add a page view
On the left side of the page view, select " Page " and click " Add View ." You will be automatically redirected to the “Page Settings” section.
We need to specify the path to the page and choose a place to link to it. I indicated a weight of 2 to display it after the “Home” link.
After entering the values, do not forget to click "Save".
Now you can see how the link (under the title “Available vacancies”) to the page with our view looks in the main navigation.
Create a block view
Blocks are used to display information in different regions of the site. These are widgets that display data such as current events, the five most popular articles, and so on. Blocks are displayed in regions such as the left sidebar, header, basement, and others.
You can place blocks in the header, basement, and left and right panels in the standard Drupal theme. Blocks are managed from the Administration> Site Design> Blocks menu.
Now create another view for the “Jobs” view; View showing recent job ads in the right pane.
Go to Administration> Site Design> Views and click on the link to edit the “Jobs” view. On the left, select "Block" and click "Add View", as before.
Override button
We will remove 3 fields from the block view so that the block fits in the side panel and is not overloaded with information. To do this, click on each field in the "Fields" section. Before deleting the field, be sure to click the "Override" button , otherwise you will change the basic view and at the same time the page view that we made a little earlier.
You can also change the name of the block that will be shown on the administration page.
Add a block to the sidebar
Let's move on to managing the blocks and add our new block view to the right panel.
Go to Administration> Site Design and click on Blocks .
In the “ Disabled ” section, find the newly created block and select the right column in the “ Region ” column.
Do not forget to click "Save" to confirm the changes.
Fine! This completes the job board development.
Drupal Themes
In conclusion, the manual let's discuss the themes. Themes are used to change the appearance of the site.
On the Internet you can find a great many topics. Here, for example, a list of topics posted on the official website of Drupal.
To install a new theme, you need to download and unpack it into the
drupal/sites/all/themes directory. If this directory does not exist, create it.
To turn themes on and off, go to Administration> Site Design> Themes .
In total, the distribution of Drupal is 5 topics. Here, for example, I activated the Marvin theme to give our newly-made website a fresh, new look:
Do not forget to mark the desired theme used by default, so that it is used on the site.
Let's sum up
I tried my best to try to cover the most difficult and incomprehensible aspects for beginners. Anyway, this guide is just one of the reflections of Drupal’s true power. I recommend that you explore the Drupal.org site yourself in search of more complex topics.
If you have questions, feel free to ask them in the comments. I will gladly help you.
Useful sites
- Drupal.ru is a Russian-speaking community of Drupal users.
- API Reference - API reference for programmers.
- Drupaler.ru is a community of translators of Drupal and its modules into Russian, Belarusian, Kazakh and other languages.
- Dances around Drupal - articles, lessons and tips for the authorship of the famous Drupal developer, neochief .
- drupalcookbook.ru - recipes for creating websites on Drupal; A huge collection of tips and tricks.
- content-management-systems.info - tips, tricks, and a forum; “Planet Drupal” operates on the site - an RSS feed that collects news from Drupal websites and blogs.
')
Discussion on drupal.ru
UPD 01: Habrayuzer kost revealed an incorrect picture.
Source: https://habr.com/ru/post/103603/
All Articles