Touch switch - in each lamp

It so happened that my wife and I bought lamps to put on the bedside tables near the bed. And all the lamps were good, except for one thing - they only had a switch on the cord, and in order to turn it off or on it would have to crawl behind the nightstand in search of this switch. Therefore, I decided to upgrade the lamps, but it was not there - my wife forbade me to drill them, saying that you spoil the appearance, they cost money! Well, I certainly understand her, after my experiments on the alteration of the chandelier ... but here the story is not about that.
Then I decided that it was necessary to put touch switches in the lamps - there was no need to drill holes for them, and it was simple - I really liked the idea of turning on the light by touch.
Since I don’t have a radio amateur out of me, I decided to buy the touch switch ready and hide it in the base of the lamp. A little googling found a company that sells various touch switches, which are installed in ordinary mounting boxes and control the light of the chandelier. At first I wanted to buy an ordinary touch switch - this one , to disassemble it and use only the circuit from it, but then it turned out that they have the sensor modules for sale separately, at a very good price - 80 UAH for on / off and 85 UAH for dimmer (about $ 10). For the test, I ordered two different modules, one just on / off, the second - with a dimmer function - smoothly controlling the brightness of the light.
Two days later I took the modules from the courier office and got to work.


In the box was the sensor switch module itself, a small advertisement, and instructions for connecting.
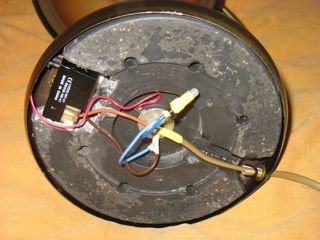
The connection is very simple, the touch switch must be connected to the open circuit of the lamp power supply, for this it has two terminals, and the lamp housing, which will act as a sensor, is connected to the middle pin. You can connect an LED to the last two pins, as far as I understand it will glow when the lamp is off, but I did not take advantage of this opportunity, since I had nowhere to insert this LED.
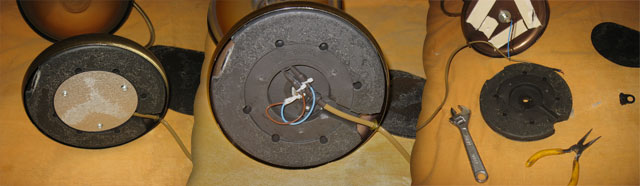
After I disassembled the lamp, it turned out that almost the entire place at the base was occupied by heavy plastic pancake, which was needed so that the lamp was heavy and stable. To place the touch switch in the lamp, I decided to cut a place for it in this “pancake”. As the autopsy showed, the “pancake” was filled with something similar to cement, so I used an angle grinder (grinder) with a cutting disk to cut it.


After I successfully cut a piece of “pancake”, I assembled the lamp, connected the wires to the switch terminals, and connected a separate wire from the sensor to the lamp body - just clamped it under the nut that holds the “pancake”. All connections, including unused contacts for the LED, are insulated by heat shrinking.
And then I thought, and just in case, I rolled up the entire switch module in the heat shrinkage of a large diameter.
Here is a video that shows what I ended up with:
A short touch of the lamp housing turns the light on and off, and if you touch and hold it with your hand, you can adjust the brightness of the light (it works only with incandescent bulbs, you cannot use “economical” light bulbs with dimmers). The switch is able to memorize the brightness of the light, that is, turning off the lamp at the minimum brightness it will turn on at the same minimum brightness. There are several nuances in the use of such a “sensory” luminaire: first, the switch will work only with one position of the plug in the socket. If he does not respond to touch - you just need to turn the plug over to the other side. Secondly - if you put the lamp on the floor, or a metal table - it may not work, or vice versa there will be false alarms. When using the lamp on a wooden table or bedside there is no problem.
')
Source: https://habr.com/ru/post/103294/
All Articles