How to use PivotViewer for Silverlight in a real project (part I)
On Habré several times already wrote about the PivotViewer control, designed to visualize and filter large amounts of data. I want to share the experience of using this extremely interesting element in a real project.
If you just want to know what it is and whether it can somehow be useful in the household - read a good overview of the PivotViewer element for Silverlight from xaoccps , this description and examples will be quite enough. But if you are considering integrating PivotViewer into one of your projects, this story will save you some time.
By the way, to write this topic I pushed a comment to one of the reviews:
I will say right away that in this case we will not encounter a dense forest, but we will have to stray a little.
')
Before you go, a pair of semi-philosophical thoughts about this element (if you are only interested in implementation, feel free to skip them).
Frankly, when I heard about the Pivot and climbed up to watch the “awesome” example of the Wiki, my first thoughts were “cool” and “what for?”. It is much easier to type “Silverlight Wiki” in Google and get the right link in the first line than to download a cxml file with a description of a heap of articles, select the year 2009 in the Web development software filter, and, after admiring the beautiful graphics, get the card with the desired By reference (this is only a first impression, I believe that there are scenarios when this approach can and will be useful). It really reminded me of a new version of the site of one of the cinemas, made on a flash fashionable then. Any click was accompanied by colorful animation, explosions and music, and when the visitor was tired of looking at special effects, he began to look for an inconspicuous link "old version of the site for a bad Internet" :)
My attitude towards the Pivot changed when I tried to pick a collation to a new computer. By the way, the last time I was interested in iron three years ago, when I was choosing an old computer. So now I had to choose from hundreds of different components with different technologies and from different manufacturers (I decided to assemble it myself “for the soul”, to remember the student years, to personally pick up every piece of hardware and even fit into the budget).
My choice was greatly facilitated by a couple of sites that allowed you to select the desired product category, filter it by different parameters and quickly compare: “what does GigaByte have of this?”, “Or maybe the same, but with a 140mm fan?” Or “will to the list something good, if I increase the price by $ 20? ".
It really was very convenient, and then I thought that this is the implementation of PivotViewer. After all, it is designed precisely in order to be able to play with different filters on a very large (and even enormous :) mass of objects. It has an area with filters, an area for the list, and a “property page” with a description of the selected item. Moreover, we get all this functionality in one simple (from the point of view of use) control element, which simply needs to “feed” the list of objects in the xml format. Moreover, numerous online supermarkets of all kinds of goods - this is just one example. In the same way, it is possible to display recipes of dishes (we filter by ingredients, type of dishes, nationality of cuisine, rating, but you never know), trips for travel agencies (countries, resorts, hotels, type of food, cost ...), real estate (location, footage , number of rooms, etc.). And this list can be easily continued.
Those who tried to pick up a ticket “somewhere” or decide where and for how much he should rent an apartment (what if a two-room apartment can be rented only $ 100 more expensive?) Will understand how convenient this approach may be. The truth is that in order for our solution not to turn into a “useless website with special effects”, we need at least three things:
Ugh, I look back and understand that you can philosophize endlessly. It's time to work.
Before walking through the “deaf forest”, let's check our backpack. It should contain:
We will start with a prototype. Those who like to program first and then think (this is not irony, it is sometimes better to “program” a working prototype, and then think about how to best implement it based on the experience gained; the main thing is not to work on the details and not bring the prototype to perfection, this is precisely lost time) can safely skip the stage with the prototype and immediately proceed to programming.
How will the prototype help us? First, we will be able to better understand what parameters we should put in the filter and the description (the data will need to be generated programmatically, so this will save us from alterations). Secondly (or rather, firstly!) We will be able to show the prototype to the customer so that he will be inspired with this idea, give the go-ahead and bring in his vital instructions. In addition, when you see the working model of this toy with your pictures, it charges you with additional energy and gives you the desire to “quickly make such a cool thing!”.
The easiest way to tinker with the prototype is to use the Pivot Collection Tool for Microsoft Excel . This is a plug-in for Excel, which allows you to quickly sketch out an example of several elements, add the necessary parameters and generate xml with data and, most importantly, a folder with images converted into Deep Zoom format. How to do this is well described in another post with Habr - Quick steps for displaying data in PivotViewer and Silverlight .
We have not started programming yet, but somehow we want to see the result. The easiest way to do this is to download Pivot's older brother, Pivot, which is the desktop WPF version of the data browser.
Download, open our collection, play, change attributes and settings (if we don’t need to add new elements, it’s now easier to edit xml manually), rejoice at the result and get to work.
We assume that you already have an ASP.NET project to which you want to add a Pivot Viewer. We have to complete 5 basic steps:
If suddenly something goes wrong - take a look at the example that is located in the folder with Pivot (I have this “C: \ Program Files (x86) \ Microsoft SDKs \ Silverlight \ v4.0 \ PivotViewer \ Jun10 \ Source”). This is a simple site with one page, so it contains almost nothing extra. There are a couple of optional, but useful moments, but more on that later.
It's simple. We need to create a file with string resources in the Silverlight project and add the necessary strings with predefined IDs to it. A complete list of all possible rows can be found in the properties of the Resources object. The default values will tell you the purpose of this line. Note that most of the lines are used to form a description of the filters “from ... to ...” or “greater than or equal ...”. If you do not play much with the filters, you may not meet them, but this does not mean that they are not needed.
Now we give our version of the translation to the control:
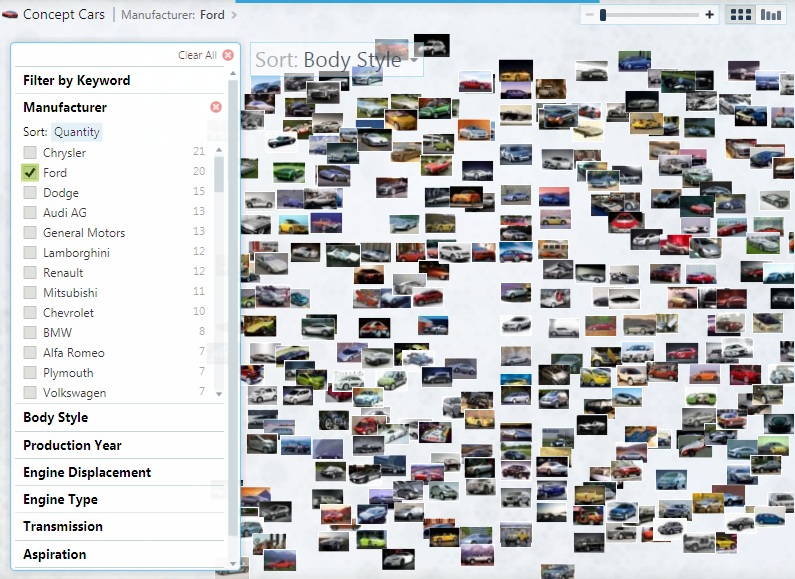
Perhaps it is time to show how it all looks in life. Of course, it would be better to screw the Pivot Viewer to some electronics supermarket, but ... “use what's at hand and don’t look for something else”, remember the good old cartoon about Phileas Fogh and his journey? So I dealt with this element in my literally favorite toy - a site with casual games. I will still refer to this example in the further explanations, and you can see my version of the translation on this page.
The easiest step. All we need is to teach IIS to recognize new types of extensions for it. For IIS 7.0 and above, it’s enough to add lines to web.config:
In younger versions you will have to register it manually in the IIS settings panel.
Ugh, I see that the text turns out quite a lot and someone can not finish reading to the most interesting - useful moments and problems that you may encounter. So I will try to break this article into two parts, I will try to lay out the second one tomorrow.
Stay with us, the ending should be ... :)
If you just want to know what it is and whether it can somehow be useful in the household - read a good overview of the PivotViewer element for Silverlight from xaoccps , this description and examples will be quite enough. But if you are considering integrating PivotViewer into one of your projects, this story will save you some time.
By the way, to write this topic I pushed a comment to one of the reviews:
What I don’t like in similar “how to” (at least for WPF and SL, perhaps for other frameworks, the situation is the same) is that they are similar to traveling along several well-lit asphalt tracks in a deep forest. While you are not turning anywhere - everything is cool, cool and just elementary. But once you turn at least a step - and you get from the dense forest to the fullest.
I will say right away that in this case we will not encounter a dense forest, but we will have to stray a little.
')
Before you go, a pair of semi-philosophical thoughts about this element (if you are only interested in implementation, feel free to skip them).
Frankly, when I heard about the Pivot and climbed up to watch the “awesome” example of the Wiki, my first thoughts were “cool” and “what for?”. It is much easier to type “Silverlight Wiki” in Google and get the right link in the first line than to download a cxml file with a description of a heap of articles, select the year 2009 in the Web development software filter, and, after admiring the beautiful graphics, get the card with the desired By reference (this is only a first impression, I believe that there are scenarios when this approach can and will be useful). It really reminded me of a new version of the site of one of the cinemas, made on a flash fashionable then. Any click was accompanied by colorful animation, explosions and music, and when the visitor was tired of looking at special effects, he began to look for an inconspicuous link "old version of the site for a bad Internet" :)
My attitude towards the Pivot changed when I tried to pick a collation to a new computer. By the way, the last time I was interested in iron three years ago, when I was choosing an old computer. So now I had to choose from hundreds of different components with different technologies and from different manufacturers (I decided to assemble it myself “for the soul”, to remember the student years, to personally pick up every piece of hardware and even fit into the budget).
My choice was greatly facilitated by a couple of sites that allowed you to select the desired product category, filter it by different parameters and quickly compare: “what does GigaByte have of this?”, “Or maybe the same, but with a 140mm fan?” Or “will to the list something good, if I increase the price by $ 20? ".
It really was very convenient, and then I thought that this is the implementation of PivotViewer. After all, it is designed precisely in order to be able to play with different filters on a very large (and even enormous :) mass of objects. It has an area with filters, an area for the list, and a “property page” with a description of the selected item. Moreover, we get all this functionality in one simple (from the point of view of use) control element, which simply needs to “feed” the list of objects in the xml format. Moreover, numerous online supermarkets of all kinds of goods - this is just one example. In the same way, it is possible to display recipes of dishes (we filter by ingredients, type of dishes, nationality of cuisine, rating, but you never know), trips for travel agencies (countries, resorts, hotels, type of food, cost ...), real estate (location, footage , number of rooms, etc.). And this list can be easily continued.
Those who tried to pick up a ticket “somewhere” or decide where and for how much he should rent an apartment (what if a two-room apartment can be rented only $ 100 more expensive?) Will understand how convenient this approach may be. The truth is that in order for our solution not to turn into a “useless website with special effects”, we need at least three things:
- Really large number of objects. If you have a shop with a couple dozen varieties of tea, Pivot will be just a beautiful toy. A few hundred is better. Tens and hundreds of thousands? Here he will show himself in all his glory (if the width of your channel is enough for him; what do you want, there is no perfection in the world :)
- Detailed specifications for most objects. If, when choosing any parameter, our entire collection will be divided into groups “selected” (10%) and "(no info)" (90%), Pivot will again turn into a beautiful toy.
- Images to all objects, the higher the resolution - the better. This is where the full power of the Silverlight Deep Zoom technology is shown, which allows you to show very large and high-quality images while minimizing traffic. By the way, images play a very important role when choosing in the internet. If the buyer sees a list in which a third of the items will not have photos, he will rather simply ignore them in spite of the attractive characteristics. And it will work, even if the appearance does not seem to be needed, for example, when choosing a motherboard or paper for a printer.
Ugh, I look back and understand that you can philosophize endlessly. It's time to work.
Before walking through the “deaf forest”, let's check our backpack. It should contain:
- Visual Studio 2010 (go Express)
- Silverlight 4 Tools for Visual Studio 2010
- Silverlight 4 Toolkit (released April 2010)
- Actually Microsoft Silverlight PivotViewer
We will start with a prototype. Those who like to program first and then think (this is not irony, it is sometimes better to “program” a working prototype, and then think about how to best implement it based on the experience gained; the main thing is not to work on the details and not bring the prototype to perfection, this is precisely lost time) can safely skip the stage with the prototype and immediately proceed to programming.
How will the prototype help us? First, we will be able to better understand what parameters we should put in the filter and the description (the data will need to be generated programmatically, so this will save us from alterations). Secondly (or rather, firstly!) We will be able to show the prototype to the customer so that he will be inspired with this idea, give the go-ahead and bring in his vital instructions. In addition, when you see the working model of this toy with your pictures, it charges you with additional energy and gives you the desire to “quickly make such a cool thing!”.
The easiest way to tinker with the prototype is to use the Pivot Collection Tool for Microsoft Excel . This is a plug-in for Excel, which allows you to quickly sketch out an example of several elements, add the necessary parameters and generate xml with data and, most importantly, a folder with images converted into Deep Zoom format. How to do this is well described in another post with Habr - Quick steps for displaying data in PivotViewer and Silverlight .
We have not started programming yet, but somehow we want to see the result. The easiest way to do this is to download Pivot's older brother, Pivot, which is the desktop WPF version of the data browser.
Download, open our collection, play, change attributes and settings (if we don’t need to add new elements, it’s now easier to edit xml manually), rejoice at the result and get to work.
We assume that you already have an ASP.NET project to which you want to add a Pivot Viewer. We have to complete 5 basic steps:
- Add Pivot Viewer to the project
- Localize (of course, if your site is for Runet)
- Configure IIS
- Learn how to programmatically generate xml data and images in Deep Zoom format
- Finish the item with a file (optional, but useful :)
So, step 1, add Pivot to the project
- Add to your solution a new project like “Silverlight Application”. He has to find a web application in a solution and offer to “take over” a new project in it
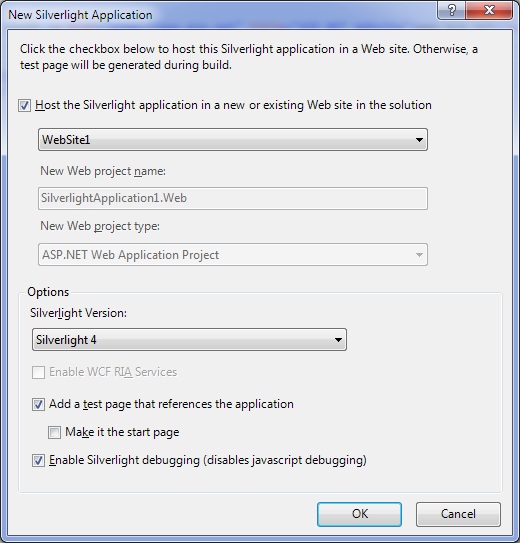
- Visual Studio will create the “ClientBin” directory in your web project and place the .xap file there - the compiled and zipped Silverlight project. If you want to change the directory name to something more visual, do not forget to change the project's Silverlight binding on the “Silverlight Applications” tab in the “Property Pages” dialog of the web project.
- Two pages (.aspx and .html) with the PivotViewer placed on them should be added to your project. In terms of functionality, they are identical, so we delete the .html version, and use .aspx as the basis: we put the scripts into an external file, add the surrounding content, etc. In the settings of the <object> tag, specify the correct path to the .xap file.
- We copy our prototype (.cxml data file and directory with Deep Zoom images) into a web project, for example, to an .xap file. Load it into Pivot using the LoadCollection method in the page constructor from the Silverlight project (by default, this is MainPage.xaml)
public MainPage()
{
InitializeComponent();
...
MainPivotViewer.LoadCollection(collectionUri, String .Empty);
}
* This source code was highlighted with Source Code Highlighter .
where collectionUri is the absolute url to the .cxml data file.
If suddenly something goes wrong - take a look at the example that is located in the folder with Pivot (I have this “C: \ Program Files (x86) \ Microsoft SDKs \ Silverlight \ v4.0 \ PivotViewer \ Jun10 \ Source”). This is a simple site with one page, so it contains almost nothing extra. There are a couple of optional, but useful moments, but more on that later.
Step 2, localization
It's simple. We need to create a file with string resources in the Silverlight project and add the necessary strings with predefined IDs to it. A complete list of all possible rows can be found in the properties of the Resources object. The default values will tell you the purpose of this line. Note that most of the lines are used to form a description of the filters “from ... to ...” or “greater than or equal ...”. If you do not play much with the filters, you may not meet them, but this does not mean that they are not needed.
Now we give our version of the translation to the control:
public MainPage()
{
InitializeComponent();
...
System.Windows.Pivot.PivotViewer.SetResourceManager(LocalizationStrings.ResourceManager);
}

* This source code was highlighted with Source Code Highlighter .
Perhaps it is time to show how it all looks in life. Of course, it would be better to screw the Pivot Viewer to some electronics supermarket, but ... “use what's at hand and don’t look for something else”, remember the good old cartoon about Phileas Fogh and his journey? So I dealt with this element in my literally favorite toy - a site with casual games. I will still refer to this example in the further explanations, and you can see my version of the translation on this page.
Step 3, IIS Setup
The easiest step. All we need is to teach IIS to recognize new types of extensions for it. For IIS 7.0 and above, it’s enough to add lines to web.config:
< configuration >
< system.webServer >
< staticContent >
< mimeMap fileExtension =".cxml" mimeType ="text/xml" />
< mimeMap fileExtension =".dzc" mimeType ="text/xml" />
< mimeMap fileExtension =".dzi" mimeType ="text/xml" />
</ staticContent >

* This source code was highlighted with Source Code Highlighter .
In younger versions you will have to register it manually in the IIS settings panel.
Ugh, I see that the text turns out quite a lot and someone can not finish reading to the most interesting - useful moments and problems that you may encounter. So I will try to break this article into two parts, I will try to lay out the second one tomorrow.
Stay with us, the ending should be ... :)
Source: https://habr.com/ru/post/102912/
All Articles