Quick install trac in openSUSE
Sooner or later, many are faced with the choice of bugtracker. At the same time, regardless of the purpose for which it is planned to be applied (industrial or personal), I would like to familiarize myself with it before use. After a cursory analysis of the results of search engine queries on the issue of interest, it becomes clear that one of the systems that cannot be ignored is Trac. But, unfortunately, when studying the instructions for installing this wonderful tool, many people have no desire to get acquainted with Trac. I'll tell you how to avoid this and get to know (and maybe make friends) with Trac as quickly as possible, and most importantly, simple.
The article will look at an example of installing Trac with the integration of Subversion version control system and PostgreSQL database management server with a web interface that will provide Apache and it will all be installed on the openSUSE free operating system. It is assumed that the reader is generally familiar with In general, a bugtracker is needed, so there will not be a review of any comparisons of Trac and related tools.
The article may be interesting to everyone, those who are “in search” and want to try Trac, as well as openSUSE users who have already made their choice and want to install it.
To work will require:
Create a new virtual machine and install openSUSE with your beloved DE (especially harsh or undecided environments can choose Text Mode). When installing the OS, no special settings need to be performed and it is enough to accept those provided by default. The only requirement is to leave English unchanged when choosing a language.
')
Add the necessary repositories:
They are needed to install: python-genshi, apache2-mod_wsgi, python-babel, python-pygments, trac, respectively, as well as other necessary packages.
Perform the installation:
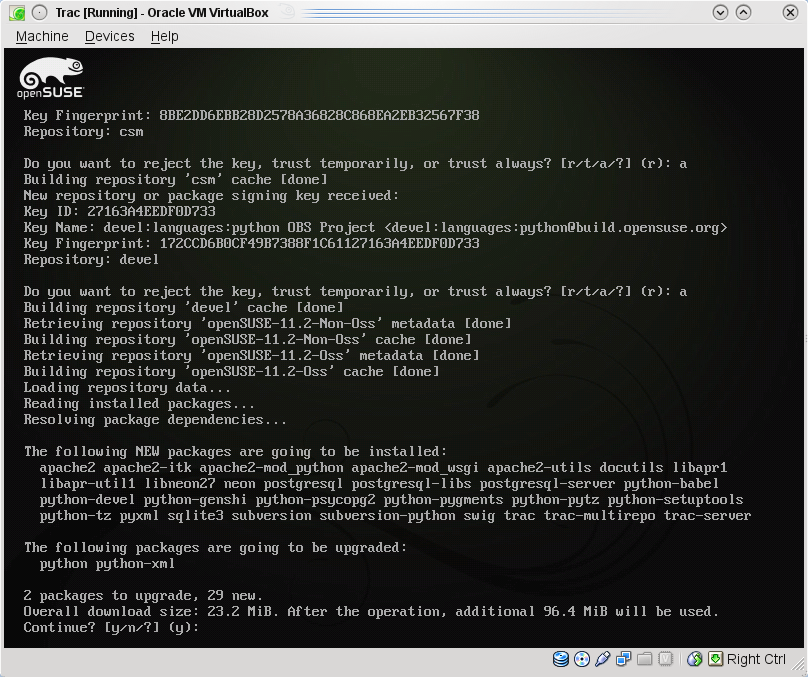
At this stage, it is highly desirable to make sure that all the pre-installed packages will be installed and therefore all repositories have been correctly initialized. If the installation is successful, it may look like this:
Create an svn repository:
Create a file to store passwords:
And add two users: admin and user:
Set the correct permissions for files and directories:
Set up the DBMS to work with Trac.
Run the server:
Define the database access parameters, for which we open the configuration file for editing:
and replace the line:
for the next:
The result should be something like this:

Then log in with the postgres user rights:
create a new user trac:
and database of the same name:
Do not forget to restart the server so that the security settings take effect:
Create the Trac environment:
If the creation of the project was successful, you will be informed about this:

Set the correct permissions for files and directories:
In order to get familiar with Trac, we will give one of the users (we are talking about those users who were created during the Subversion configuration stage) admin rights:
Change the cgi file:
Add two lines between the try and from the lines, resulting in the following form:
Configure Apache.
Open for editing the Apache configuration file:
And set the following value for the parameter APACHE_SERVER_FLAGS:
Let's open for editing the trac module configuration file:
And change the settings in the section <Location "/ trac"> we bring it to the following form:
The remaining parameters must be left unchanged. As a result, you should get something like the following:

Launch a web server:
Now we can, using our favorite web browser, start exploring Trac locally:

A similar dialog box indicates that authentication is configured. And if after entering the name and password you can see something like the following:

then authentication is configured correctly. In addition, you can access Tracnormally remotely, without forgetting to open the corresponding port in the Firewall:

In conclusion, it is worth noting that in fact, there is a shorter way to install Trac. You can omit the installation and configuration of Subversion and Apache while using it to start the standalone server:
For access you will need to go to the address: http: // localhost: 8000.
Introduction
Who needs it?
The article will look at an example of installing Trac with the integration of Subversion version control system and PostgreSQL database management server with a web interface that will provide Apache and it will all be installed on the openSUSE free operating system. It is assumed that the reader is generally familiar with In general, a bugtracker is needed, so there will not be a review of any comparisons of Trac and related tools.
The article may be interesting to everyone, those who are “in search” and want to try Trac, as well as openSUSE users who have already made their choice and want to install it.
What will be necessary for work
To work will require:
- Internet access;
- VirtualBox (the author strongly recommends not to conduct experiments on working machines and servers);
- openSUSE 11.2 installation DVD;
- a few hours of free time and the desire to touch the beautiful.
Installation and Setup
OS installation
Create a new virtual machine and install openSUSE with your beloved DE (especially harsh or undecided environments can choose Text Mode). When installing the OS, no special settings need to be performed and it is enough to accept those provided by default. The only requirement is to leave English unchanged when choosing a language.
')
Adding Repositories
Add the necessary repositories:
sudo zypper ar http://download.opensuse.org/repositories/home:/FunkyM:/scm/openSUSE_11.2 FunkyMsudo zypper ar http://download.opensuse.org/repositories/Apache:/Modules/Apache_openSUSE_11.2 Apachesudo zypper ar http://download.opensuse.org/repositories/home:/babelworx:/python/openSUSE_11.2 babelworxsudo zypper ar http://download.opensuse.org/repositories/devel:/languages:/python/openSUSE_11.2 develsudo zypper ar http://download.opensuse.org/repositories/devel:/tools:/scm/openSUSE_11.2/ csmThey are needed to install: python-genshi, apache2-mod_wsgi, python-babel, python-pygments, trac, respectively, as well as other necessary packages.
Directly installation
Perform the installation:
sudo zypper in python python-devel python-xml python-setuptools postgresql-server python-psycopg2 subversion swig apache2 apache2-mod_wsgi apache2-mod_python docutils python-pygments python-pytz sqlite3 subversion-python trac-multirepo trac-server tracAt this stage, it is highly desirable to make sure that all the pre-installed packages will be installed and therefore all repositories have been correctly initialized. If the installation is successful, it may look like this:
Creating a source code repository
Create an svn repository:
sudo mkdir -p /srv/svn/reposcd /srv/svn/repossudo svnadmin create --fs-type fsfs habrahabrCreate a file to store passwords:
sudo mkdir /srv/svn/user_accesssudo touch /srv/svn/user_access/habrahabr_passwdfileAnd add two users: admin and user:
sudo htpasswd2 /srv/svn/user_access/habrahabr_passwdfile adminsudo htpasswd2 /srv/svn/user_access/ habrahabr_passwdfile userSet the correct permissions for files and directories:
sudo mkdir -p /srv/svn/repos/abacus/davsudo chown -R wwwrun:www habrahabr/{dav,db,locks}sudo chown root:www /srv/svn/user_access/habrahabr_passwdfilesudo chmod 640 /srv/svn/user_access/habrahabr_passwdfilePostgreSQL setup
Set up the DBMS to work with Trac.
Run the server:
sudo /sbin/service postgresql startDefine the database access parameters, for which we open the configuration file for editing:
sudo vim /var/lib/pgsql/data/pg_hba.confand replace the line:
host all all 127.0.0.1/32 identfor the next:
host trac trac 127.0.0.1/32 passwordThe result should be something like this:
Then log in with the postgres user rights:
su<br>su postgrescreate a new user trac:
createuser --pwprompt --encrypted --no-adduser --no-createdb tracand database of the same name:
createdb --encoding=UNICODE --owner=trac tracDo not forget to restart the server so that the security settings take effect:
sudo /sbin/service postgresql restartCreating a Trac Project
Create the Trac environment:
sudo trac-admin /srv/trac/habrahabr initenv This answers the tricky questions as follows:habrahabrpostgres://trac:secret@127.0.0.1:5432/tracsvn/srv/svn/repos/habrahabrIf the creation of the project was successful, you will be informed about this:
Set the correct permissions for files and directories:
sudo chown -R wwwrun /srv/trac/habrahabrIn order to get familiar with Trac, we will give one of the users (we are talking about those users who were created during the Subversion configuration stage) admin rights:
trac-admin /srv/trac/habrahabr permission add admin TRAC_ADMINChange the cgi file:
sudo vim /usr/share/trac/cgi-bin/trac.cgiAdd two lines between the try and from the lines, resulting in the following form:
try:import osos.environ['TRAC_ENV'] = "/srv/trac/habrahabr"from trac.web import cgi_frontendWeb server setup
Configure Apache.
Open for editing the Apache configuration file:
sudo vim /etc/sysconfig/apache2And set the following value for the parameter APACHE_SERVER_FLAGS:
APACHE_SERVER_FLAGS="TRAC_CGI"Let's open for editing the trac module configuration file:
sudo vim /etc/apche2/conf.d/trac.confAnd change the settings in the section <Location "/ trac"> we bring it to the following form:
SetEnv TRAC_ENV "/srv/trac/habrahabr"Order allow,denyAllow from allAuthType BasicAuthName "Trac"AuthUserFile /srv/svn/user_access/habrahabr_passwdfile<br> Require valid-userThe remaining parameters must be left unchanged. As a result, you should get something like the following:
Launch a web server:
sudo /sbin/service apache2 startUsing Trac
Now we can, using our favorite web browser, start exploring Trac locally:
A similar dialog box indicates that authentication is configured. And if after entering the name and password you can see something like the following:
then authentication is configured correctly. In addition, you can access Trac
Conclusion
In conclusion, it is worth noting that in fact, there is a shorter way to install Trac. You can omit the installation and configuration of Subversion and Apache while using it to start the standalone server:
tracd --port 8000 /srv/trac/habrahabrFor access you will need to go to the address: http: // localhost: 8000.
Source: https://habr.com/ru/post/102448/
All Articles