Creating documentation in .NET
 Quality documentation is an integral part of a successful software product. Creating a complete and understandable description of all the functions and capabilities of the program and program component requires a lot of effort and patience. In this article I will discuss some practical aspects of creating documentation for .NET components.
Suppose that we have some .NET library for developers (they are end users) ready or almost ready. The library's API is flawless, the number of bugs is impressively small, and in general it is not a library, but just a storehouse of perfect code. Things are easy - to explain to users how to work with this wonderful product.
There are different approaches to writing documentation. Some teams prefer to start creating documentation at the time they start creating a product. Others postpone writing manuals to complete the work. In some teams, documentation is written by special people who go from developer to developer and from manager to manager, accumulating knowledge about the product. In many small teams there are no such special people, and therefore the documentation is often written by the developer or developers. Someone uses third-party tools like Help & Manual, in which, as in a real text editor, you can create a very complex layout and receive documentation in a variety of formats. Many use a different approach widely promoted recently - writing documentation right in the program / library code.
')
I used both third-party and embedded tools in my work. I started writing documentation both at once and at the last moment. As a result, I decided for myself that it is better to start writing the documentation in the second half of the product creation, since the closer to completion, the more stable the API, the feature set, etc., which means that it will be less necessary to correct the documentation. Writing documentation directly in the code, too, ultimately turned out to be more convenient than in third-party programs, although at first it seemed quite the opposite. This article is just about how to write documentation right in the code.
We describe API
The C # and VB.NET compilers can recognize comments made in a special way (xml comments) and, if necessary, create an xml file, which can then be used to create documentation. To take advantage of this opportunity, you must describe all public classes and methods using xml comments. It looks like this:
/// <summary>
/// Gets the R component value returned from ABGR
/// <see cref = "O: BitMiracle.LibTiff.Classic.Tiff.ReadRGBAImage"> ReadRGBAImage </ see>.
/// </ summary>
/// <param name = "abgr"> The ABGR value. </ param>
/// <returns> The R component from ABGR value. </ returns>
public static int GetR ( int abgr )
{
return ( abgr & 0xff ) ;
}
By default, the creation of an xml file from comments is disabled. It must be included in the project properties on the Build tab.

As a result, during compilation, in addition to your build file, an xml file will be generated that contains all the xml comments from the code (including comments to non-public structures). This file is in itself useful because if you put it next to the assembly (your dll), this will allow the IntelliSense function in Visual Studio to display descriptions for the methods when the user types the code. Here is an example of how this will look for the GetR function shown above:

However, in most cases, the generated xml file contains comments to internal structures that users do not need or cannot see. Below I will write how to automatically clean up the xml file so that it only contains descriptions of public methods.
I will not consider in detail all the xml-tags, but only try to briefly describe the most frequently used.
The summary tag is used to briefly describe the purpose of a class, interface, enumeration (enum), methods and properties of a class or interface, and enumeration members. The param tag allows you to describe the parameter accepted by the function. This tag should be used for each parameter received. The returns tag is used to describe the return value of a function. The value tag is useful for describing a value that accepts and / or returns a property. In a sense, the value tag is analogous to the returns tag.
/// <summary>
/// Gets the font ascent.
/// </ summary>
/// <value> The font ascent. </ value>
/// <remarks> Ascent is the maximum height above the baseline reached
/// by glyphs in this font, excluding the height of glyphs for
/// accented characters. </ remarks>
public short Ascent
{
get
{
return impl. Ascent ;
}
}
A very useful (and, unfortunately, often ignored) tag is remarks , which allows you to specify notes to the described entity. This tag can be used almost everywhere except for the description of the enumeration members. In fact, for members of the listing is also possible, but in the documentation, decorated in the style of vs2005, these notes just will not be visible, which reduces the usefulness of such notes.
I will cite a few more practical observations / recommendations.
Download and install an extension for Visual Studio called GhostDoc . This extension works in all studio versions (since version 2005) and greatly simplifies the creation of xml comments. By pressing Ctrl-Shift-D, this extension inserts a description of the entity on which the cursor is currently located. All necessary tags are inserted, and description text is generated based on, for example, the name of the method and the name of its parameters. Often it remains only to correct and supplement the generated text.
The lack of writing documentation right in the code is that sometimes there are more comments than the code, which can make it very difficult to read the code. To circumvent this problem, the complete separation of the public interface and implementation is very convenient.
If you have several overloaded methods, a separate page will be created when generating documentation for them ( here is an example of such a page). The text for this page must be specified in the overloads tag in the description of one of the overloaded methods.
/// <summary>
/// Saves the font bytes to the specified stream.
/// </ summary>
/// <param name = "stream"> The stream to save font bytes to. </ param>
/// <overloads> Saves the file. </ overloads>
public void Save ( Stream stream )
{
Impl. Save ( stream ) ;
}
If you want to give a reference to another method or type in the description of one method, then you need to use a construct like
<see cref="X:MEMBER"> </see> , where X is an optional prefix denoting an entity type (T for a class , M for a method, P for a property, O for a group of overloaded methods), and MEMBER is a complete or partial specification of an entity. The partial specification and the missing prefix can be used, for example, for references between two methods of the same class or between two entities of the same namespace (namespace).An example of using a partial specification (PdfFontEmbedStyle is in the same namespace with the PdfFont):
public sealed class PdfFont
{
...
/// <summary>
/// Gets or sets the <see cref = "PdfFontEmbedStyle" /> value that specifies
/// how this font is embedded into the document.
/// </ summary>
/// <value> The <see cref = "PdfFontEmbedStyle" /> value that specifies
/// how this font is embedded into the document. </ value>
public PdfFontEmbedStyle EmbedStyle
{
get
{
return impl. EmbedStyle ;
}
set
{
Impl. EmbedStyle = value ;
}
}
}
If you refer to an entity from another namespace, to a group of overloaded methods, or to a particular method from a group of overloaded methods, then you must use the full specification. Examples of complete specifications:
- property reference
<see cref="P:System.Exception.HResult"/> - method reference
<see cref="M:BitMiracle.LibTiff.Classic.Tiff.GetR(System.Int32)"/> - reference to a group of overloaded methods
<see cref="O:BitMiracle.LibTiff.Classic.Tiff.PrintDirectory"/> - class reference
<see cref="T:BitMiracle.LibTiff.Classic.TiffTagMethods"/>
As you can see, the full specification also includes the method parameters, which allows you to uniquely identify the link, but complicates the writing of the links. Manual labor can be saved by copying complete specifications from a previously compiled xml file.
With links to a group of overloaded methods, there is one nuisance. Visual Studio requires that such links be
O:XXX.YYY , while Sandcastle Help File Builder requires such links to be Overload:XXX.YYY . To solve this problem, I use a simple script that is called on the Post-build event and replaces in the xml file O: with Overload: which is quite tolerable.To link to some external article of your documentation (not related to the API description) or to some resource on the Internet, use the good old
<a> tag with the href attribute. For example, <a href = "54cbd23d-dc55-44b9-921f-3a06efc2f6ce.htm"> </a> or <a href = "http://site.com/page.html"> </a> . In the first example, the name of the document with an external article is presented in the form “TOPIC_ID.htm”. That such a topic id, will be discussed below.You can learn more about documenting code with xml comments in these articles:
- Recommended Tags for Documentation Comments (C # Programming Guide)
msdn.microsoft.com/en-us/library/5ast78ax.aspx - XML Documentation Comments Guide (Detailed Guide with Examples)
www.dynicity.com/products/XMLDocComments.aspx - XML documentation in C #
habrahabr.ru/blogs/net/41514 - C # and XML Source Code Documentation
www.codeproject.com/KB/XML/csharpcodedocumentation.aspx?msg=1679454
We generate the documentation file
After the xml description of your component is ready, you can generate a documentation file. I prefer to use the Sandcastle + Sandcastle Help File Builder (SHFB) bundle for this. I note that some prefer DocProject. This requires:
- Download and install Sandcastle
sandcastle.codeplex.com - Download and install Sandcastle Help File Builder
shfb.codeplex.com - Download and apply the patch for the styles used by Sandcastle
sandcastlestyles.codeplex.com - If you have problems with the assembly of documentation in the format of HTML Help, then you need to check that itircl.dll is present in the system and is registered. Usually this dll is in System32, you need to register it through regsvr32. More details are written here:
frogleg.mvps.org/helptechnologies/htmlhelp/hhtips.html#hhc6003
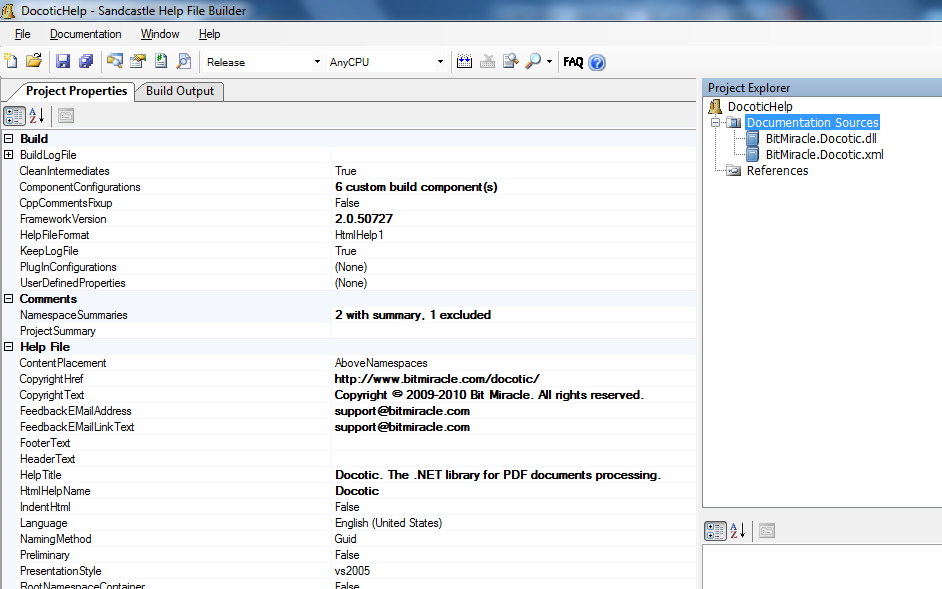
We proceed to the assembly of documentation in chm format. To do this, run Sandcastle Help File Builder and set up the Project Properties. In the “ComponentConfigurations” property, you can configure additional components used during assembly. If you do not know which components you may need, you can select all the components. In any case, I recommend always using the IntelliSense Component, as it automatically creates a copy of the input xml file, cleared of all non-public comments. It is the result of this component that should be given to users, and not the xml file that the compiler will create.
I also recommend immediately changing the following properties:
- Build section: FrameworkVersion
- Help File sections: CopyrightHref, CopyrightText, FeedbackEMailAddress, FeedbackEMailLinkText, HelpTitle, HtmlHelpName
- section Paths: OutputPath
Next, in the Project Explorer window, add Documentation Sources. I recommend to choose here a specific assembly and an xml file with comments for it, and not a C # / VB.NET project file. If you select a project file, then sometimes there is a problem because changes in xml comments are not reflected in the documentation. Who is to blame, I do not know.
Another important step is to describe the namespaces in the SHFB. Xml comments in the code do not work for namespaces, so you need to do this manually. Here will help the Comments section and the NamespaceSummaries property in it. In the description of namespaces, you can use standard html tags.
Setting up the project is complete, it's time to build a .hm file. We select Documentation-> Build Project, and if everything was done correctly, we get a beautiful MSDN-style documentation file.
Useful links on the topic:
- A detailed description of the settings SHFB
www.codeproject.com/KB/cs/SandcastleBuilder.aspx - SHFB review on HabraHabré
habrahabr.ru/blogs/net/68227 - Sandcastle versus DocProject
stackoverflow.com/questions/319632/docproject-vs-sandcastle-help-file-builder-gui
Writing articles
However, you should not stop at what has been achieved - one description of the API of your component is not enough for full documentation. Good documentation usually contains additional articles, examples, FAQ, etc.
In the Project Explorer window we add a new Content Layout element - this is a description (with indication of relative position) of what is included in the documentation. In the Content Layout window new articles are added (topics). Each article is described in the MAML format (.aml files), this is the xml-based format. Sandcastle Help File Builder comes with a set of predefined templates, which greatly simplifies the debut in writing articles. I mainly use the conceptual template, less often - walkthrough .
The description of each article begins with specifying the topic id - a unique identifier. Based on this identifier, an html file is generated, which will later be placed in chm. The generated html file is named in the form “TOPIC_ID.htm”. This topic id is also used for links to articles from other articles or xml-comments in the code.
When creating an article, it is suggested to save it to a file with the name “TOPIC_ID.aml”. It is possible and necessary, when creating, to immediately indicate the normal name for the file.
Consider some of the controls in SHFB that are useful when editing articles.

 | Sets the start page of the documentation (will appear when opening documentation. |
 | Sets the location at which the API description will be inserted, generated from xml file. Depending on which option is selected, API description will be inserted either before, after, or as a child of this way. an item. |
 | Preview the current article. |
 | Insert a link to the article in the documentation. Use topic id in as an address. |
 | Insert standard tags to mark up the article. |
The Entity Reference window (in the picture located on the right) can be used to insert links to the description of functions / methods, etc. entities from code. This way of inserting links is not very convenient in my opinion, since you first need to open the text of the article, then open the Entity Reference window, then write a part or full name of the entity in this window, then find the necessary line in the list and double-click on it. All this will lead to the fact that the article is inserted into the link at the cursor position. I prefer to write links with my hands, and find the text for the links in the build log-e (the log from the previous build can be opened in a text editor).
To insert the code in the article uses the tag
<code> . For example:< code language = "cs" >
private void helloWorld ( )
{
Console. WriteLine ( "Hello World ! " ) ;
}
</ code >
To insert images, do the following:
- In the Project Explorer window, select Add, then Existing Item, and select the desired image.
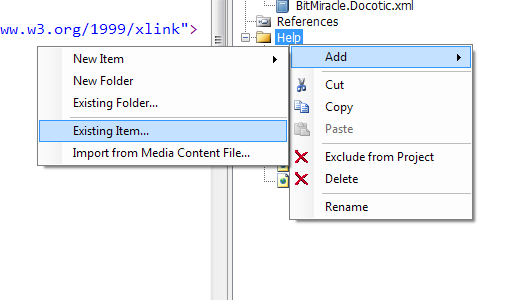
- In the properties of the added file, we change the BuildAction to Image, and the ImageId property, to a convenient name (which will be used in the links to this image).

Then you can use the image in the articles as follows:
<mediaLink> <image xlink: href = "ImageId" placement = "center" / > < / mediaLink>
Unfortunately, in the current version of SHFB the editor is far from perfect. For example, tags are not closed automatically, a lot of actions have to be done with the mouse (there are no hotkeys), not all standard tags have corresponding elements on the toolbar. Paradoxically, for most of the actions with aml files, it’s more convenient for me to use Visual Studio. Of course, you can use any other convenient xml-editor for writing articles.
I have described a solution to basic needs when writing articles for documentation. If you want to better explore the topic, I recommend the following links:
- Overview MAML format
davesexton.com/blog/blogs/blog/archive/2008/05/24/maml-migration-the-next-step-in-the-evolution-of-help-authoring.aspx - Detailed description of MAML format
sandcastlestyles.codeplex.com/releases/view/17333 - Various examples of paperwork with SHFB
www.codeproject.com/KB/winhelp/SandcastleConceptual.aspx - How to create articles from HTML, not MAML
habrahabr.ru/blogs/net/68227 - How to insert class diagrams into the documentation
habrahabr.ru/blogs/net/73790
Integration into the assembly process
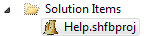
You can include the project file (* .shfbproj) from Sandcastle Help File Builder in the solution Visual Studio, however at present there is no possibility to use it as a full-fledged project. That is, you cannot see the contents of such a project, the project will only be added to the Solution Items group.
Adding is as follows:
- For a solution, select Add-> Existing Item ..., add the draft documentation. It will be added to the Solution Items folder.
- Click on the added element with the right mouse button and select Open With ... In the dialog that opens, add the “Sandcastle Help File Builder GUI” and set it as the default editor.
After that, the project documentation can be opened from Visual Studio.
More useful is building documentation from the command line. Such a build can be done at the Post-Build event or in other cases. Building the documentation from the command line is very simple with the following command:
%SystemRoot%\Microsoft.NET\Framework\v3.5\MSBuild.exe" /p:Configuration=Release Help.shfbprojIn this line Help.shfbproj is the name of the documentation project.
I hope this article will help you start writing documentation for your projects (if you are not already doing this) for which your users will surely thank you. Good luck to you in writing documentation!
Source: https://habr.com/ru/post/102177/
All Articles