How Microsoft DevDiv uses TFS - parts 8 and 9
Part 8 (Working with Quality Gates)
In a previous post, we talked about risk control in several projects at the same time. Today we will talk about tracking quality characteristics (Quality Gates).
Let's think about it for a moment. Say, when we started to develop Orcas (Visual Studio 2008), someone at the very top gave instructions:
- VS2008 will not have performance worse than VS2005.
- We will cover 70% of the code with automated testing.
These are just two requirements, but the biggest ones. How can you be sure that 3,000 people will add hundreds of new functions in the next 2-3 years and these instructions will be followed?
Our response was Quality Gates. When working on Orcas, we installed 16 such gates, from simple ones like “You must have written specifications” to numerical ones, for example: “70% of the code should be covered by automatic testing”.
In the Feature work item, we have dedicated the whole form to Quality Gates.

Let's look at it in more detail.
The first four points were based on documentation. Therefore, the document had to exist and be approved in order to pass through this gate.
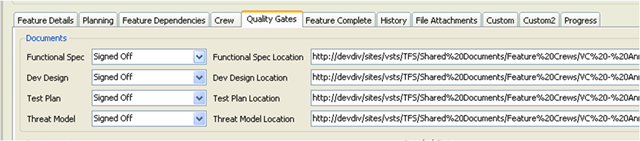
The remaining gates were tracked by approving and setting status.
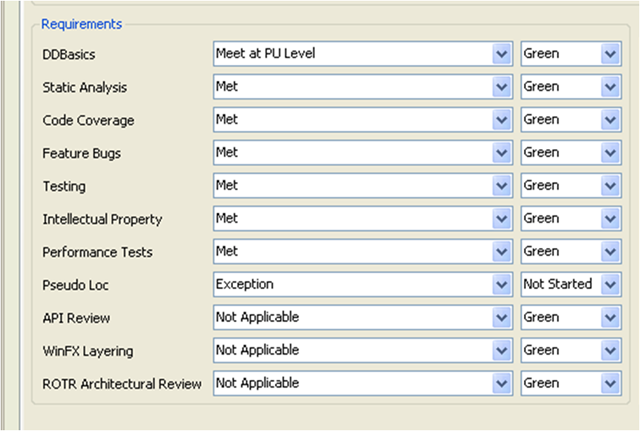
Before the development team could change the status to “Completed,” they had to make sure that all the quality characteristics were achieved. To show that this criterion was reached, they set the Quality Gates fields to “met” (“achieved”), or “not applicable” (“not applicable”), or “exempted” (“removed”). Work rules did not allow setting the status to “Completed” until all field statuses are set. If at least one field had the status “Exception” (“exception”), the field “Exception Authorization” became mandatory in which the responsible person had to approve the exception.
It was effective from the point of view of electronic document circulation. If you set the indicator to “reached,” this information was stored in the history of the work item and was, in a way, your signature.
This begs the question: how did you keep people from cheating just to get and set Quality Gate to “met”? The answer is simple: just nobody did it. Can I be sure that all the functions marked as completed were really completed by the time the status was changed? Not. Such confidence would require a lot of time to check the details of each new function. This system was based on trust. We trusted people that they did everything right and, I think, in most cases it was so.
Another problem was the need to re-check Quality Gate on the main branch. For example, all testing related to localization (Quality Gate “Pseudo Loc” above), all performance testing, automatic testing took place in the main branch on a regular basis. If someone saved the code in the version control system that did not meet the requirements, such information was displayed in reports received from the main branch.
To track the status of quality characteristics, we used this report:
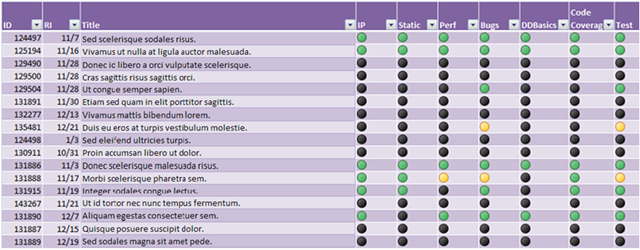
This report was built in Excel and included all the functionality under development and used Excel 2007 functions to display the yellow / green / red / black indicators for each of Quality Gates (where black color meant not getting started).
As in the case of other reports, our project manager asked us the following questions every week:
- I heard that you are nearing the completion of work on this functionality (column RI on the report above), but you have not yet started working with Quality Gates. Bother to explain - why?
- You set some Quality Gates to red. Why? How can we help?
What we did was not the design of rockets (rocket science is something highly technological), and there is no magic at all. Working with Quality Gates, you just had to keep others informed. However, without the support of TFS / Work Items, I don’t see how we, as an organization (or any other organization for which this is important), could be successful in performing tasks of such importance and influence on team culture as Quality Gates were.
In the next post, we’ll talk about the reports we created to have a clear picture of the status of all tasks.
Gregg boer
Part 9 (Transparency in reporting)
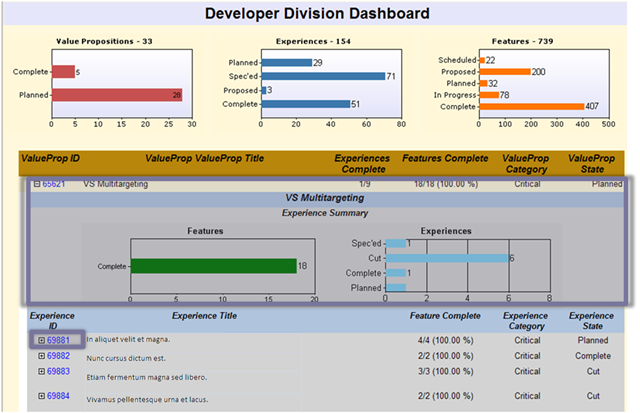
Below is the control panel of our unit:
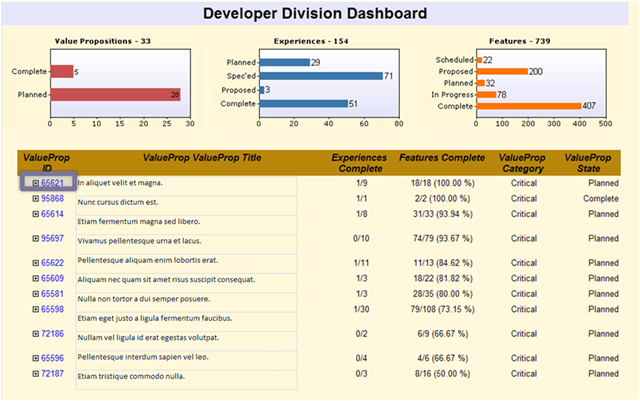
Perhaps, you remember, in one of the previous publications we talked about Value Props (values) related to Experience (experience), which in turn are related to Features (functionality). The picture above is a snapshot of the status of DevDiv working with them.
The upper part of the report shows the progress of work with Value Props. Value Props, as you remember, are the base points for the unit. In Orcas, we had about 10 of them.
If you click on an element (highlighted with a gray rectangle above), the status of the corresponding Experience will open:
Here you can see the status of all items associated with this Value Prop. Go down to the Experience below.
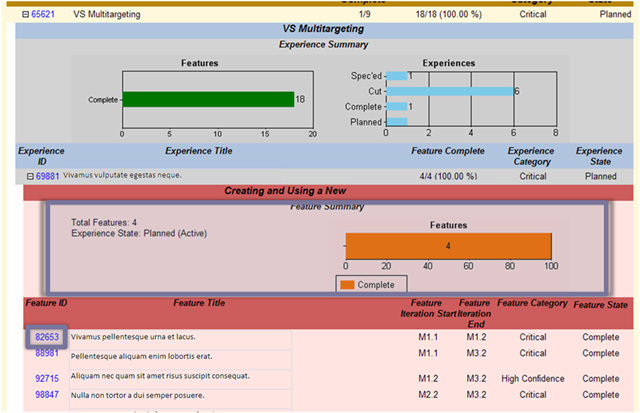
This report shows the progress of work on the functionality associated with the selected Experience. We go even lower:
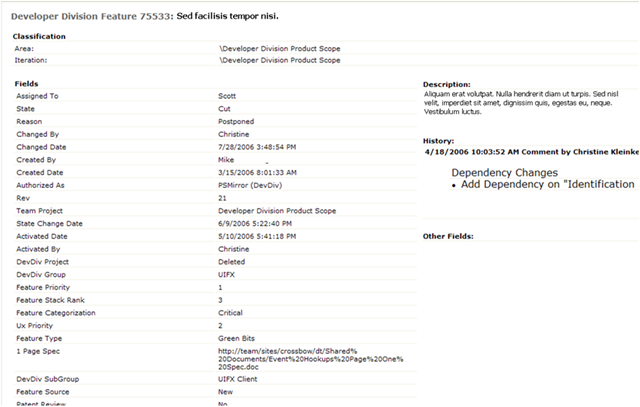
and get a report in the browser, which shows the data on the functionality.
This set of reports allows staff at any level to track the status of the entire release. It also provides transparency that influences the team culture at all levels, and all of this is a change for the better.
')
Source: https://habr.com/ru/post/102042/
All Articles