.Net Micro Framework - First Steps
The teaser was perceived conservatively, but positively, so continue.
So, the box was unpacked, the buttons were poked, poked on the debug output at startup. Cool! Zhelezyaka something works.
')
Although, on the other hand, it does nothing useful.
I will not describe the installation of IDE, SDK, and the initial firmware of the piece of iron, since With the first two, everything is clear, and the firmware is a specific matter, and is well described by the manufacturer.
Disclaimer: Embedded platform I hold in my hands for the first time. There is no development experience (I do not think that viewing hackaday.com and reading wasm.ru is enough). There are only vague ideas. But there is an experience of writing in C #. If you are a harsh Asm / C embeder, and for you this story is a harsh work life, then my article is probably not for you.
For the time being, I'll write a short hello world!
I open a studio, choose a new project for the ChipworkX Module.
I cheerfully write in the main method
and here I get
Uh, drove by. Console here and does not smell. We will go another way.
- Is there a screen?
- There is!
- So it will draw pictures.
After a short search, the following construction appears:
The Habr resource is a bitmap located in the usual * .resx
I start and see. Works, draws a picture, hello Habra.
But we would be more interactive.
- Are there any buttons?
- There is!
- We will intercept interrupts.
After a run through the documentation, the InterruptPort class was discovered, which allows you to hang GPO interrupt handlers on pins.
A little mana smoking, and the code was written, which, when you press the central button, does an operation to raise the pen and lower the pen, while winking at the LED (class OutputPort), and the cursor buttons move the pen accordingly.
Code: pastebin.com/AMF2Th2g
And the result :)

It took 3 with a little hours. So far, the result is satisfactory ... One of these days I will write something else.
PS
There is an accelerometer on the strapping, so the continuation of the experiment will consist in communicating with the sensor in I 2 C and drawing the rolling ball around the screen :)
Pps
Literature:
Beginner's Guide to NETMF
MicroFrameworkProject.com
So, the box was unpacked, the buttons were poked, poked on the debug output at startup. Cool! Zhelezyaka something works.
')
Although, on the other hand, it does nothing useful.
What do we need to start?
- Visual Studio 2010 Express (C # Edition)
- Microsoft .Net Micro Framework 4.1 SDK
- GHI Electronics SDK (this is, of course, only for this family of hardware)
I will not describe the installation of IDE, SDK, and the initial firmware of the piece of iron, since With the first two, everything is clear, and the firmware is a specific matter, and is well described by the manufacturer.
Wednesday prepared? Go!
Disclaimer: Embedded platform I hold in my hands for the first time. There is no development experience (I do not think that viewing hackaday.com and reading wasm.ru is enough). There are only vague ideas. But there is an experience of writing in C #. If you are a harsh Asm / C embeder, and for you this story is a harsh work life, then my article is probably not for you.
For the time being, I'll write a short hello world!
I open a studio, choose a new project for the ChipworkX Module.
I cheerfully write in the main method
Console.WriteLine ("Hello, World!"); and here I get
Error 1 The name 'Console' does not exist in the current context
Uh, drove by. Console here and does not smell. We will go another way.
- Is there a screen?
- There is!
- So it will draw pictures.
After a short search, the following construction appears:
public class Program
{
private static readonly int LCDHeight = SystemMetrics.ScreenHeight;
private static readonly int LCDWidth = SystemMetrics.ScreenWidth;
private static Bitmap LCD = new Bitmap (LCDWidth, LCDHeight);
public static void Main ()
{
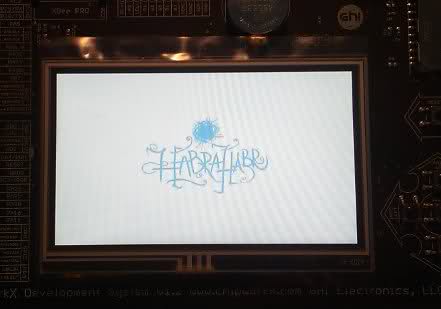
Bitmap habr = Resources.GetBitmap (Resources.BitmapResources.Habr);
LCD.Clear ();
LCD.DrawRectangle (Colors.White, 0, 0, 0, LCDWidth, LCDHeight, 0, 0, Colors.White, 0, 0, Colors.White, 0, 0, ushort.MaxValue);
LCD.DrawImage ((LCDWidth - habr.Width) / 2, (LCDHeight - habr.Height) / 2, habr, 0, 0, habr.Width, habr.Height);
LCD.Flush ();
Thread.Sleep (Timeout.Infinite);
}
}
The Habr resource is a bitmap located in the usual * .resx
I start and see. Works, draws a picture, hello Habra.
But we would be more interactive.
- Are there any buttons?
- There is!
- We will intercept interrupts.
After a run through the documentation, the InterruptPort class was discovered, which allows you to hang GPO interrupt handlers on pins.
A little mana smoking, and the code was written, which, when you press the central button, does an operation to raise the pen and lower the pen, while winking at the LED (class OutputPort), and the cursor buttons move the pen accordingly.
Code: pastebin.com/AMF2Th2g
And the result :)
It took 3 with a little hours. So far, the result is satisfactory ... One of these days I will write something else.
PS
There is an accelerometer on the strapping, so the continuation of the experiment will consist in communicating with the sensor in I 2 C and drawing the rolling ball around the screen :)
Pps
Literature:
Beginner's Guide to NETMF
MicroFrameworkProject.com
Source: https://habr.com/ru/post/101749/
All Articles