We connect the domain and dynamic IP
What we have:
1. a computer with an axis and installed mysql, apache, php (I will not write anything here, there is enough manual)
2. Internet with assigned dynamic IP, router.
What we want:
1. Whatever people typing in the address bar of the browser a second-level domain name (purchased by us or obtained on any service), came to our site (regardless of what IP is on it now).
2. We want it for free.
So, how it was implemented by me in the form of a brief instruction can be read under the cut, maybe someone will find it useful or just be interested. Also, I will be glad to objective criticism. Thank you for your attention, and who are interested in welcome under Habrakat.
')
Go:
1. We register on the dyndns website (it is worth noting that free registration on this resource requires mandatory visits to it once every 30 days, otherwise it will be deleted, so if this is a big inconvenience for you, there are enough alternatives, some are named in the comments, the rest can be easily found using the search engine)
2. Add there a host of the type Any_Name.dyndns.org with your current external IP.
Further, paragraph 3.1 or 3.2 to choose from:
3.1. We download the tool from the site dyndns www.dyndns.com/support/clients which, each time a new ip is assigned to you, will link it to the received address of the type Any_Name.dyndns.org
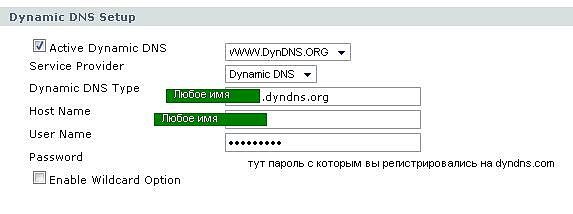
3.2 In the settings of the router, configure Dynamic DNS (if this setting is present in the router, then it is better to select this item rather than trust the program)
4. Get the domain name. * There is a bunch of free solutions that will help you find Google, and if you already have a domain name, then skip this item. In any case, hereinafter, I will call it “Our_Domain_Name.com”
5. Registering on the zoneedit website
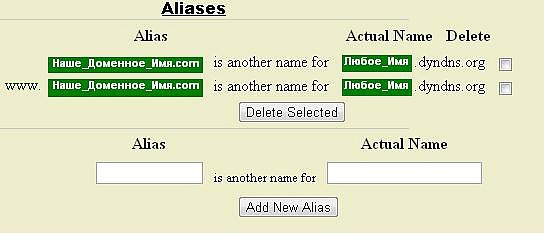
6. Add a new zone, delete all zone settings in the MailForward and Mail Servers sections, and in the Aliases (CNAME) section, add 2 redirects:
one, Our_Domain_Name.com <- Any_Name.dyndns.org
second, www. Our_Domain_Name.com <- Any_Name.dyndns.org
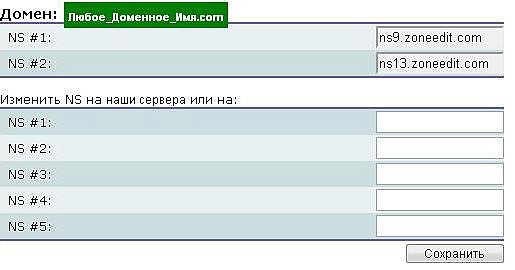
7. On the zoneedit in the Viev section, look at Nameservers, and prescribe them as an NS server from our domain supplier.
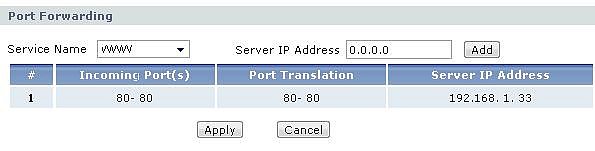
8. In the settings of the router, we make a transfer for 80th port to the internal ip. (here if something is not clear as well as the road to Google, there are also enough manuals for various routers) In addition, I’ll only provide a screenshot:
9. And what would the internal ip be unchanged in the settings of the router (Network> LAN> Client List) assign it to the MAC address.

10. All, we wait from a couple of hours to a couple of days while the zoneedit and the supplier of the domain name eat changes and enjoy the result.
Now, driving in the address bar of the browser Our_Domain_Name.com, or www.Nas_DDomain_Name.com , the user will see what is uploaded to the apache server regardless of what IP the provider assigned.
1. a computer with an axis and installed mysql, apache, php (I will not write anything here, there is enough manual)
2. Internet with assigned dynamic IP, router.
What we want:
1. Whatever people typing in the address bar of the browser a second-level domain name (purchased by us or obtained on any service), came to our site (regardless of what IP is on it now).
2. We want it for free.
So, how it was implemented by me in the form of a brief instruction can be read under the cut, maybe someone will find it useful or just be interested. Also, I will be glad to objective criticism. Thank you for your attention, and who are interested in welcome under Habrakat.
')
Go:
1. We register on the dyndns website (it is worth noting that free registration on this resource requires mandatory visits to it once every 30 days, otherwise it will be deleted, so if this is a big inconvenience for you, there are enough alternatives, some are named in the comments, the rest can be easily found using the search engine)
2. Add there a host of the type Any_Name.dyndns.org with your current external IP.
Further, paragraph 3.1 or 3.2 to choose from:
3.1. We download the tool from the site dyndns www.dyndns.com/support/clients which, each time a new ip is assigned to you, will link it to the received address of the type Any_Name.dyndns.org
3.2 In the settings of the router, configure Dynamic DNS (if this setting is present in the router, then it is better to select this item rather than trust the program)
4. Get the domain name. * There is a bunch of free solutions that will help you find Google, and if you already have a domain name, then skip this item. In any case, hereinafter, I will call it “Our_Domain_Name.com”
5. Registering on the zoneedit website
6. Add a new zone, delete all zone settings in the MailForward and Mail Servers sections, and in the Aliases (CNAME) section, add 2 redirects:
one, Our_Domain_Name.com <- Any_Name.dyndns.org
second, www. Our_Domain_Name.com <- Any_Name.dyndns.org
7. On the zoneedit in the Viev section, look at Nameservers, and prescribe them as an NS server from our domain supplier.
8. In the settings of the router, we make a transfer for 80th port to the internal ip. (here if something is not clear as well as the road to Google, there are also enough manuals for various routers) In addition, I’ll only provide a screenshot:
9. And what would the internal ip be unchanged in the settings of the router (Network> LAN> Client List) assign it to the MAC address.
10. All, we wait from a couple of hours to a couple of days while the zoneedit and the supplier of the domain name eat changes and enjoy the result.
Now, driving in the address bar of the browser Our_Domain_Name.com, or www.Nas_DDomain_Name.com , the user will see what is uploaded to the apache server regardless of what IP the provider assigned.
Source: https://habr.com/ru/post/101336/
All Articles