A little more about astrophoto
After reading the article about connecting the telescope to a computer, I also want to tell a little about the process of astro shooting of bright objects like the Moon or planets. In general, there are different ways to connect the camera and the telescope, but in principle, the main two are shooting in the ocular projection and shooting in the main focus of the telescope.
When shooting in the ocular projection, the camera lens looks into the eyepiece of the telescope, this can be compared with ordinary visual observation, here the camera lens plays the role of the lens of the eye, and the matrix or film plays the role of the retina. This method has drawbacks such as image vignetting and brightness decay towards the edges of the frame.
Another way - the eyepiece of the telescope and the camera lens are excluded from the optical scheme, it turns out that the matrix or film is in the main focus of the telescope, in this case the role of the long-focus camera lens is played by the telescope itself. This method will be discussed further.
In principle, any modern webcam is suitable for shooting bright objects, but for high-quality images, cameras with CCD matrices like Philips NC900 are used. First you need to modify the webcam - remove the lens.
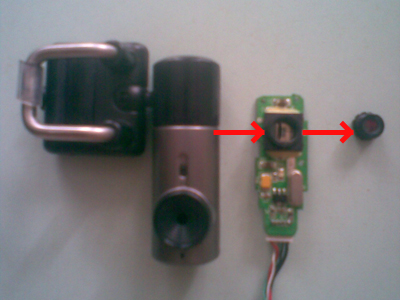
To conveniently fix the camera in the focuser, a simple solution was found - a cork from a plastic bottle. There is a hole in it for the camera matrix, and for a more tight mounting in the focuser several layers of electrical tape around the cork.
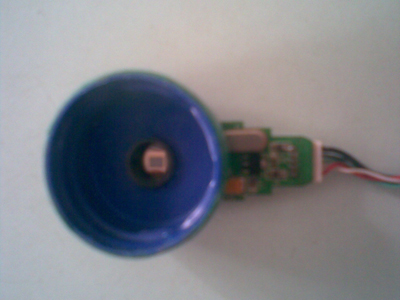
After that, you need to fix it in the main focus of the telescope.

My shooting process looks like this: a few hours before the observations, the telescope is taken out onto the street. This is necessary for the thermal stabilization of its elements, in other words, it is necessary that its elements be equal in temperature with the environment. Then the laptop, webcam is taken, everything is connected and guided to the subject. The important stage is to focus the image, since some flaws can be later corrected during processing, but the defocus cannot be corrected later.
')
Next, shoot directly. Video lengths are written, for example, 30 seconds with 15 FPS. Then they are processed by a program like Registax. All this is done to increase the amount of useful information (signal-to-noise ratio). The program aligns the frames of the video, selects the best and adds them into a single image. There is a post-processing stage, brightness, wavelets, channel offset, etc. After that, the resulting image is saved and the process is completed. You can then glue the resulting photos to get panoramas, which I then do. The result is something like this:
Video
and what came of it:

Certainly not ideal, but with my 0.3 MP webcam for 100 hryvnia, I think this is quite acceptable.
Such a setup, of course, is suitable not only for astrophoto. You can get something like this:
http://www.youtube.com/watch?v=ZYSSSTRrR9E
http://www.youtube.com/watch?v=JGT-QFo74yw
Female:
Male:
Well, or look at the windows, for example.
And if we talk about astrofoto galaxies, nebulae and other objects, then the budget for such equipment is already becoming rather big, and from above it is almost unlimited. For such a photo, long exposures are used, so a stable mount with a tracking drive and a camera like the Canon EOS 450D are needed, but the result is sometimes impressive.
When shooting in the ocular projection, the camera lens looks into the eyepiece of the telescope, this can be compared with ordinary visual observation, here the camera lens plays the role of the lens of the eye, and the matrix or film plays the role of the retina. This method has drawbacks such as image vignetting and brightness decay towards the edges of the frame.
Another way - the eyepiece of the telescope and the camera lens are excluded from the optical scheme, it turns out that the matrix or film is in the main focus of the telescope, in this case the role of the long-focus camera lens is played by the telescope itself. This method will be discussed further.
In principle, any modern webcam is suitable for shooting bright objects, but for high-quality images, cameras with CCD matrices like Philips NC900 are used. First you need to modify the webcam - remove the lens.
To conveniently fix the camera in the focuser, a simple solution was found - a cork from a plastic bottle. There is a hole in it for the camera matrix, and for a more tight mounting in the focuser several layers of electrical tape around the cork.
After that, you need to fix it in the main focus of the telescope.
My shooting process looks like this: a few hours before the observations, the telescope is taken out onto the street. This is necessary for the thermal stabilization of its elements, in other words, it is necessary that its elements be equal in temperature with the environment. Then the laptop, webcam is taken, everything is connected and guided to the subject. The important stage is to focus the image, since some flaws can be later corrected during processing, but the defocus cannot be corrected later.
')
Next, shoot directly. Video lengths are written, for example, 30 seconds with 15 FPS. Then they are processed by a program like Registax. All this is done to increase the amount of useful information (signal-to-noise ratio). The program aligns the frames of the video, selects the best and adds them into a single image. There is a post-processing stage, brightness, wavelets, channel offset, etc. After that, the resulting image is saved and the process is completed. You can then glue the resulting photos to get panoramas, which I then do. The result is something like this:
Video
and what came of it:
Certainly not ideal, but with my 0.3 MP webcam for 100 hryvnia, I think this is quite acceptable.
Such a setup, of course, is suitable not only for astrophoto. You can get something like this:
http://www.youtube.com/watch?v=ZYSSSTRrR9E
http://www.youtube.com/watch?v=JGT-QFo74yw
Female:
Male:
Well, or look at the windows, for example.
And if we talk about astrofoto galaxies, nebulae and other objects, then the budget for such equipment is already becoming rather big, and from above it is almost unlimited. For such a photo, long exposures are used, so a stable mount with a tracking drive and a camera like the Canon EOS 450D are needed, but the result is sometimes impressive.
Source: https://habr.com/ru/post/101052/
All Articles